Horizon Guide
Welcome to the Horizon Guide!
- Introduction
- Borrower Records
- Checkin
- Checkout
- Requests and Holds
- Blocks and Fines
- Item Search
- Out of Province Loans
- Adding & Editing Items
- Reports
- Troubleshooting
- Other Guidance
Introduction
What the Guide is About
This guide will take you through the skills you need to use the Horizon Integrated Library System.
The guide provides illustrated examples of core tasks, such as checking items in and out, and registering new borrowers. Most explanations include a Video Guide, and links to all the video guides can be found in the Other Guidance Section.
 |
The guide also provides links to other useful resources, such as the printable Quick Guides for common tasks, and to useful forms and guidance found in the Staff Portal.
How it’s Organized
The guide is divided into sections and each section covers a set of related tasks, such as the different ways to search for items or how to add and edit items.
The sections are listed in the navigation bar on the left side of the screen, and to go a section just click on it.
Each section contains several subsections that describe a skill or task in more detail.
When you have selected a section, its subsections will appear in the side navigation bar.
You can read through an entire section simply by scrolling down the screen, but if you want to jump straight to a subsection then just click on it in the navigation bar.
All the guidance is reachable from the side navigation bar with just two clicks:
| Select a section... | ...then... | ...select a subsection |
 |
 |
 |
If you are a new user, you can read through the guide in the order it’s written and use it as a training reference.
If instead you are looking for quick guidance on a particular subject, then the modular sections let you go straight to what you need.
Links appear throughout the sections to help you jump quickly to related topics or further guidance:
 |
There’s a Troubleshooting section at the end of the guide which explains how to handle general problems with Horizon, including what to do if it stops working.
If after using the guide you still need help, contact your local Horizon superuser or your divisional office. During evenings and weekends, contact staff at another library in your division.
Let's begin with opening Horizon and a tour of its interface.
Opening and Closing Horizon
Logging into Horizon
Double-click on the Horizon icon ![]() on your desktop. The login window will open:
on your desktop. The login window will open:

The username should already be completed. Contact your supervisor or regional office if it isn’t showing, or if you don’t know your site’s password.
Type in the password and then press [Enter] on your keyboard or click on OK.
Horizon will launch.
Logging Off
To close Horizon at the end of the day, just click on the X in the top right corner of the screen:
Changing the Default Font Size
Depending on your personal viewing preferences and the size of your screen, you might want or need to change the default size of text in Horizon. This is done from the login window:
-
-
- type in the password
- click on Options:
-

The Login Options window will open:
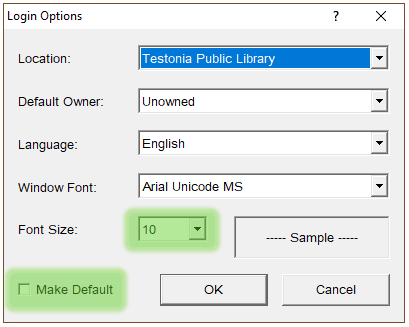
From here you can change the font size. Select Make Default and Horizon will remember this preference.
Understanding the Interface
After you have logged in, Horizon opens the Launcher window:
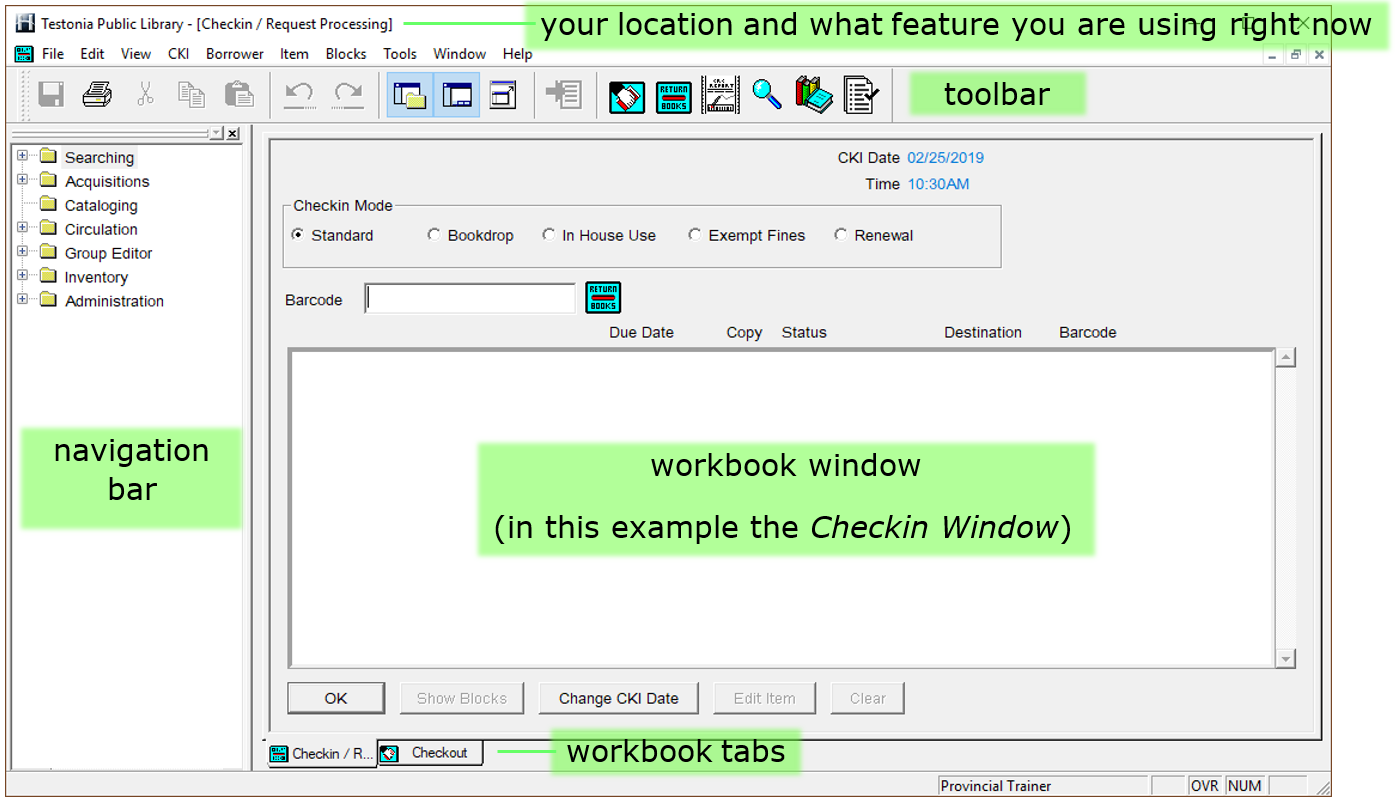
Click on the image to view it full size in a new tab. When finished, close the tab to return to this guide.
The window is split into several areas, with a main work area surrounded by a toolbar and navigation bar that help you to do tasks easily.
Workbook Window
This is where most work takes place. For example, if you are checking in items then they will be listed here. If you are editing a borrower’s record then their details will be shown here.
You can open different windows to do different tasks. A tab will appear at the bottom for each window currently open:
![]()
The workbook tabs let you switch between open windows to get different tasks done.
During a typical working day you will regularly switch between the Checkin and Checkout windows to check books in and out, and often open the Search window to find items for borrowers.
Toolbar
The toolbar lets you quickly reach the most commonly used functions.


| Toggle Navigation Bar | hides or shows the navigation bar | CKI | opens the Checkin window | |||
| Toggle Workbook | hides or shows the workbook tabs | Circulation Reports | opens Circulation Reports in a separate window | |||
| Toggle Full Screen | makes the workbook window full screen, closing or shrinking other elements. | Item Search | begins a new Item Search | |||
| Send To |
sends a record to another process |
Item Group Editor |
opens the Item Group Editor process | |||
| CKO | opens the Checkout window | Item Report | opens the Item Report process |
You will see how to use all of these functions as you progress through the guide.

You won’t need to use the Navigation Bar much in day-to-day use because the most commonly used functions can also be reached from the toolbar or top menu.
Almost everything that you can do in Horizon can be reached from the top menu. So if you’re trying to do something and it’s not obvious which toolbar or navigation bar option to use, take a look in the top menu and see if you can find the answer here.

Some functions, such as recording an item as lost, can only be reached from here.
If there’s a shortcut key to a function then it will say so in the top menu. In this example the shortcut for Find Borrower is [F4] and the shortcut for New Borrower is [F5]:

The contents of the top menu can vary depending which window you are currently using.
Shortcut Keys
Some frequently used functions can be accessed by using shortcut keys, which can speed things up for you.
For example, Item Search can be opened in 3 different ways using the interface:
| 1. click on the Search button: | |
| 2. select from top menu Item > Find Item: |  |
| 3. select from navigation bar Searching > Item Search: |  |
...but simply pressing [F2] on the keyboard is a lot quicker!
To help you to get used to the common shortcuts, print out this guide and keep it somewhere near your screen:

Here’s a list of circulation shortcuts:
| function | key | function | key | |
| item search | [F2] | make request | [F5] from item copies window | |
| find borrower | [F4] from checkout window | move forward to next field in record | [Tab] | |
| create new borrower | [F5] from checkout window | move back one field | [Shift] + [Tab] | |
| edit borrower record | [F6] from checkout window | save record | [Ctrl] +[S] | |
| close the current window | escape | copy |
[Ctrl] +[C] |
|
| toggle between checkout and checkin | [F8] | paste | [Ctrl] +[V] | |
| send to |
[F10] |
select all | [Ctrl] +[A] | |
| place request | [F5] from item copies window | cut | [Ctrl] +[X] | |
| view title requests list | [Ctrl] + [F5] from item copies window |
Short Codes
Horizon uses a lot of short codes to represent information, such as:
-
-
- abr as the location code for Bay Roberts Public Library
- tr as the item status code to show that an item is in transit between locations
-
This can save a lot of time when typing information into the system, but there are a lot of codes to remember, so wherever a short code is used:
-
-
- a longer description will appear next to it
- a nearby Codes button can be clicked on to bring up a list of valid codes
-

You will see lots of examples of short codes being used throughout the guidance.
To reach the next section about Borrower Records, click on this link, or scroll up and use the side navigation bar.
Borrower Records
This section explains how to register a new borrower and how to edit an existing borrower’s record. We'll begin with the policies that guide and govern this process.
![]() Printable Quick Guide: Borrower Records
Printable Quick Guide: Borrower Records
Registration Policies
Getting a Card
A borrower must show proof of identification to register for library services. A government issued ID is preferred, such as a driver’s license or MCP card. We do not record the details of the ID.
Some patrons may only have one legal name, if that is the case complete the verification process (including confirming the patron’s name with valid identification). Once everything is verified, add a block note to the patron account (see Note Block) to confirm to other staff who might interact with the patron that the name information has been confirmed. Doing so will save the patron from having to re-confirm these details on subsequent visits.
Each borrower is given a free plastic library card and should sign on the back. There is a $2 replacement fee for lost or damaged cards, although cards which become worn or damaged through normal wear and tear can be replaced free of charge.
A library card provides access to the services of all public libraries in the province, including the checkout of items, use of eLibrary services, and use of public computers.
A borrower can hold only one active card at a time.
Registration is Paperless
Registration is recorded directly into Horizon. However, if the circulation desk is busy or if Horizon is down, then a patron can complete a Borrower Registration Form. The form must be shredded once details have been entered into Horizon.
If Horizon is down, then do not provide a library card at this time. When Horizon is working again, check that the borrower does not already have an account and then register them in Horizon.
Registering Different Borrower Types
Children Under 13
A parent or guardian must apply for the child’s membership. If they do not have an ID present for the child, then they can show an ID for themselves.
Use the child’s name. The parent’s name should be recorded in the ‘Parent/Guardian’ field of the borrower record. The parent’s email address should be used.
Children are issued a child library card which the parent must sign.
Young Adults (13-17 inclusive)
A young adult must apply for their own membership and show their own ID. If they don’t have ID, then the ID of a parent or guardian who is present can be used instead.
Young adults are issued a regular library card. A young adult takes full responsibility for borrowed materials and must sign their card.
Talking Book Borrowers
The Talking Book audiobook collection is produced by CNIB and housed at A.C. Hunter Library in St. John’s. To register as a talking book borrower, a patron must have a CNIB number or a registration card signed by a doctor or registered nurse. A talking book borrower could be homebound, a walk-in, or a non-resident.
Visitors from Out of Province
A visitor from out of province who wants to borrow items can be registered using a Temporary Card made of cardstock. Cards are available from Technical Services.
Visitors from out of province includes tourists and people visiting their family.
A person who resides within the province is not a visitor and should be registered as a regular borrower. This includes students at Memorial University of Newfoundland (MUN) or the College of the North Atlantic (CNA).
Record the visitor’s temporary address first and the permanent address second in the borrower record.
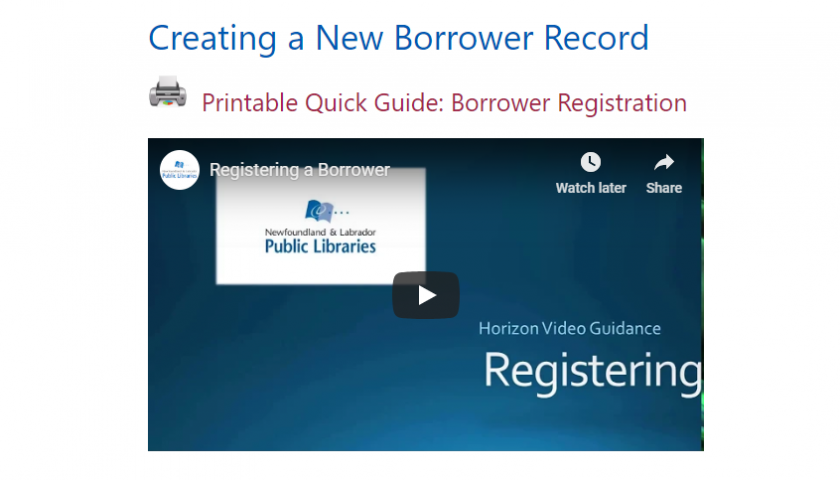
Registering a New Borrower
Before registering a borrower, check that they are not already registered.
Delinquent borrowers sometimes try to re-register rather than pay fines. Borrowers who have moved within the province sometimes don’t realize that their card is valid at all provincial libraries.
Searching for a Borrower Record
To check if a borrower is already registered, perform a borrower search. Go to the Checkout tab and press [F4] or select from top menu Borrower > Find Borrower.
| A pop-up window will appear: |  |
Normally you would search by name, although other indexes can be used.
| Type the last name first. For example: |  |
You don’t need to use capital letters. Use spaces to separate the first and last names.
The results display alphabetically, with an arrow pointing to the name closest in spelling to your search:

| For an unusual name, you might need to only type the last name and first letter of the first name: |  |
| For more common names, it might help to type in the middle initial too: |  |
Advanced search techniques are useful if you think that a borrower record might already exist under a misspelled name.
* (asterisk) replaces zero or more letters. For example:
cor* will list borrowers whose last name begins with ‘cor’
? (question mark) replaces a single letter: For example:
perr?n will return results for perrin, perron and perryn
If the borrower already has a record, then select it and click on OK. Press [F6] or select from top menu Borrower > Edit Borrower to open the record. Confirm details and issue a new library card if necessary. See the section Editing a Borrower Record.
Creating a New Borrower Record
![]() Printable Quick Guide: Borrower Registration
Printable Quick Guide: Borrower Registration
If the borrower you are searching for is not found then you will need to register them.
First close both pop-up search windows:
-
-
- click on Cancel or press [Escape] to close the borrower list window
- click on Cancel or press [Escape] to close the borrower search window
-
You should now be back at the Checkout window.
Open a new borrower record:
-
-
- press [F5] or select from top menu Borrower > New Borrower
- enter borrower details in the fields as prompted
-
Fields with an asterisk (*) are required. The record cannot be saved unless they are completed correctly.
-
-
- click on Page Down/Page Up to move through the registration
- click on Save then Close when complete
-
Registration Example
Click on the images to view them full size in a new tab. When finished, close the tab to return to this guide.
Completing the Record
Completing most parts of the borrower record is straightforward, but there are a few areas that behave differently.
Fields That Use Codes
Some fields use short codes. Type a code into the field and the matching description will appear in blue text on the right.
If you don’t know which code to use then click on the Codes button to the right of the field to see a full list.
The following examples illustrate.
Location
![]()
This field uses a 3-letter code to represent the borrower’s home library.
Type in a 3-letter code and Horizon will write the full name of the library next to it, in blue text.
When creating a new record, Horizon will autocomplete the code for your local library. If you need to change the location but don’t know the code for the library, then you can click on the Codes button to view a list of valid codes.

City, Prov
![]()
This field uses codes to represent communities within the province.
-
-
- start typing the name of the town or city and pay attention to the location that appears in blue text
- stop when the required location is shown in blue
- don’t use spaces
-
If you can’t find a town or city, then click on the Codes button to view the full list and select from there. If a community is not in the list, then choose the nearest instead.
Blinks

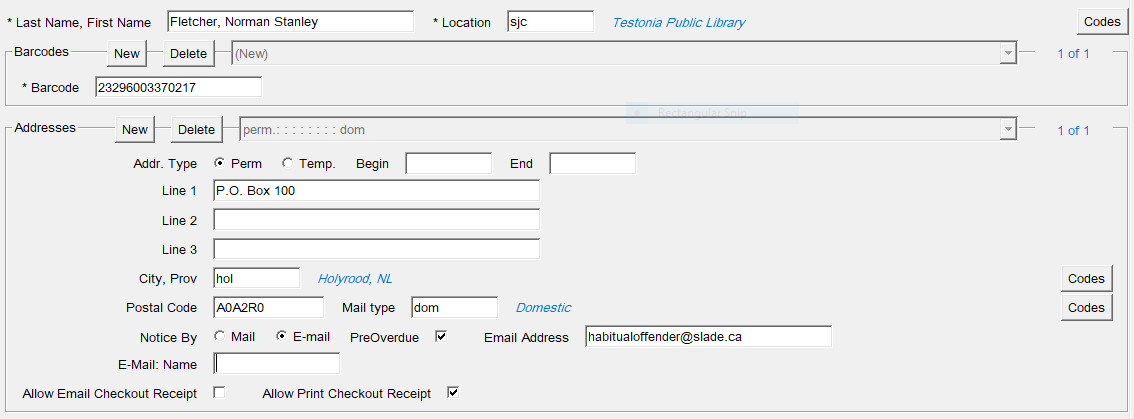
Some areas of the record allow you to enter more than one set of details. These areas are called Blinks.
Each blink is surrounded by a thin indented rectangle and has its own New and Delete buttons. There is also a drop-down list that lets you select which set of details to edit or view.
Enter the first set of details by simply typing into the fields. To add another set of details, click on the New button. To remove a set of details, choose them from the drop-down list then click on the Delete button.
Borrower Type
![]()
Enter the borrower type into the BType field. The most common borrower types are shown below and you can click on the Codes button to view the full list.
|
Borrower |
BType |
|
adult |
a |
|
young adult |
y |
|
child under 13 |
c |
|
preschool |
ps |
|
visitor from outside province |
va |
|
child visitor |
vc |
Borrower Stats
Two borrower stats need to be entered into the BStat blink. The first is age/service related and the second is geographical. The Section-by-Section Guide explains how to determine them. To record them:
|
|
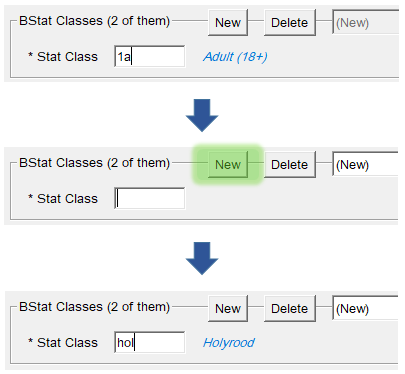 |
If you fail to enter both stats, then the record will not save. If you make a mistake in this section, the easiest way to rectify it is to click on the Delete button three or four times and then re-enter the stats.
Section-by-Section Guide
|
Last Name, First Name |
|
|
|
Location |
|
|
|
Barcode blink |
|
|
|
Address blink |
Addr Type |
|
|
Lines |
|
|
|
City, Prov |
|
|
|
Postal code |
|
|
|
Mail Type |
|
|
|
Notice By |
|
|
|
PreOverdue |
|
|
|
Email address |
|
|
|
Email name |
|
|
|
Allow Email Checkout Receipt |
|
|
|
Allow Print Checkout Receipt |
|
|
|
Phone blink |
Phone |
|
|
Type |
|
|
|
Country Code |
|
|
|
PIN # (4 digits) |
|
|
|
Birth date |
|
|
|
Parent / Guardian |
|
|
|
Staff Initials |
|
|
|
BType |
|
|
|
BStat classes blink |
1st BStat |
|
|
2nd BStat
Press ‘New’ before entering the 2nd stat. |
|
|
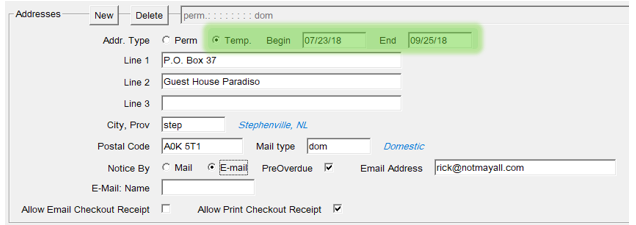
Registering a Temporary Borrower
Visitors from out-of-province are registered the same way as regular borrowers, with an additional step.
Record their temporary provincial address and include a Begin and End date.
You can record their out-of-province address in Line 3.
Editing a Borrower Record
Borrower records can be edited to reflect changes in a borrower’s personal details or simply to correct a mistake.
At the checkout window, scan their card or press [F4] and perform a search for the borrower.

Press [F6] or select from top menu Borrower > Edit Borrower. The borrower’s record appears.

Edit the record as needed then click on Save and Close.
Home Service
When editing an existing record, you will see a Home Services section. This is often empty and can be ignored.

Replacing a Library Card
|
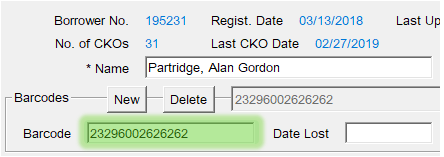 |
When changing the barcode, don't click on New or enter the Date Lost.
Duplicating a Borrower Record
If you need to register a number of people who share a lot of details, such as a family living at the same address, then you can duplicate one of their borrower records. Many fields will be automatically filled in, saving time and effort.
To duplicate a borrower’s record, click on the Duplicate button at the bottom of the first page of the record screen:
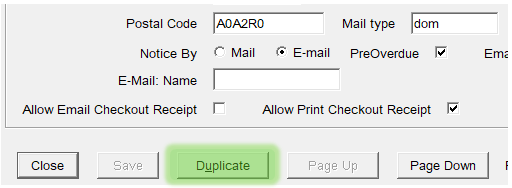
A new, partially completed borrower record will appear. Complete the record, carefully reviewing each pre-completed field.
Self-Registered Borrowers
Self-registered borrowers have registered online and received a library card through the mail. Before they can borrow physical items, we need to verify their identity and contact details.
When a self-registered borrower tries to borrow physical items for the first time and you scan their card, Horizon will prompt you to update their record:

To complete verification:
-
-
- press [F6] to enter the borrower record
- change location from ‘elib’ to your site
- confirm the borrower’s name, address, email, phone number and date of birth
- enter your initials in the staff initials field
- change the borrower type from SR to the correct code
-
- for example ‘a’ for an adult
-
- fix the borrower stats:
- delete the ‘1sr’ stat
- add a 1st stat for the borrower type
- for example ‘1a’ for an adult
- add a 2nd stat for the borrower’s address location
- for example ‘avo’ for Avondale
- Save the record
- click on Clear on the Checkout screen
- re-scan the borrower's library card
-
Borrowers Registered Before Automation
Some borrowers who registered before Horizon was introduced will need their records updated, similar to self-registered borrowers.
These borrowers may have zero, one or many borrower stats currently recorded. The easiest way to correct and complete their records is to delete all existing borrower stats and then re-enter them.
Annual Details Check
Once per year, when you scan a borrower’s card or [F4] search for them, Horizon will prompt you to check that the borrower’s recorded address is correct:

Click on Continue and the borrower’s record will appear in a pop-up window:

Carefully review the record and update where necessary. Save when complete.
Horizon does not automatically update the borrower type or borrower stats as a borrower ages. So if a borrower has aged from, say, a young adult to an adult, then you will need to update their btype and bstat fields.
Deleting a Borrower
Occasionally we discover that a borrower has been recorded twice into the system or has died. If the surplus account does not have outstanding items or fines, then it can be deleted:
-
-
- search for the borrower
- press [F6] to enter their record
- select from top menu Borrower > Delete Borrower
-
Do not delete a borrower record for any other reason.
If the account has outstanding items or fines, then it cannot be deleted. Contact your regional office for assistance.
Guest Computer Users
A person who only wants to use a public computer can do so if they show an ID and write their name, address and date of visit in the Guest Computer Users Log.
Staff should log onto MyPC for the patron using a Guest Computer User Card. Do not hand the card to the patron.
Please refer to the MyPC Staff User Guide for further guidance, including on how to create a guest computer user card. The guide can be found in the staff portal, under Staff Tools > Training Guides.
Checkin
This section explains how to checkin items and how to perform some simple item status editing.
![]() Printable Quick Guide: Checkin
Printable Quick Guide: Checkin
Checking in an Item
You need to be in the Checkin window to check items in:

To check in an item, scan its barcode. The barcode will appear in the Barcode field and the item will be added to the top of the list of checked in items, as shown in the pane above.
If the item does not scan, click inside the Barcode field and try again.
You can also type in a barcode into the barcode field.
You do not need to use a borrower’s library card to perform check in.
Item Status
When an item is scanned into the Checkin window, its status gets updated. The status is shown next to the item’s name in the list.
By default, the status is changed to ‘Shelving Cart’. This will automatically update to ‘Checked In’ after a short time.
If an item needs to be held for another borrower, Horizon will prompt you with a pop-up message and the status will change to ‘Being Held’.
If an item belongs to another library, Horizon will prompt you to place it in transit and the status will change to ‘In Transit’.

In general, checking in an item is a good way to determine where it belongs. If it was already checked in, Horizon will tell you and it can be shelved. If it needs to be held or mailed, Horizon will tell you who to hold it for or where to mail it.
Checkin Modes

Standard
The default setting. It will checkin items at the current date and time, automatically assessing fines and activating hold and transit requests.
Always return the checkin to Standard mode when you have finished a task using one of the other modes.
Bookdrop
This mode resets the checkin date to the last open day that the library was open, and the time to one minute before closing time on that day.
Use this option for items left in your site’s bookdrop, if it has one.
In-House Use
This mode allows you to record in-house use of an item. For example, if a patron reads a book within the library without checking it out.
Exempt Fines
Select this mode to avoid charging fines for overdue items. For example, if a borrower was unable to return their items on time due to a hospital stay.
Renewal
This mode allows you to renew an item that is present for a borrower. Horizon will ask you to confirm whether or not the item is present, and if there are no requests for the item, then it will be renewed, with the new date shown in the checkin list.
Renewing items in the Checkin window is quick, but it is usually better to renew items from the Checkout window.
Why? Renewing from checkout allows you to see all items that a borrower currently has checked out, potentially spotting other items that might need renewing or are overdue. Using the checkout will also automatically make you and the borrower aware of any blocks on their account.
Checkin Display Options

Show Borrower
If selected, then the name of the returning borrower will display as each item is checked in. Any fines incurred for the item will show too.

Always Put in List
Always keep this selected!
This option makes sure that items are listed in the Checkin window as they are checked in. This allows you to see if you missed checking in a title. You can also select a title from the list to edit it if needed.
Hide 'Item Not Out' Message
If this option is not selected then whenever you check in an item that was already checked in, a pop-up message will appear. Selecting this option skips the message.

Hide 'Place on Hold Shelf' Message
Never select!
We need to see the pop-up message that tells is when an item needs to be set aside:

Checkin Buttons

OK
Show Blocks
After checking in returned items we might want to go to the borrower's blocks so that, for example, fines can be paid.
Select an item in the Checkin window and then click on Show Blocks to see the current blocks for the borrower who returned the item.
See the section Blocks and Fines for how to take payment for fines.

Change CKI Date
The checkin date can be dialed back to a previous day if, for example, the library was closed unexpectedly for a snowstorm, preventing borrowers from returning items on time.
Usually you should not need to change the checkin date following a closure.
If your library has to be closed for any reason, you should contact your regional manager. They will contact headquarters who will adjust the library’s hours in Horizon, preventing borrowers from incurring fines due to closure.
Edit Item
This allows you to edit items listed in the Checkin window. It can be useful for tasks such as changing the status of an item, for example from 'checked in' to 'discarded'. See the section Editing Items from Checkin.
Clear
This clears the list of checked in items.
Editing Items from Checkin
To edit items from checkin:
-
-
- check in the item(s)
- select the item(s)
- click on Edit Item
- the Edit Window will open
-
Single Item
Several fields can be edited. Where codes are required, you can click on the Codes buttons to see full lists of valid codes.
Previous borrower details and usage statistics are also shown.

All Items
To select all items in the Checkin window, press the [Ctrl] + [A] keys or select from top menu Edit > Select All.
Horizon does not allow you to select specific items from the checkin list, so you may need to Clear the Checkin window before scanning the items that you intend to edit.
Clicking on Edit Item will bring up the Batch change Message:

Click on OK and you will be able to edit the item's status or add a checkin note:

Items Without Barcodes
Items without barcodes can be sent to the checkin list. To do this:
|
 |
From here you can edit the item.
This is a good way to discard items from the catalogue if they are not present.
For items with barcodes, it is better to use the Item Group Editor.
Checkout
This section explains how to check out items and how to renew them.
![]() Printable Quick Guide: Checkout & Renewal
Printable Quick Guide: Checkout & Renewal
Simple Checkout
The checkout window automatically opens when you log on.
If you have closed it and need to open it again, click on ![]() in the toolbar or from the navigation bar select Circulation > CKO.
in the toolbar or from the navigation bar select Circulation > CKO.
In the checkout window, scan the borrower’s card. If the borrower doesn’t have their card with them, ask for ID and [F4] search for the borrower.
After you have scanned the borrower's card or searched for them, Horizon will show the borrower’s name in the checkout window.
To checkout each item, scan its barcode which is found on the back cover. Each checked out item appears in the checkout window, along with the due date and other information:

Remember to stamp the item with the due date shown.
The standard loan period for most library materials is 3 weeks. Horizon might reduce the loan period for high-demand items. Loans can normally be extended by renewal.
Clear the Checkout Screen When Finished
When you have checked out all items to the current borrower, click on Clear before doing any more tasks in Horizon. This will remove the borrower’s details from the screen and prevent accidentally checking out other items to them.
If the Borrower has Fines or Other Blocks
If a borrower owes fines then a window will open after scanning the borrower’s card showing their current blocks. This Blocks Window prevents you from checking out items until you have made a decision about the blocks. When you have made a decision click on CKO to continue.
The section Blocks and Fines explains this.
All Items Out
Click on All Items Out to see the full list of items checked out to the current borrower.
Items checked out in the current session appear in blue text. Items checked out previously appear in black text:

It is a good idea to view all items out during checkout because it allows an opportunity to renew items that are almost due for return.
If possible, it is also a good idea to check in any items returned by the borrower before checking out items to them. This will ensure that the list of all items out is up-to-date.
Non-Catalogued and Non-Circulating Items
Some books, such as Harlequins, are not and should not be catalogued. They can be loaned, but the loan will not be recorded in Horizon. Simply stamp a 3-week due date on the back of the item and keep a count of these items in your daily stats.
You might have items at your site that aren’t catalogued but should be. For example, titles that were added to the collection before automation, or donated newer items. These items can be added to Horizon. That can be done during checkout if time permits. If there's not time, add them when they are returned. The chapter about Adding and Editing Items explains this.
Some items are not available for check out to borrowers, and are restricted to in-house use. These include reference books, encyclopedias, almanacs, and dictionaries. If you try to check out one of these items, then Horizon will display a message telling you that the item cannot be loaned. Click on Continue to close the message.
Changing the Due Date
You can change the due date of an item that is checked out. To do that:
-
-
- open the checkout window
- scan the borrower’s card or search for them
- click on All Items Out
- select the item or items
- click on Edit Item
-
If you have selected more than one item then Horizon will ask:
-
-
- "Okay to make a batch change?"
- click on OK
-
The current due date appears in the Due Date Field, in the format mm/dd/yy:
-
-
- change this to the required date.
- click on Save then Close.
-
Changing the due date should only be done at the time of first checkout. For example, if a borrower is going to be away for longer than the standard 3-week loan period and it would be difficult for them to renew.
Do not give an extended loan period for items loaned from other locations, nor for in-demand items.
The due date for overdue items cannot be edited. To extend the due date for an overdue item, you must renew it.
Renewals
Borrowers can renew items in person, by phone, or online. The new due date is usually 3 weeks from the current date, to match the standard 3-week loan period, but pay attention to the screen in case it is shorter.
Items Present
If an item has been brought back to the library, then it can be renewed providing that there are no requests.
Items Not Present
If an item has not been brought back, then it can be renewed a maximum of 3 times before the borrower must return it. This is to ensure that the item has not gone missing. If the borrower returns the item and there are no other requests, then you can check it out again to them.
Items on Loan from Other Locations
Items borrowed from other libraries within our provincial system can be renewed the same way as items borrowed from your location.
In general, items borrowed from out-of-province cannot be renewed. If an extension is needed, then check with the divisional inter-library loans manager.
Items Overdue
Overdue items can be renewed and Horizon will calculate the fine owing as if the item was returned today.
Items Lost or Claimed Returned
Lost and Claimed Returned items cannot be renewed. Those items must be checked in and any fees processed.
Items from the eLibrary
Items borrowed from the eLibrary, such as eBooks and eAudiobooks, cannot be renewed using Horizon and do not appear in the borrower’s list of all items out. Borrowers must use the eLibrary system to loan, renew, and request eMaterials.
Renewing One or More Items
-
-
- open the checkout window
- scan the borrower’s card
- or for renewal-by-phone, search for them
- click on All Items Out
- select the item or items that you want to renew
- select from top menu CKO > Renew
- or CKO > Renew All Items, if appropriate
- Horizon will ask "Are the Items Present?"
- click on Yes or No
-
When an item is renewed, its new due date appears next to its title in the list of checked out items.
If the due date is for a reduced period, Horizon will let you know.
If an item cannot be renewed, Horizon will tell you.
Lending Policies
|
Type of Item |
Loan or Renewal Period |
Max # Renewals |
Max # Out |
|
book |
3 |
3 |
18 |
|
periodical |
3 |
1 |
12 |
|
dvd or blu-ray |
3 |
1 |
6 |
|
audiobook |
3 |
3 |
6 |
|
sound recording |
3 |
1 |
6 |
|
talking book |
3 |
3 |
6 |
Horizon will prompt you if you attempt to exceed the maximum number of renewals or exceed the maximum number of items out.
The loan period might be automatically reduced by Horizon if an item is in high demand.
Horizon actually allows twice the maximum number of books to be checked out to a patron.
Why? Because staff might not have time to check in all returned items before checking out new items to a borrower.
Your site might use lower lending limits than Horizon allows. Please tell your borrowers what your site’s policy is concerning the number of items that they may check out.
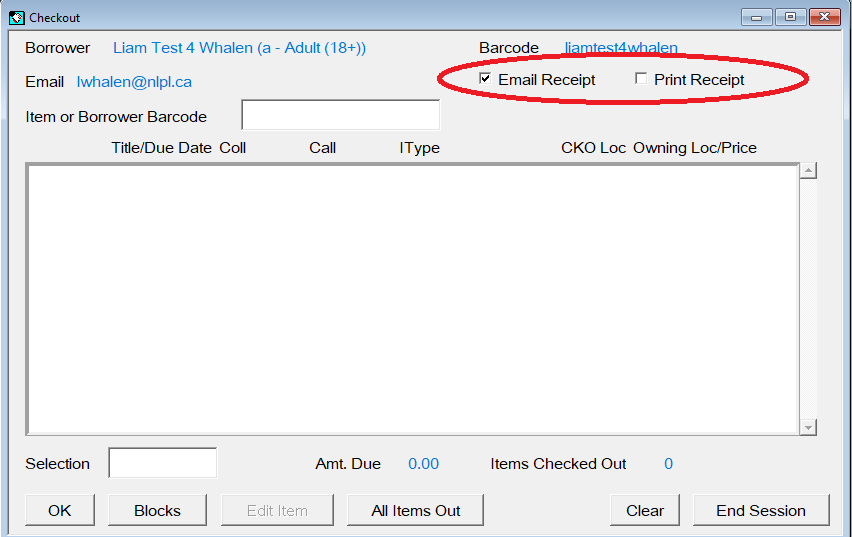
Emailing and Printing Horizon Circulation Receipts
Some libraries have receipt printing enabled and can email and print Horizon checkout receipts for patrons. These receipts allow patrons to have a record of the items they have checked out.
Checkin receipts are not currently available.
After items are checked out to a patron, if they want a receipt you need to:
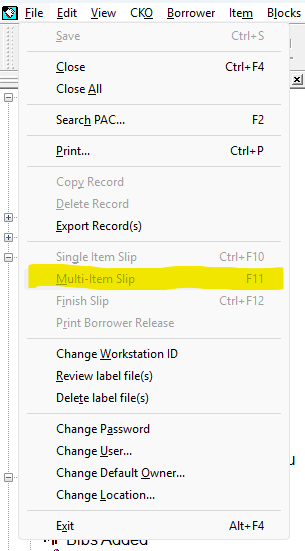
- press [F11] on your keyboard or select from the top menu File > Multi-Item slip
Horizon has an option for Single-Item slips. This is not configured and will produce an error if used. If this happens, click through the errors and choose Multi-Item slip.
It is possible to print and email the same receipt. If the patron does not want both types of receipts, you can select the type of receipt they want from the checkout window.
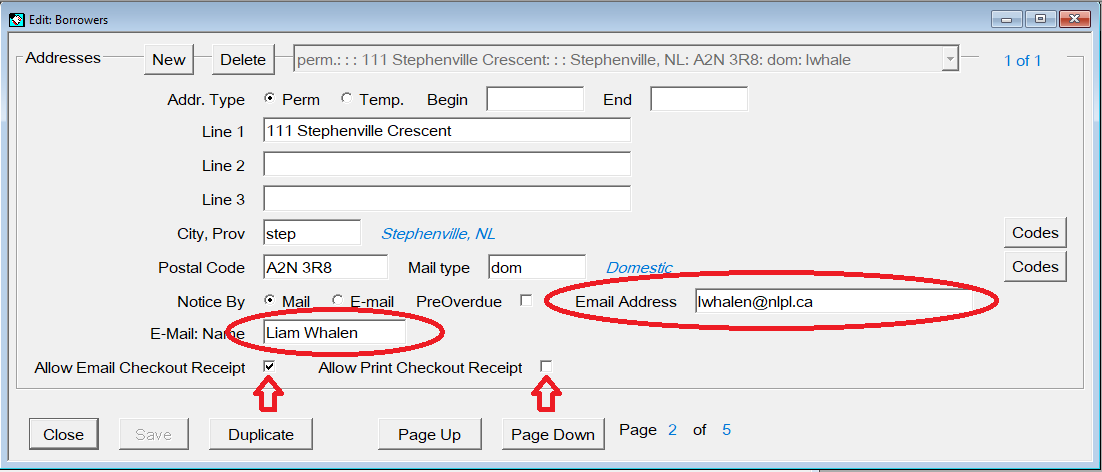
Editing a Borrower for Email Receipts
If a patron wants their receipts emailed, then you need to configure their account with an email address.
If you are unfamiliar with editing a borrower record, please review the Editing a Borrower Record section of the Horizon Guide.
- in the CKO window, press [F6] or select from the top menu Borrower > Edit Borrower
- add an email address, email name, and check the 'Allow Email Checkout Receipts' option.
- if the patron does not want a printed receipt, you can uncheck the 'Allow Print Checkout Receipt' option.
Requests and Holds
This section explains how to place a request on an item for a borrower and how to handle a request when checking in an item.
![]() Printable Quick Guide: Requests and Holds
Printable Quick Guide: Requests and Holds
Introduction
If a borrower wants an item that is currently checked out, then you can place a request on it for them using Horizon. If a lot of borrowers want the same item then Horizon will keep track of who's turn it is next. When the current borrower returns the item, check it in, and Horizon will tell you who it is on hold for next or where to send it:

There is no fee for placing a request. You can place a request on a borrower’s behalf or the borrower can place a request online themselves.
Horizon is helpful and flexible when handling requests and holds. For example, it will warn you if you try to check out an item that is being held for another borrower and will let you renew or cancel their request as appropriate.
You can place a request on an item from any location within our provincial system.
See the section Out of Province Loans for how to request items from outside our system.
Placing a Request
It doesn’t matter if you are placing a request on a local item, or one belonging to a different location, the process is the same.
When a requested item is returned by the previous borrower, or when it arrives in the mail, check it in and Horizon will place it on hold for the next borrower.
From the Checkout Window
The best way to place a request for a borrower is to begin at the checkout window.
Why? Because you will be able to immediately verify if the borrower has any current blocks that might stop them from placing requests or checking out items.
To place a request:
|

 |
|
|
|
 |
|
 |
|
|
|
|
|
|
 |
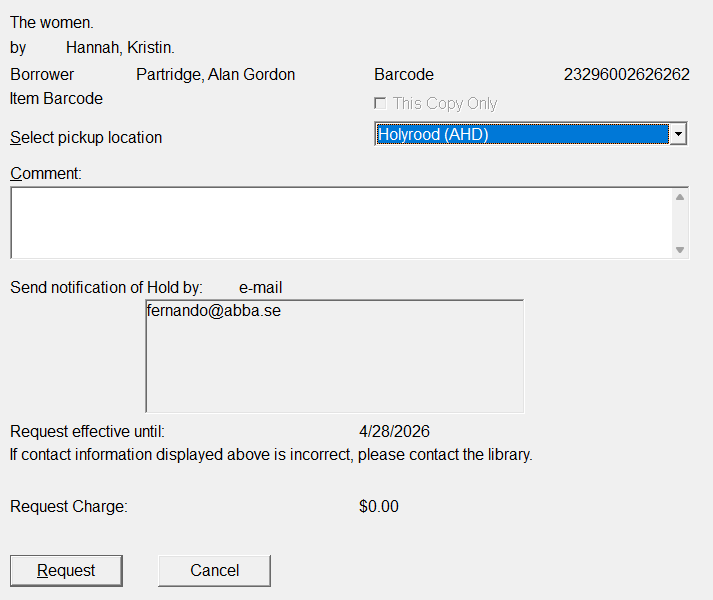
The comments box in the request window is generally not used but can be useful if, for example, the borrower has an alternative temporary contact number.
If you notice that the borrower’s contact details are not correct, then go into their record and update them.
From the Search Window
This way is quicker if the borrower has no blocks on their account.
|
To place a request:
|
 |
Placing a Copy-Specific Request
If a borrower is looking for a particular edition of an item and there are multiple copies in the bibliographic record, then you will need to place a copy-specific request:

This is useful if the borrower only wants the latest edition of an item.
Why can't this request be placed?
Sometimes a request cannot be placed because the borrower is blocked from borrowing or already has a maximum of 50 current requests. In such situations, Horizon will provide a clear explanation.
This cannot be overrode. A borrower must resolve any blocks to borrowing before materials can be requested.
But sometimes when you try to place a request for a borrower, this cryptic pop-up message appears:
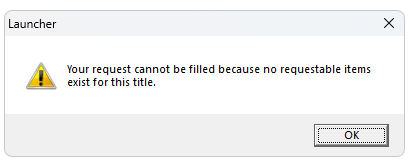
This is Horizon’s way of telling you that the items are not available for system wide holds.
Some requests can only be placed for items at the borrower’s home library (ex. Playaway Launchpads, Board Games, etc.).
Placing a request for an Out-of-Province library
If an out-of-province library requests an item currently in use then place a request on the item using your own library’s account. Horizon will remind you about the request when the item is checked in.
To open the borrower record for your library:
-
-
- go to the checkout window
- type its 3-letter code for your library directly into the barcode field
- click on OK or press [Enter]
-

If there are any blocks, click on Override to continue.
-
-
- place the request
- in the request window enter a comment to let staff know:
-

See the section Out of Province Loans for how to check out an item to a library from outside our system.
Checking in an Item with a Request
Whenever you receive an item in the mail, or whenever an item is returned by a local borrower, check it in.
Run the Pull List every day to see which shelved items have been requested.
If an item has been requested then Horizon will let you know when you check it in.
If it needs to be sent to another location, Horizon will tell you where to send it.
If it needs to be held for a local borrower then Horizon will tell you who to hold it for, and how they will be notified.
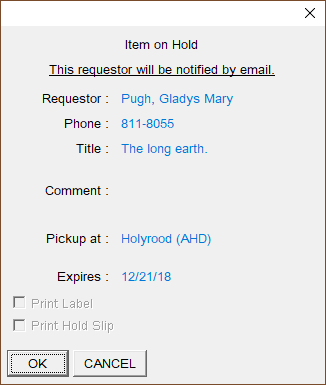

Always complete a Hold Slip for the item before closing the message.
Our system is not set up to print a Hold Slip so you will need to complete one by hand and attach it to the item before placing it on the holds shelf. When the hold slip has been completed, click on OK to dismiss the message.
The borrower needs to be told about the hold. The method of contact is based on the borrower’s registration information. See the section Editing a Borrower Record for more information about how to change that.
Notification by Email
Horizon will automatically email the borrower about the hold when circulation notices are next run. See the section Reports for more information about running notices.
Notification by Phone
If the borrower is to be notified by phone, then you will need to call them.
Notification by Mail
If the borrower is to be contacted by mail, then Horizon will generate a notification letter when circulation notices are next run.
Transit Request
Horizon will tell you which library to send the item to. Follow your library’s local procedure for mailing transit requests.
Cancelling a Hold
Sometimes a borrower no longer needs an item that is being held for them. The quickest and simplest way to cancel a hold is to check in the item. This message will appear:

Click on Yes to cancel the hold. If the item needs to be held for another local borrower, or sent to another location, then Horizon will tell you.
Another message will appear claiming that the borrower will be notified when notices are sent. However Horizon does not generate a notice. Instead Horizon places a ‘Hold Cancelled’ block on the borrower’s account, which will display when their card is next scanned.
Expired Holds
By default items are held for 7 days, after which they should be checked in again. If another borrower has a request, then Horizon will tell you to hold it for them.
You can view the list of expired holds by going into Circulation Reports and selecting from top menu Request > Expired/Canceled. See the section Reports for more details.
Viewing a Borrower’s Holds
Search for the borrower or scan their card. If any items are being held for them then the blocks window will appear:

Viewing a Borrower’s Requests
- [F4] search for the borrower or scan their card
- select from top menu Borrower > Requests
The Borrower Request List window will appear:
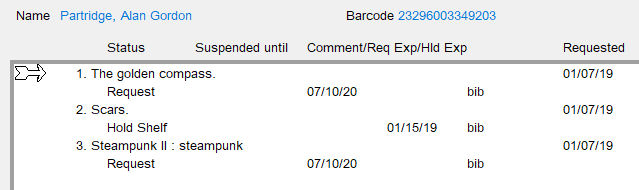
The window shows all of the borrower’s active requests and all items being held for them.
Editing a Request or Hold
A request or hold can be edited by selecting the item in the Borrower Request List window and then clicking on Edit. Multiple items can be selected. A request can also be deleted by clicking on Delete.
For example, suppose that a borrower is going on vacation. They want to stay in the request queue but don’t need the item until after they return. You can suspend the request until their return date. If the item becomes available in the meantime, then other borrowers’ requests will be fulfilled.
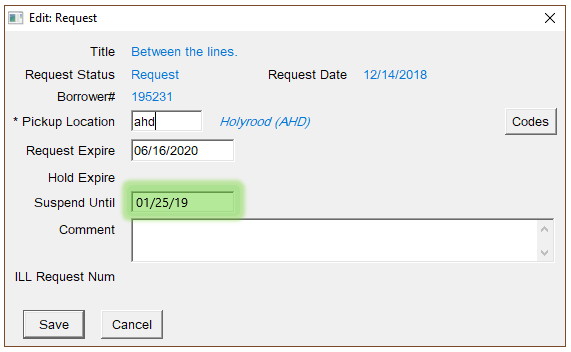
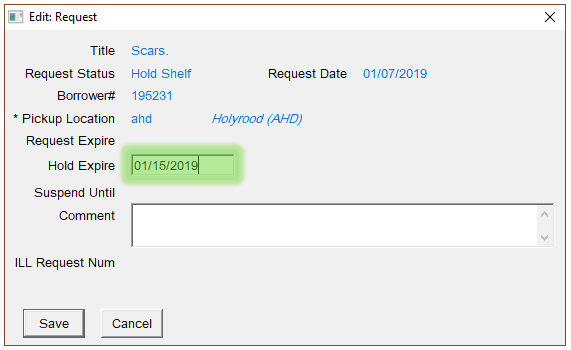
When an item is already being held, the request cannot be suspended, however the Hold Expire date can be changed:
Viewing the Request List for a Title
The Request List for a title shows all requests on that title across the province, in the order in which they were placed:

There are several ways that you can view a title’s Request List:
From Checkout
-
-
- [F4] search for the borrower or scan their card
- select from top menu Borrower > Requests
- select the title from the list of requests
- click on Item Queue
-
From Checkin
-
-
- checkin the item
- select from top menu Item > Requests
-
From Item Search
-
-
- [F2] search for the title and select it:
- select from top menu Request > View Title Request List
-
Reordering the Request Queue
Viewing the Request List allows you to judge the demand for an item. From here you can also reorder the request queue. To do so:
-
-
- highlight the borrower whose position you wish to change
- click on Reorder Queue and enter a new position number:
-

Do not do this unless instructed or authorized. Many borrowers track their requests and could be upset if they are moved down in the queue.
Checking out an Item on Hold for Another Borrower
We shouldn't check out an item that's being held for another borrower, but sometimes a borrower might ask a family member or friend to collect an item for them.
If an item is on hold for one borrower and you try to check it out to another borrower, then Horizon will warn you about the current hold before asking you if you want to go ahead with the checkout:

Click on Yes.
Another window will ask if you want to renew the borrower’s request:

If the item is being picked up on behalf of the borrower then click on No.
Checking out an Item Requested by Another Borrower
Sometimes a borrower brings an item to the checkout that's been requested by another borrower but hasn’t yet been placed on the hold's shelf. Horizon will warn you that the other borrower has requested the item:

You should go ahead with the checkout by clicking on Yes.
This doesn't happen often and is not a problem. The request for the other borrower will be activated when the item is returned and checked in.
Blocks and Fines
This section explains the blocks that can appear on a borrower’s account and how to handle them.
Current Blocks Window
Sometimes when you search for a borrower or scan their card, Horizon will divert you to the Current Blocks window. This is where Horizon lets you know about issues that you might need to address before checking out items to a borrower.
Often the blocks window appears because the borrower owes fines for items returned late, or because the borrower has overdue items still checked out. Other blocks can also exist, such as a message to remind staff and the borrower that an item is being held.
If the blocks window appears take note of each block listed and attempt to resolve any issues before moving on.
When you have finished with the blocks window, click on the CKO button to progress to the borrower’s checkout window, or click on No CKO to clear the borrower.

Viewing Blocks
If a borrower has any blocks then the blocks window will automatically open whenever you search for them or scan their card.
To reach to the current blocks window from the checkout, click on the Blocks button:

Resolving Blocks
Some blocks are deleted automatically by Horizon once resolved, such as when payment is taken for a fine. Other blocks, such as messages for borrowers, need to be manually deleted once resolved.
Some blocks don’t need resolving straight away for the borrower to continue borrowing, such as blocks for overdue items.
We'll look at those types of block later.
First we'll look at blocks that need to be resolved before a borrower is allowed to borrow any more items.
Maximum Exceeded Blocks Window
Sometimes borrowers are blocked from borrowing more items until an issue has been resolved. If you try to progress to the checkout screen by clicking on CKO then Horizon will warn you with a pop-up message:

If no blocks can be resolved at this time then click on Cancel to close the message and leave the borrower’s record. The borrower will not be able to borrow any new items.
If any blocks can be resolved then:
-
-
- click on Override to progress to the checkout window
- click on Blocks to return to the current blocks window
-
The borrower must resolve the blocks before they are able to borrow any more items. In the above example the borrower will need to pay the outstanding fines and pay for or return the lost items.
Borrowing and computer (MyPC) privileges are suspended if a borrower has more than $5.00 owing.
How to take payments is covered later in this section.
Overdue Items
Overdue items are resolved by checking them in or renewing them. The ‘Overdue Still Out’ block will automatically disappear.
Fines for Late Returns
Overdue YA and adult materials are charged $0.15 per day to a maximum of $5.00 per item.
Overdue juvenile materials are charged $0.05 per day to a maximum of $0.50 per item.
Horizon automatically calculates and applies fines.
No libraries charge for the days that they are closed.
It is possible to exceed the maximum fine per item. For example, suppose an overdue item has accrued the maximum $5.00 fine. If you renew the item then that $5.00 is still owed but Horizon will begin charging fines if the item becomes overdue again.
Borrowers have 6 months to pay a fine before they are blocked from borrowing.
Determining the Amount to be Paid
If a borrower has an amount to pay for late or lost items then it will show in the top-left of the current blocks window.
In fact there are two totals: one for Amount Due and one for Overdue Accrued Amount:
![]()
Amt. Due is the total for lost items and items returned late. This amount can be paid now.
Overdue Accrued Amt. is the total for overdue items that have not yet been returned. This amount cannot be paid yet, because the amount will increase daily until the items have been returned or renewed.
In the above example $84.30 can be paid straight away, but the $1.80 is an increasing amount and cannot be paid until the borrower returns or renews the overdue items.
Taking Payment
![]() Printable Quick Guide: Fines and Lost Items
Printable Quick Guide: Fines and Lost Items
A borrower can pay any amount up to the total amount due. They can choose to pay for specific blocks.
At the current blocks screen:
-
-
- optional: if the borrower is paying only for specific blocks then select them
- click on Payment
-
The Fine Payment window will appear, showing the total amount due:

If the borrower is paying a smaller amount right now then you can change the amount manually. Just type it into the Amount field. Horizon will calculate the remainder to be paid and adjust any monetary blocks accordingly.
The borrower cannot pay more than the total amount due. So they cannot ‘pay in advance’ for accruing overdue fees.
If the borrower wants to pay more than is due and wants the surplus to be a donation, then:
-
-
- take payment in Horizon for the total amount due
- record the surplus as a donation in your site’s daily revenue, outside of Horizon
-
Horizon does not generate receipts for payments. However if you take payment for a lost item then you must issue a paper receipt.
Waivers
Fines and Fees can be waived in special circumstances, such as if a borrower was in hospital and unable to renew items when due.
To waive a monetary block:
-
-
- highlight the block(s) that the waiver will be applied to
- select from top menu Blocks > Waiver
- adjust the amount if need be
- add a comment as appropriate
- click on OK
-

Lost and Damaged Items
![]() Printable Quick Guide: Fines and Lost Items
Printable Quick Guide: Fines and Lost Items
Items overdue for more than 42 days are automatically set to a status of ‘Lost’. Those items no longer appear in the borrower’s list of checked out items, and instead appear as fee blocks in the blocks window.
To resolve a lost item the borrower must return it, replace it, or pay the replacement fee.
Borrower Returns a Lost Item
If the borrower returns a lost item, then check it in. This message will appear:

The lost item block, along with its fee, will be automatically removed from the borrower’s account. Horizon will automatically apply any fine for late return.
Borrower Says That They Have Lost or Damaged an Item
If a borrower has lost an item or damaged it beyond use, then you will need to manually declare that item as lost.
At the borrower’s checkout screen:
-
-
- click on All Items Out
- select the lost item
- select from top menu CKO > Lost
-

Another window will appear telling you the replacement cost of the item.
Changing the Amount for a Lost Item
If you believe that the cost is unreasonably high, then you can change the amount. For example, some older paperbacks show a default price of $27.00 but the actual replacement cost may be only $7.95.
Check with your division manager if you need to clarify whether or not the amount should be changed.
To change the amount, go to the borrower’s blocks screen:
-
-
- select the lost item
- click on Change Amt
- the Change Fee Amount window will appear
- enter the new amount and provide a reason
-

When payment is taken for a lost item a receipt must be issued.
Refunds for Lost Items
Sometimes a borrower loses an item, pays for it and then later finds it.
To receive a refund, the borrower must return the item within 2 years in good condition and with the original payment receipt.
Do not take money from petty cash to refund the borrower.
Complete a Refund for Materials Previously Reported as Lost form, which can be found in the staff portal. Attach the original receipt and forward it to your divisional office for your Divisional Manager to sign. Headquarters will issue a refund cheque directly to the borrower.
Check in the item to restore it to the collection.
Claimed Returned
Sometimes a borrower may believe that an item has been returned but not checked in. If this happens, then immediately check the shelves.
If the item is found, then check it in using Exempt Fines Mode.
If the item is not found and the borrower insists that the item has been returned, then you will need to change the status of that item to Claim Returned.
In the checkout window:
-
-
- [F4] search for the borrower or scan their card
- click on All Items Out
- select the item(s) which the borrower claims to have returned
- select from top menu CKO > Claim Returned
-

Horizon will change the status of the item to claim returned and add a claimed returned block to the borrower’s account. The block will remain until the item is found.
There is no fee associated with the block and no fines are charged if the item is later checked in.
If a borrower claims on 3 separate occasions that items were returned then they will be blocked from borrowing.
Manually Adding a Block
You can manually place a note or fee block on a borrower’s record.
A note block will need to be manually deleted when resolved, but a fee block will be automatically deleted when resolved.
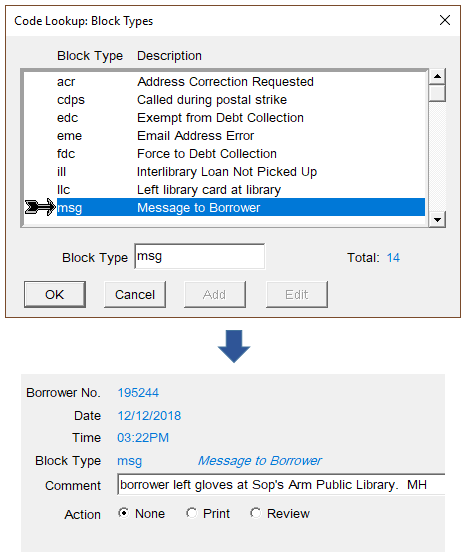
Note Block
-
-
- go to the borrower’s current blocks or checkout screen
- select from top menu Blocks > Add Note
- choose an appropriate block from the list
- add a comment and include your initials
- leave Action as ‘none’
-
These are the types of notes that we use:
|
Block Code |
Description |
Who can see? |
|
acr |
Address Correction Required |
staff and borrower |
|
eme |
Email Address Error |
staff and borrower |
|
llc |
Left Library Card at library |
staff and borrower |
|
msg |
Message to borrower |
staff and borrower |
|
nid |
Need ID to complete registration |
staff only |
|
note |
comment |
staff only |
|
nsn |
Never Send Notices |
staff only |
|
pcr |
Phone Correction Requested |
staff and borrower |
|
smsg |
Staff Message |
staff only |
Comment
A possible use for this type of block note is when a patron only has one legal name. This can confirm to other staff who might interact with the patron that the name information has already been verified. Doing so will save the patron from having to re-confirm these details on subsequent visits.

Message to Borrower
Fee Block
-
-
- go to the borrower’s current blocks or checkout screen
- select from top menu Blocks > Add Fee
- choose an appropriate block from the list
- enter the amount in the Fee field
- add a comment and include your initials
-
These are the types of fees that we add:
|
Block Code |
Description |
Who can see? |
|
damage |
Damaged |
staff and borrower |
|
fee |
Fees |
staff and borrower |
Add a Comment to an Existing Block
-
-
- highlight the block
- click on Detail
- Horizon will display the Current Block Detail window
- click on Comment
- you can enter up to 80 characters
- leave Action as ‘none’
- click on Close
-

Manually Deleting a Block
At the borrower's blocks window:
|
 |
Blocks with monetary amounts cannot be manually deleted. They must be resolved by paying or waiving the amount.
Blocks cannot be manually deleted for items that are lost, claimed returned, or being held. The item must be checked in or checked out.
Viewing a Borrower’s History Blocks
The history blocks window shows a list of the borrower’s resolved blocks and the dates that they were resolved.
|
At the borrower’s current blocks window:
|
 |
Viewing a Borrower’s Payment History
You can view all of a borrower’s payment transactions from a chosen date.
|
At the borrower’s checkout window:
From here you can click on:
|
 |
Appendix: Types of Blocks
Horizon comes with a set of predefined blocks, some of which we will never use, such as Force to Debt Collection or Exempt from Debt Collection. These predefined blocks cannot be deleted so we must ignore them.
These are the blocks that we do use:
|
Address Correction Required |
Manually placed by staff if they are aware that a borrower’s address has changed, so that the next time the borrower checks out an item you can update their registration. This block must be manually deleted. |
|
Adjustment Credit |
Automatically placed if staff decreases the amount that a borrower owes on an existing fine or fee. It is appended to a particular block and can only be viewed when you select the detail for that block. It tracks the date and the amount adjusted. This block is automatically deleted when the fine or fee is resolved. |
|
Automatic Bill Sent |
Automatically placed when a borrower exceeds the max fine, or an item is so long overdue it has been set to lost. It is attached to each fine or lost block that has an amount included on the billing notice. This block is automatically deleted when the fine or fee is resolved. |
|
Adjustment Debit |
Automatically placed if staff increases the amount that a borrower owes on an existing fine or fee. It is appended to a particular block and can only be viewed when you select the detail for that block. It tracks the date and the amount adjusted. This block is automatically deleted when the fine or fee is resolved. |
|
Balancing Entry |
Automatically placed as a notation appended to the original fine block. This block is automatically deleted when the fine or fee is resolved. |
|
Billing Notice |
Automatically placed when Day End is run, triggering a billing notice when fines or fees have exceeded the maximum. Unlike Automatic Bill Sent this is a separate current block and must be deleted manually when the blocks are resolved. |
|
Claim Returned |
Manually placed by staff when a borrower claims that an overdue item has been returned. It should only be used after the shelves have been checked. This block is automatically deleted if the item is checked in. No late fees are charged to the borrower. |
|
Credit |
If a borrower returns an item that they have previously paid for then this block is placed when an amount is credited to a borrower account. It will appear as a negative amount. Do not delete this block. |
|
Damaged |
Manually placed by staff when a borrower returns an item in a damaged state. This removes the item from circulation and does not trigger any requests. The borrower is not charged a fee. This block is automatically deleted when the block is resolved. If the item is irreparable then it should be declared lost instead. |
|
Fees |
Manually placed by staff to apply miscellaneous fees. This block is automatically deleted when the block is resolved. |
|
Final Overdue Notice |
After other overdue notices have been sent Horizon automatically appends this notation to the Overdue Still Out block. This can only be viewed when you select the detail for that particular block. This block is automatically deleted when the block is resolved. |
|
Fine |
Automatically placed when an overdue item is checked in. The Overdue Still Out block is replaced by a Fine block. This block is automatically deleted when the fine is resolved. |
|
Hold Cancelled By Borrower |
Automatically placed so that there is a record of why and when a hold was cancelled by a borrower. A borrower can cancel a hold online. This block must be manually deleted. |
|
Hold Cancelled By Library |
Automatically placed so that there is a record of why and when a hold was cancelled by staff. Often placed following a verbal request by a borrower, but shows as cancelled by library because it was done through Horizon. This block must be manually deleted. |
|
Hold Cancelled and Reinserted in Queue |
Automatically placed when a staff member checks out an item on hold to another borrower. Horizon allows the option of reinserting the original request back into the top of the hold queue. This block must be manually deleted. |
|
Hold Expired |
If an item remains on hold for more than 7 calendar days and is not picked up by the requester then Horizon automatically cancels the hold. This block must be manually deleted. |
|
Hold Notification Mail |
Automatically placed when a hold notification for e-mail or letter has been generated. This block is automatically deleted when the item is checked out. This block changes to Hold Expired if the item is not checked out. |
|
Hold Notification Phone |
Automatically placed when a hold notification by phone has been generated. This block is automatically deleted when the item is checked out. This block changes to Hold Expired if the item is not checked out. |
|
Lost |
Automatically placed if an item is overdue more than 42 days. It can also be manually placed by staff when a borrower claims to have lost the item. It applies a fee to the borrower’s record. This block is automatically deleted when the block is resolved. |
|
Message to Borrower |
Manually placed if staff wish to relay information to a borrower. For example if the borrower left their library card you would use this block. This block can be viewed by both borrowers and staff. This block must be manually deleted. |
|
Comment or Staff Message |
Similar to Message to Borrower but these are not readable by the borrower. This block must be manually deleted. |
|
Never Send Notices |
Manually placed when there is a borrower who should never be sent a notice. This block over rides the system-generated notifications. This may be helpful for staff who do not need to receive notifications about holds and overdue items. Some locations may find it useful for Books by Mail borrowers if they don’t need to know that their items are overdue or on hold. Should never be used for regular borrowers who pay fines. This block must be manually deleted. |
|
Overdue Still Out |
Automatically placed when an item has not been checked in by its due date. This block is automatically deleted when the block is resolved. |
|
Fine Payment |
Automatically placed and appended to a fine block as a notation, and can only be viewed when you select the detail for that block. When the borrower pays the total fee the original block automatically moves to the History Block list. |
|
Request Deleted |
Automatically placed by Horizon when a bib record for a requested item is deleted from the system which had a copy specific request. There are no other details given other than request deleted. This block must be manually deleted. |
|
Request Expired |
Automatically placed when the system defined expiration date of 18 months or 550 days has been exceeded for the unfilled request. This block must be manually deleted. |
|
Refund of Payment |
Automatically placed and appended to a credit block when you refund a payment to a borrower It keeps track of the date and the amount of the transaction. This block is automatically deleted when resolved. |
|
Requested Item Lost |
Automatically placed when an item that is a copy specific request is aged from overdue to lost. Does not apply to title (or bib level) requests. This block must be manually deleted. |
|
Waiver of Fines |
Automatically placed when you waive a fine. Horizon deducts the amount waived from the total amount owed and then attaches a Waiver of Fine block to the original block and moves the whole block to the History Blocks list. |
Item Search
This section explains how to search for items, such as by title, author or subject, and how to restrict a search to a chosen type of material or location.
![]() Printable Quick Guide: Item Search
Printable Quick Guide: Item Search
Search Menu
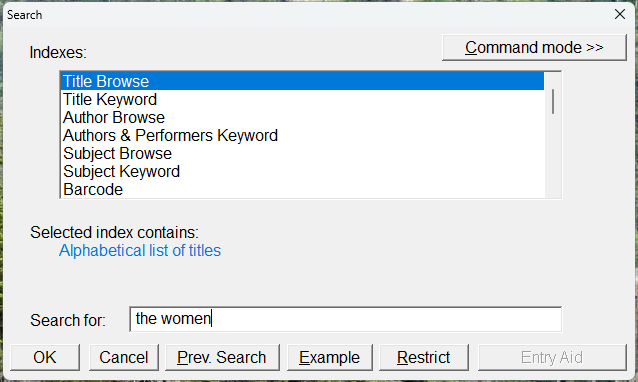
To search for an item press [F2]. A pop-up window will appear:
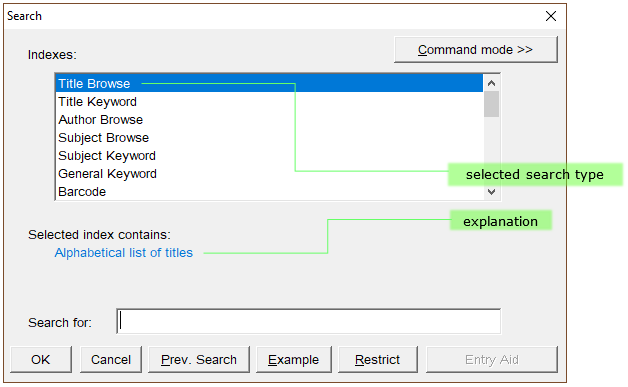
The list of indexes allows you to choose different types of search. Title Browse is selected by default. Horizon will remember the last search index used.
Capital letters are not needed when searching, and articles such as ‘a’, ‘an’ and ‘the’ can be left off the front of a search.
For example a title browse for “wonder” will also find titles called “The Wonder”, and “fistful of dollars” will find the title “A Fistful of Dollars”.
Similar to borrower search, item search is not forgiving of spelling mistakes.
If you subject browse for “knirring” instead of “knitting” the results will be unhelpful.
However, if the spelling is correct then you don’t need to type in a full search phrase to get good results.
For example a title browse for “harry potter and the ph” will find entries for “Harry Potter and the Philosopher’s Stone”.
Types of Search
Browse Search
The main type of search that we use at the circulation desk is a browse search, either by title, author or subject. We’ll use examples of those 3 types to illustrate how search works, and also mention the other types of search available.
Title Browse
This provides a list of titles in alphabetical order.
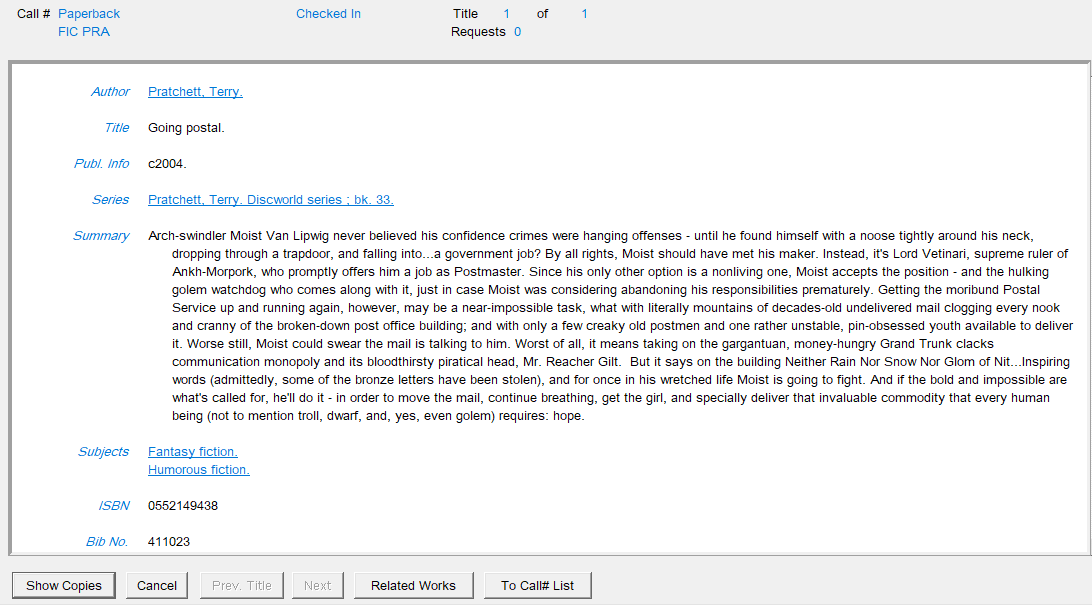
Example: a simple search: Going Postal by Terry Pratchett
Searching for “going postal” returns these results:
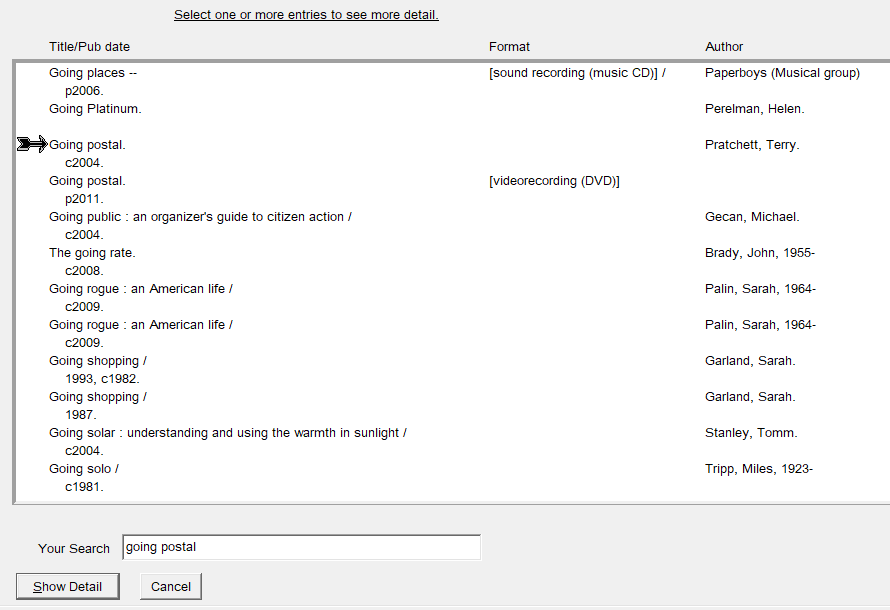 |
|
|
Click on the image to view it full size in a new tab. Close the tab to return to this guide. |
The arrow points to the closest match. Notice that the Format is blank, which tells you that it’s a book. The entry below it has the same name but is a video recording.
Click on Show Detail to view the Bibliographical Detail window:
 |
|
|
Click on the image to view it full size in a new tab. Close the tab to return to this guide. |
Most of the time we reach this window we simply want to click on Show Copies to see which locations have this item. However, sometimes the links and information can be useful.
The blue underlined links for Author, Series and Subjects can be double-clicked, and will take us to more titles by the same author, in the same series, or on the same subject.
The Publication Info and Summary can provide clarification if a borrower is looking for a book but isn’t too sure about its title, or is looking for a specific edition.
Clicking on Show Copies brings up another window that shows where copies are held:

Here you can see that there are 4 copies in the collection, and that all are checked in.
If there is a copy at your location then it will appear at the top of the list. If there isn’t a copy at your location it can be requested from another location.
If a copy is checked out then you can see who has it by clicking on the Detail Status button. This provides information about the current borrower and prior circulation.
Searching for an item causes a few windows to open. When you are finished with a search the easiest way to close each one is to press the [Escape] key.
Example: when multiple editions exist: Harry Potter and the Philosopher's Stone by J K Rowling
Searching for “harry potter and the ph” returns these results:

Again, the arrow points to the closest match but we can see that there are 5 entries for this title: 2 books, 2 video recordings and an online electronic version.
The online version cannot be checked out using Horizon, but if no physical copies are currently available it could be useful to let borrowers know that it exists. Borrowers can check it out using the eLibrary system.
If the borrower is looking for a video recording then check the format carefully to see if it’s the tape, DVD, or Blu-Ray version. Sometimes this is obvious from the Format column, other times you need to click on Show Detail and view the Bibliographical Detail window to verify.
If multiple entries exist for a book they can sometimes be differentiated by the publication date. If it’s important to the borrower then select the edition that they prefer. In this example there are 2 entries for the book, and both have a 1997 publication date. So to find all copies you should highlight both entries by selecting them…

…then click on Show Details to move onto the Bibliographical Detail window:
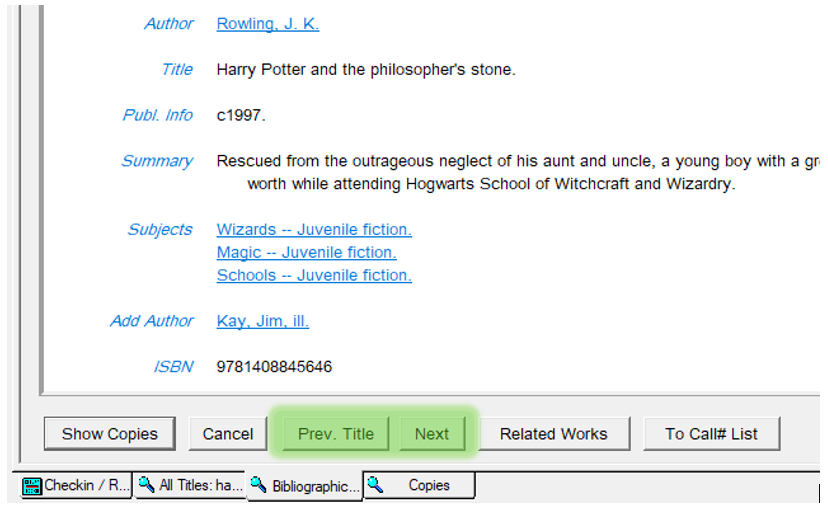
You can move between the details of each selected entry by clicking on the Prev. Title and Next buttons at the bottom.
To see where the copies for an entry are located click on Show Copies. In the Copies window click on the Prev. Title and Next buttons to see where copies of each version are held.
Example: when different titles have the same name: Wonder
Searching for ‘wonder’ returns these results:

You can see that there are several different titles named “Wonder” and that they are not listed alphabetically by author.
Also, scrolling down a little reveals that there are even more results for “Wonder” after the results for Emma Donoghue’s “The Wonder”:

So you may need to scroll up or down the list to find a title with a common name by a particular author, or to find all versions of a particular title.
This provides a list of authors in alphabetical order.
Example: search for Karen Robards
Searching for “robards karen” returns these results:

Here you can see that we currently have 76 of Karen’s titles in the collection.
Clicking on Show Titles lists them:
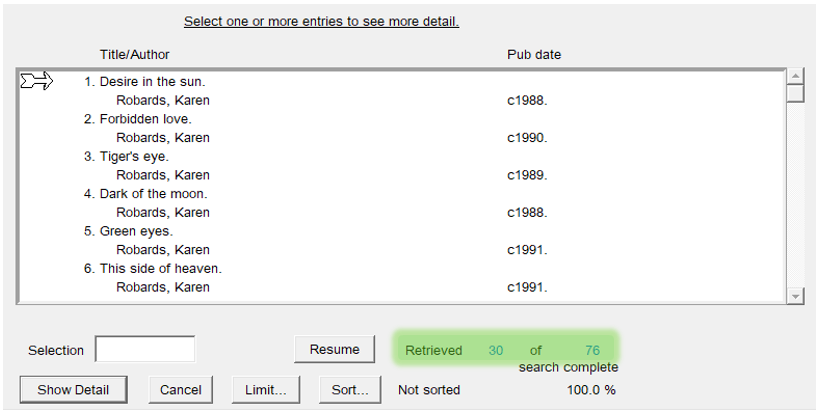
You can also see that only 30 of the 76 entries were retrieved. Click on Resume to fetch the rest. You may need to do this a number of times.
You can click on Sort to sort the list. A pop-up box appears:

There are 3 ways to sort: by title, author or publication date.
Often a borrower is looking for the latest or oldest book by an author. So, to sort by publication date:
-
-
- select Pub date and it will move to the top
- select Descending sort to make the newest titles appear at the top of the list
- click on OK
-
To find where copies of a particular title are located, click on Show Detail and then Show Copies.
Subject Browse
This provides a list of subjects in alphabetical order. Selecting a subject shows all titles that belong to it.
The name of the subject must begin with the word or words you type, so sometimes it is worth performing a Subject Keyword search too, because that search will return all subjects that contain the keyword.
For example, a subject browse for “knitting” will return all subjects that begin with the word “knitting”, such as “Knitting Patterns” and “Knitting: Newfoundland and Labrador”, but it won’t include subjects such as “Peg Knitting” or “Spool Knitting”. However a subject keyword search for “knitting” will include those subjects.
Here are the results of the subject browse:

In general the quality of search results depends on the quality of the input. So if a borrower wants titles about “Spool Knitting” then a subject browse for “spool knitting” is more likely to return relevant results than a browse for just “knitting”.
Series Browse
This provides a list of series in alphabetical order.
You need to know the first word or words of the series name.
If you are not sure of the precise name of a series then use a Series Keyword search instead. If that doesn’t help then search for a title that you know is in the series and then double-click on the series link in the Bibliographical Detail window.
Other Browse Searches
You can also browse for audiobooks, dvds, videos, journals, and music.
Keyword Search
This type searches for words located anywhere within a title, subject or series.
For example a Title Keyword search for “pigs” will find all titles that have the word “pigs” in them:

A real mixed bag of results!
So there are benefits and drawbacks to using keyword searches.
If we have a title containing the keyword, it will be in the results list - somewhere. However the results list is often lengthy and cannot be sorted by material type or collection. That makes it hard to trawl through to find titles that the borrower may want to know more about.
It is usually better to adjust the search. If the borrower wants books about pigs, then use a Subject Keyword search instead. If the borrower wants juvenile books that have the word “pigs” in the title, then restrict the search to juvenile materials only. See the section Restricting a Search.
What most types of keyword search do is obvious by their names (such as Title Keyword), but there are a couple of types of search that are worth a little more explanation.
General Keyword Search
This will search by Author, Title, Subject, Series and Contents – all at once.
This is a very powerful yet very blunt instrument. For common words it will often return too many diverse results, but it is worth using if you are having trouble finding something on a subject.
This will find items by an author or with a listed performer.
For example, it can find all the books, music, and videos that Madonna has either written or performed in.
Enhanced Searching by Keyword
Using Truncated Keywords
Keywords can be truncated using an * asterisk.
For example, a Title Keyword search for “econ*” will find all titles that contain a word beginning with “Econ”, such as “Economics”, “Economy” and “Economical”.
Using Multiple Keywords
A keyword search can be narrowed by using two or more words, each separated by a space. It will find titles that contain all the keywords.
The words AND and OR can also be used to improve your search.
Here are some examples of how multiple keywords can be used:
|
Using…
|
…and searching for… |
…will find |
|
title keyword
|
harry potter |
items with both “harry” and “potter” in the title |
|
subject keyword |
paint* canada |
books about painting or painters in Canada |
|
|
animal* AND (sound OR communication) |
books about animals sounds |
|
|
(atomic OR nuclear) AND (energy OR power) |
books about nuclear power |
|
general keyword
|
newfoundland AND (ghost OR spirit OR supernatural) |
ghost stories from Newfoundland |
Number Search
There are several ways to search by number, such as by Barcode, ISBN, or Dewey Call Number.
Searching by barcode can be a quick way to reach useful information.
For example if you have an item in your hand, scanning it in will bring up its Bibliographical Detail window. From there you can look up more titles by the same author, titles in the same series, and other titles on the same subject.
Restricting a search
Searches can be restricted by types of material and location.
-
-
- press [F2] to begin a search
- the Search Window will open
- click on Restrict
- the Restrict Title Display pop-up will open:
- press [F2] to begin a search
-

-
-
- In the left pane you can select one type of restriction, such as Large Print Only.
- In the right pane you can select zero, one or more locations.
-
Click on OK to return to the search window. A blue bar will remind you that searches are now restricted:

From here you can continue with your search.
The restriction will remain in place for future searches until you clear it.
To clear a restriction:
-
-
- press [F2] to open the Search Window
- click on Restrict
- the Restrict Title Display pop-up will open
- click on Clear
-

If you want to temporarily disable a restriction then click on Disable instead of Clear. Click on Enable to bring it back.
Limiting a search
After you have performed a search you can refine it to make the results more relevant.
For example, to find books about dinosaurs published since 2010:
-
-
- perform a Subject Browse search for “dinosaurs”
- select the entry “Dinosaurs”
- click on Show Titles to bring up the full list of titles
- click on Limit
-
The Search Limit box will appear:

There are several fields that you can choose to limit the search results. In this example we have limited the results to titles published since 2010.
This limits the results to just 11 items:

Out of Province Loans
We can loan items to libraries outside of our provincial system, and also borrow items from them.
This section explains how to check materials in and out for out-of-province loan (OOP), so that Horizon can track where they are.
This chapter does not explain how to use the Canada Post Shipping Tool or how to file any OOP paperwork. If you need guidance with any of those, please contact your division office.
Loaning an Item to an Out-of-Province Library
Libraries outside our provincial system are treated in Horizon as if they are library borrowers. We check items out to their account.
If an OOP library wants to borrow an item from our system then they will contact the Provincial Reference Library (PRL). If the item is held at your location, then PRL will contact you by email.
You will need to check out the item to the requesting library. [F4] borrower search for the library by name.
Don’t stamp a due date on the item. The borrowing library will do that when they check the item out to their borrower.
Mail the item to the address in the library’s borrower record, which should also be listed in the shipping tool.
At the end of the loan, when the item is returned to you in the mail, check it back in:

If an Out-of-Province Library Requests an Item and it’s Already Checked Out
See the section Placing a Request for an Out-of-Province Library.
Borrowing an Item from an Out-of-Province Library
Borrowers sometimes ask for items that we don’t have in our provincial system but might be available in other provinces or systems. Forward the requests to your division office who will let you know if a copy can be found.
Generally books are only loaned when they have been published for 2 or more years.
The item won't be in Horizon yet, so when the item arrives let the borrower know.
When the borrower comes in to check out the item, 'Fast Add' it to the system:
|
 |
|
|
|
|
|
|
|

The item will now be checked out to your borrower.
Please note:
If there is no due date label on the item do not attach one. Place a slip of paper inside the book and attach using a paperclip.
Items borrowed from out-of-province cannot be renewed using Horizon. To request an extension you will need to contact the lending library using the contact information in the ILL paperwork.
When the borrower returns the item check it in. Horizon will tell you that the record will be deleted:

Click on Continue.
The item can now be mailed back to the loaning library.
Out-of-Province Loans Not Picked Up
If the borrower does not pick up the item in the allotted time then you will need to return it.
Holds for OOP items aren’t recorded in Horizon, so Horizon can’t tell you when they’ve expired. You will need to check your holds shelf daily for expired OOP holds. Generally we hold an OOP item for a week before returning it.
When a hold has expired:
-
-
- check in the item
- search for the borrower
- add a block to their account:
- select from top menu Blocks > Add Note
- select ill – Interlibrary Loan Not Picked Up
- in the comment field include the title and return date:
-

The note will let the borrower and other staff know what’s happened with the item.
Adding & Editing Items
This section explains how to add and edit items. This is useful for adding donated items and magazines to the collection, and for editing the records of items to show that they have been discarded or have a new location or barcode.
![]() Printable Quick Guide: Adding an Item
Printable Quick Guide: Adding an Item
Adding an Item
Donations and Locally Purchased Items
Items such as donated or locally purchased books and dvds can be added to Horizon directly at sites. The way to do it is:
-
-
-
search for the title in Horizon:
- identify the correct version
- check that there isn’t already a local copy recorded
-
tell Horizon to create an entry for the local copy:
- add a barcode and scan it in
- save the entry
-
prepare the item for circulation:
- add a spine label and due date label
- mark the item as belonging to our organization and to your location
-
search for the title in Horizon:
-
|
Before You Begin |
||
|
Read the Guide! It’s important that we accurately record new copies of titles, such as identifying the particular format or edition.
For this reason a definitive guide to Adding Items to the Catalogue can be found in the Staff Portal and should be read before adding any items to the system. What if I Can’t Find a Record for this Title, or for this Particular Version? If a title isn’t recorded in the system then a copy cannot be added at a site.
You will need to contact Technical Services and provide them with details about the title so that they can add it to the collection.
The Cataloguing by Mail guidelines can be found in the Staff Portal. |
||
Example: adding a copy of a locally purchased book to the collection
Suppose the book Shattered Mirror by Iris Johansen has been purchased locally. To add it to the system, first search for it. The results look like this:
![List of search results from an [F2] item search](data:image/PNG;base64,iVBORw0KGgoAAAANSUhEUgAAA0gAAADRCAYAAAD2ZpLNAAAACXBIWXMAAA7EAAAOxAGVKw4bAAAgAElEQVR4nOydd5yV1bX3v+dM773Tht6LVBEFFERsWGOJLSaa5CYx5SY3vsmNyc29phdTTDeJJbFFBQsoCIiCSu+9w/Te+5zz/iEHn9ns9pwZsORZn884z9l77bV+a/12WfuZYfTV1dUFAYLBID6fj2AwiFN8Ph+iOHWdY5y6zjbx2fldtCvzbYPJVkSsNrE4x8qwq+IT2/rKjip3Jl86PCofTl2ZX1W7brxNn8m+2K6zrRqnylW4eHqTExtscHY40mF0O87UZit9ba+30tcx90VePY7Cw/PvxJFMbPZGt35tx/VV7vvSh82ZYWs/3PydCx8eR+4wfhA+PI7cYTzbPnx1dXVBm4LN+azTUTlzjj3t3KKoc+qpMMns9QjShW2ZnhO3qmjVjdfhUPnqC5smPduDXWYj3DngtGMzT0zFgsqm7bxVxSbzrcJpisfGvm28Mt+2HOlicI61HWfb7yY2W3GLWedTt4fYrlk3fjyOzOM8jnrPkc154mavc2vbxr7JztkuomxrDxt84RSbHkdm8TjyOLLxczY48js7VEWu07CpKHPqOe067TkTIbOnsqsS8cBUjddh7o0Psc0ZcyheVWEu8yHqynyKNlX2ZDlw2nNy44zHiUWXR1UsMv2QLd1EFf2afNksNmdbKH4xRhN2lX3TOB1PqtydC47EteAcL65fUVTrVacvE3EfEO2Y5pZuLpnWmFNHXE+y+SOKbL8Ubep8y+zp2jyOPI7ccCTuezpRnWE6v6qzSrSh40hWb4jPOuwm3DLRnd+ymHU4bM4+mT2PI48jsc3jyE7ONUd+1QHiLChlQTiLTXGc87N4YIjtzmJPd4iYJpo4RoZZpedGRxaPU0Kx2BbQJh3xoqAbZ1uwOJ/FBer0o5rosnG6PJnEVEToPqsWhWq+qHCr5repiFIVbLpLkcq3zGdfcqSLw6ZYFfVsC1wxN7Ybos1mquNPHGPaR2yLUtuiW7aJy/YzlR9VHCaMHkceRyq8uvPc2a4632W+xXrBxJEsFvGck+mrCj/VfJEVQrraQFaDmLgVY5DNJ514HHkcOds9jj5cHPlqa2uDqkFOZV3xJzoSv8v6nGDdtIt9MkwyomU6bor4cMaF66MvbYt8mGyJ/Ju4D1dsbJl0VLh1MZjsu42xrzm2wfph4uhc2Q0nRtOcB/cX+d7gPhvicWRvry/HfBjs99bu2Y67L+WD5CiceWhj91yMP5ficfThF48jd+KHM4tK0ZDqQiTTkYEQ+5w+ZMBllyIVFllbyL6zXXbjFW+pshuk+NmJzXkj14239WPqE0VmU3bzlt2kdfZkfMtidoNFFNmbDdu4ZTacfKu414036dpgkOEOh0Mb/XA4koku9+I6tLGnwuuU3m7QtuN1eqY3ZOGIjHOx35YX2TgZPo8jd/LvxJHJj+pFTLi5Fce7sWPaO1XYdHhFLnVzSPcW2Qa7rl4wjdWJx5HHkcfRB8eRr7a2Nig7iEw/dTCJamyo3TZwEyadn5CE+5MjJ1aZDZMtWb8sfp0dWx9OPbe4bP3b5k6XH5s+W9FhU/WJ806mJy4aJ95w1oSNXV1sss8q3d7kMPTZiS30bIPDrfR23ofEtJ5s8iOLW2WvL/C7EY+jnvY8jvS+3fiQnZM29tzwFbJtw6ubGMKpIZz6qvlka1Pny/Zs8zhSYxHHexx5HJ1rjqR/xS5kwMagbqys8DQV824O3dbqY5TVd9EdEJR8PvwpeRSmB6k63kBM/3ySIrpoaaikPSaPjLgAnW1N1FW0EpufQ1Kk0h0A3e1NNLW2E4xJILqtnuqqBtp6aEQRl5JGRloicVERmjjaqC1qJjIjmfi4KCL0bp1REwy0UHm0hcQhWcTrsHa109xcTyAmm9RYwUofHspu7PWVX7dz5YMQ24V6rnD31pdpA/8ocCITN5vvB4El3PEeR+cOS7jj33sO0tXRRNXxchoF3ciYeNKy80mNPfuXXFFaG8po9meQFh9FhN+s31sJJ69n6zJsU3vYrKO+jOnDIB85joLdtDfXUlbVSmRaNgViIaSw09nWQHNHkKjYFBKiO2iqaqYrMoaE1HiiLPF9UPKR4+gjso56XA2cFxjQ//qQeIESb466dtlNU7Rrcxvd89R93P9sJU3t0Fy+n6qoQQxMjwF/JHHX/4Rl93Tw988tYfjff8GlCaUs+9vXOTjtKb51QTNl+5bw8Bc3MO3pX3NdgY6sbur2rOSFtXvwz7icQe/8jV/+4lVOZKUSF7rhdCfTb+ZVfPqeG5g7Ko/YCNUtfjeP3/sKud+7nQXTCkm2vvUG6Wx/i5/MeYMrT/6I2crCIUhD+R5eeeEv1J//W74wuWfR1NdFku1bENk8slkQ4gX9XG5OphcBKiy9ebtxNopBG8wyLKGxzjGyt1ei/bPJkWpfCidGWa4/KPE4ksvHm6M2aote5L9n/j/WDSggJer9cZlDz+O2b/2Om0f3Hf4QHt357vN1seGZr/Nazg/4z0v6kxHfu98iscESjpj23r7gSIbTdh31xUXatI5EXY+j9zkKtFaw55Uf88Uf7aT/Ld/hz1+bS1JUzzFn2unm+JbnWHowwMgLP82lg4/z+i+XUtF/Egs/dxH9Jf48jnriCI39OK2jyJABsRhVBSYzJj7LdFX2ZIBl/px9IXtTvvgSK77wXv+q/yrgJwOeZOkXRuD3+YAgge4GPvnQQGLS2qnZv5rNr+2iI/cAJ0dnOVLgIxjooL2xktKyahq7oolLyyInK53kKB/QSPHxGtpq05gyLJWWdzKZet1/8Z3/vptp6aew12/nsQf/xJuvvku/fgvp19hAMDGRpLR4omil+lgD/owUkhJPuWyppOh4kJjOADEZueSmJBDpOzMf7Y3FFB2roYUgUantDvYDtFQUU1xeRyt+IqKSyMrNIyOhlfL9b7J91S7i+x2hZOgA8pOCtDVUUFpeQ1N3DPFp2eRkpZEUKc+9zW1e9mx7CdNNetPFysaW7YZk6tfZVtlXXf5sFqNMR7U+wuXIpKeL3dQniymcN0lOH26xqWzabLTiPmUaG27Rr4rR4+jfjSOAaNIL5vPdJX/l5n4ibiDQQWtDNZVVzXQQQXRCCmlZ6SQFmqlubKCuqYOI1g78SUlER0dCN0QEW2luDhCXlkFSLLTW1dDQGiQmI4uM5DhiIqCrsYby0grq2zvpJpbkzDzysxLorF3P1hXbKJu6k6Pj00npl0BkhPv8yfLZ2yJItbeKPlS+bM4rmT2VLZt82O7BqrhM9k11lBv5+HDUTUt1MYd3H2HAtCkMffs5XrhmOneMiAc6aalrpKkRkvunE0sHTdWNtLZHEJtUw5HN73JwbxxJQ0qoze0+Za6JyhOHaazrJDY1m9zsFOJi/NDZQE1FLQ2tnXQTTWJ2DhmJMUS2VnKwARJbq6ltSSB3eD6p0ZGnalKPI9HWh30dRaqKPNVg53exYBTBiAlQBaJLrikolV4w2E1b45v84opHGfny7yl44Te8uKeSqL99n4yM73NHdkizi/aa/Wxc/Dv+9tpODjdnkzHhMm6+4TqunJxJfEctVTUdtAT6k5cKhyU4umKHMGxEPKVdDbS2HmHpD5bSOXcOl31iCrns5/lvLiX+nmu5bB5APdVbXuLR5U0019cSOexqPnfrZQzPij/9K3c+nw/aK3nnqR/y+0f3UBnTTsGlF733475ggI7a46z8yc/457t7KY30AwOZccOX+eqN0Wx+5e+8vKWSJH5JdsZ/c/fwEt5+4Q88/voejrbmknPeFdxyw9VcNiGDWItDXTbBbSdhb4p4k6gWimyuqca4EVmedJd3kx1bfDaFly1Hsj7V+rfBoRLTJqyyZ7uRqdrC2Rx1ujZjbfOieoFgg8XjSK37seUo0EFTyW7WL3uZFRvLaIyIISl3POdfdRlz04/w/Esv8sKmWoY1d5MxYxxRtFJTBgPSGjm0t4KUCRcycUACFTs3sONoLdHTr+GWG2ZzXlYXe59/kn/+aznbGhtpao0jd8rdPPCtywis/jNL91ZydN+DkJrPz28dR1p8pDQOm1hVuRHbbHIS7r6tsqOqWXRiuz+LvkzrSFYj9abQU2HX6XxsOOpuoOzYOpa/ncpF37iBiLf+h5cXv8PVX7uE1Kga9q18lZXLI7j8j7cxhgq2Pr+MzUcymXRdC2vXrmb5Nj8HY4ZRkHk+0ExD6UYW/3EJm1eeIHLENXzpq9cxe0w0FVuW88pLG9hb3UJHdwr5MxdyzcIpDD/yOJ/6ZxOXtGxk68lpfP7RL3NxXgoxFjn6t+HoI7SO/MFgz79QIRaZzj4nkFBb6Fk8WJzOnLpOG2KbaFt1UIkHk9zv+89RiWlc+B+/5N7pBdz03Sf49qXZ73d213JkyzIef6GFhQ8u4dV//JbPFrSx9a9PsrMlSEfxcY511tA6bSwDAeikvuIYe7asZ/36975Wr3iFpZti8cUOISv5DCiCbGVdywV89j9/zMMPf50Ryx/nXxuKaegI9Iixbe/f+N5DTdzwzxWsXP4kn+1cxlsAwU7ayzfzdtF53P/8al5/7Wke/GI/1j/9GsdyBnPJpx/g03PHc+e3f8sXZgTZ+84y/rXCzzU/epFlj/2C21Nq2fzE8+xpCUr5NRX4qgu0jagWRsiOTTFii1XUc77xkOGWzXOTDxGzaYNS2RcxiRtCX3KkWs9OXVUMNmNNNkJjbOaNMw+mmHW+ZHOht7Z0G7A4RqUn7rU6jB5H7m19uDkCCNDZXsORbe+fJeu37GBfWTPdTUVseu0lnlo3jM/86GEe/vm3uWVAM9v+8CfeKumE4mpismZy1yN/4YFPz6Jf5R4OHzlJ5oxr+Oy951G+7jc89Ke1RM24mbs+O4a6pc+xfO1equr28O7uKGZ88dc8s3w1ix+9ka6t77ChooYhtz/Ip6YVcM23HuOnt046fTmSxauqGcKVcPkOiS3X4hibokxsc+vPzVrtjXgcBeiqq+DY5gMUX3AHN84tZOa0S0jdsIQlh5q1fvKmXsGiRTdy28138LUvfYFLRyYBh9ldHmDcXf/Ln578PANaDrP+wHHKTr7OQ7/eQ9TEz/C9Xz7Mwz+4g/yX/8jzq/dQ2RqETQdIuuv3PLH0ARY6LkchrP/eHH201pHyJ0ihwkxWBIoi6qrGysaEbMqC112sRBtnjpU2nyGB+jpK9x9lV8ZYrqrcx5ZK6ExqIy5xD7v2NZNVf4LO6lamXTYQOA40cmTjG2yo2PT+H3fIHsnMG+7kxrnjKUzYy9tajyOYcd4gUpKigbFMvKiUhw4V0XbRIHwx7/+ibOnGdRQt+jLXFPjw+fsx9dYvMemPB8EfQ9Ko6/nvR2qpLT3I0dJq2jqTGEUQhBR211ZTdLiYfWnDuaJ8L1vLIZDaSGTtIfYd6mLy+KgzinHVZ2fOwxXVbV/l2/ks6phwyRahDr8Mm83lx8a2rl83RnVh6g1HOgxijKo1LY7V9dticKsv23BV+GSfbbHa4FDN63D9eRz9O3AE0EVTzS7W/vJ/WBuqotIGMP76r/LA1CZK6krpvvgGhqYDZJA7IZf04u0cPFJHQlo+eclDGJAC1AIMY8L505lxyVQKqzsYnzuDjIsuZdbciYxIiGL/44cpqWmmNX42dz04jvqKaqoP7aa50c+QYKTkD/8EcR4oJs50l0yT2HCmk3Dmia0NWZw268gGk65+EW3J8KjmsQ67rN1GPhIcBdqoKt7C0lfeIfmSBezfdICGlmiiojay5MV3uGrIOMGeyWM/Rg2byrj8LPLjhzIj8wCdQO3BPRSPyGfBmExSYoHYkUy+tI03S4tpTOiAwZOZ0D+B2EiPIxW2j8o6inQqic6cBZqsGBMvOGJhabpsOftUCZONVT33DFiVJl+PhdHR0U516X5Kd+/jLz9Ze7o9afAUhncfpaSog4aGSQwfGOpJZ9IVX+SyU/8GSUzwe7bb6OjsorsL6O6gLdD93luEIEAqyUlRRET2PIDEfAHkpafhwwcE8aWmkQkQ6KatfC+LX19HzeFSqktLOL7nKCeZf8r+aWu0t7VSU7aPk9v38eefrDndkzL8AsYHW4CUHnl2xiI77G0mq0rf5tIjmy/inNBdplWT3u2YvvBpK6KfUPwye73lSMeB076oK+4DMiwyv73Nhy42m01YJ709CJx2nDlR2Q3nkPI4+jhzBBBNWt5F/Oejf+Wmgp52Wk5uJiY6ioykxNNtMTFxxCeknfFX7+SSQWpKEgkJQkyNJby76132bz9EdUk5FYd283ZRP878exDu/mG5G65s9qizVajJ+LKN081LBlvbNnu1br56HL0vXS11nNi+hg1VKWS881d+8g5AN231sQTfeYkXryxkPF10dXfR0QE+fxedHR10KC2mk5qcTEKCT3z3THpSIjHR0ac/JyVnENkejSgeR2qbH4V1FCkCljnQAZU9yw7pcA5N3cGjerYRp3pEZBTx+aOYcMUCfvP1BfRP8NFQcoLiilYS0gNs62qkc9jE9y4n1rZPUlpeQWNzCw3lB9nfUM8oOHUfOsz+wzVcMqmQtMR6asvjSB0bT4S/52SOy8ymfOW7nKgaRmEWVO7axi7gE12tlK/8Jf/9pyh+8dvPMSs9gtp3VvPMr9uE+5aPiKhoEgrGMvWahfzsvospiIO6ouOU1naRNiQFmYi5tMlzX3Gkugzo8LnFrVswJuxu3wbJxuhw29hzg1uHQ8yBadNSbbjhbFo6UdnvzcXPJOGM0WG2FdMF2+PozPEfH470+CKioiEQQfneozRePoDkiHZqSyqpKmkic3A04v/Zwlba977Ar3+3njFXX8P86xeRXLed4Oe3EncmUtc5sy2W+no+6nCo7NvOJZsCqy/GqHDa+rGVjy1HwS7qi/ezcuV+hv3XH/nrzcNPjWunfOcy/vDzR3j55XfI719HQ2Mt5RUttEWXcLzkJCXku8IenZxKw/FSqsob6BiURHRnPYd2lRNT4Ccqsuffxvc4OtPWR2kdRcoOAJUDZ5+b258JkHhBk13YTG8t9eLDH5FASnIku7etYfug0Zz64Q9RKVmMHjeFUX9fyaPPNzE5NYbyLTs4UhPLuPnjaaprIveiYSQHxV9he/8nQD3jTKRgkJ8dx9fx1tI2UnwHKGpqZ8Tp/nZqj21n68YOTsQeZH3ZHObfMYTE2J7/M6bcmTdy25/+zN8eiWHmpFTK9h+jlXyCQEt8FLkTkmkqKaH4ZC2HjuzmcCCP1lY/UVGJxEd3cHD7uxzJKmDc6HFsfnYFj79Qz4SkSEo2bONkRw7zvjKK3ET3/8BOml1NAaHTtxknzgMbP2KREk4hpsNtoyvrd5trcR30liPbDU/mqy82XJm43Vxln3UFqxv/bnHY9qlElmOPI73tfxeOYtJyGTd6MoeWbGfVqmhyYpso2t5MbOY8pg1L4d19rsI4La0REaSOSgaaqd67n+LarexprWRIWzeBQDzpmSlU7lvHxjFpzB2ZRkyk/f8MScW3GwlnrslwhHsOnU2RYXJ7hjjbwsH9ceUo0F5HyfZXebt0Fl+9dASc/nWaGHIGTmDu+SN4d/nrvBU3iqSoA2xcupi2zGp2ljfSmQUQRXxiEl2NJ9m9dy9jMhw1h1D7pY66gMuSV1O+aSNvdZ4gvrmEHeXTmLVwJOnBnVL8buTjylFfyblcRxH333//95yJcA6Q/RRIVdw6RbxdyvpEkR0kssNG9ROtptK9NPe7lIuGJuMDfD4IdDdScbiLgQtmMSQxjphAOes27iLQbxoTsgLUV0cxaO5Mxg0ZwKiB9ex9Yzkr1p+kMWkCl91+AxPTmmhuS2H0jAnkxPqATpqqmiExl8Lxg8mIliU+hUEDkmk4vJe1b5fA6IuYlFjA6KmD6ZcTRePRTKZN6WD33t3s2lVN/k3/waIJWSQJP50NJgxmzvhW1r24ijd2dTHwwgXM6E5k2LWTKOyfSXDTKt54ax9HSuIYfPHlTOpsJWv6dAoTogm0FLFx9wmiCy/k4mnDGJpbxc43VrByYzHtmVO5/LYbuGBozBmTQ3apkF1EZRw6eVb169p1NkWuVT6coopNZU/U0+no4rTtty3i+pIjmw0k3AJT5t+0kan6Vfacvs7WpVc33iYvNj8pCRePx5F5/EeHoyDdHY3UlPgYOHcaA+J72g5GxJPRL5/+2WVsWrOBncerCQ6axNxbL2NcfDM1Td3EZhUycWgW0d2t1NZ0Epc3gOEjc0nobqG6spuUwYUMLcwk3tdObVEzCYOHM+aCUWRVH2D7WxvZvKWOxMnzmRzpJ3/8OAqzc8iJb2Hju+9QmjiB6UMziInsefa62dvD0dNxpMqvbq/TzWWbeHRnj2qvtfHt1NXt5zbnkWk96/yHo/dh5Ki7vYWyo/upHHgJ11/Yn3gnRzHxxCXG4GtuIr5wJvMKu3j39V0URw9m1KhpTMzNZOD4QrIjg1Sc3MueKj/5gwaS0h4gviCf/kOziQu2UVfcQdLQgfQfPoYpk2KpO7KDTdt2sb8Yht5+K5dOLCCts4rDzRlMmzyEnIQY/A68Iaz/rhzp2mT+PwzryFdXVxcUO3QgZYWwOEYGWGVT1m4CLeKxnWxuDmyZ2Nh049cUmwmD7Rib8W78im3nYsHbYAiJmxh0/bJC0LTA3HBpsqPC1BuOdPbC4bE387+34jZ34drRfTZttDJfYp/HkcfRh42jvrLnhiOQv3g17Z8hnXD2396I6fw7G77Ohj2Po771dTbseRz1rS9b8csuKSEDYsJDxp1JU40V21VAnV/BYM8/OS6zoyLbOdY5XrSlsm0jTv8qHDY6znbbfMn6VM8yMRX7op5qnIhFdkGxWZCiHRNuHQbnszMmGQ9imwmXCpsOixtedHbOBkey+WrCapqPthzJcq/jwaTn3DPc4lbpmYpjcYwpZzZ7pMeRWTyO3HHk5pwTffdWVLnQ5c0mZ6r55XyWzQOn2MZpM16FXXXGeBx5HLkRj6MPniN/aJBpg1bdJnWbtOoAUumr+m0OFvFQE5PeV7dT00Q09YmYnG2yfOiKC1FP1xdODp1YVf5sLwXhxhDuJcs5p5251S1G04bQm/ljO9dV0tccyfRs5p8NR6ZiWLYZ63CLz6p9SrUvieL2ENPlT4bdplgWx3oc9RSPo95xZJsHnb5JwuXIpl9VBMpyqDv3bfdKpz2dng1HOt8eRx5HJnsm8Tg6dxz5VRcIUwGsOzhUdpzFneowlYnzcJEd1qoDV4XRaS+c26g4uVSXGCcu0+GoKsCdObP1q8IpwybDKtqQ4XfyoMJhitsGv2q8yJ+JA5l/UU/FgWmu9GY+mTDJPofLkeq7LnYTdlXxKcuJ6rtpQxdjFPOg2m9068W0HkXfqnhNm7XNmvU4OnO8U098VsWpivffkSNVfE5/NhdVFVY3Y0QcNhybCitZnnV7sOksUrXrYpVxpLLtcXSmfRNmjyP1WKcN0bfH0Zl+w+XIV1tbqx2hOlxUh5BTX3ZIqgCqxontIhYTNpkt2wNM9CubSOHYOhciYgvn4O5rDGdLP9zYZAtHVfj1Re4+CA5MGMQcmOIPd171BUfhyodhLbgRjyOPI1u/51JsMJ9tfB+Ez4+SeBx9+MXj6MMvoVyc/glS6CcVoS+nYkic7aKu89YZancWnbKxTpuyS5DsDaMMi7NfVeiGU0jLcIr9bkSFWSc2bxlkN35Z/G592+qoRHchlvkJN59uL6niePFZp6ezp2oz2QnXnhsdFQbVywjVGJsLpcmv6g2VDV6Vjd7k3UZ6sw7c2vI4Ck88jtyLzoZ49uh4to1DhdU2Bt0+7VbcYunNXuxxFJ54HOn92baL4nF0Zp+MI7/zg0iQrAB16qgKSVFHdC6zIfoL6cgOFdXh4ry0yQ4qXcHe14WobZHtxGTKi0rP9qJgi8mtjs6Xbnw4k111YbZpM8UiXqJNvtxcmmW2bPjoa46c69Fm0+4Ln6qxsjdYOpHNeedncbzKntt8hSs6/zIOnOM8jjyObMfKOFLtMaqzQ6ZrwieeuzrR7cu6wkXXLtYLpnG2Z7xqzrt5URZqV431OJKP8zjyOJK1f1AcRZoUQm3t7e2cOHFCGoAnnnjiiSeeeOKJJ5544snHQXpckMS3fM436a2trezZs0er4/Y5NF58Vr15lLWrdGQ3WJt21c23N2/6bMfLbsm6seH2nW1bbiScNw0mTLr5ZBrbW9HNU+dnm7lqsm3b1xvpjV1bvLYc9QWXOhsm7mz8eRx5HPW13d5wJNMH/U8Ge7MX2Z5hveHIVtz6tTl3euvT48hsw+PI4+jDwpFfHCAOlPWFwKmMO9tVP7YLjZddmsRARB3V5UjEF9IV7TntiJh7S6po12RTxKCKU6WvEnFhyThw2rO1pcJi26bCIfNno6saL+NTvDjZiGpOqtrEeSfmTjXPziVHJj3bOeYWr5gXXVwyjlRtplhU+4DOv6wQV+mq8NjuAx5HHke69nA4EvPnxKHiSMeTiiMZT077Z4MjVbsNl6bzVOVXtT+rfMrOBNG/x5HHkYjb46in/Q+aI7+zUxe0yrgIWHVAyNpE8nUByQ4bFeHOIlS8SMn6RHw2h75snC4GGV5dzlUx2h60sgkrm0i9KQhMC0c2mcO5LNr6Nok4F9yM0fmV6bi5hDnnTUjOJkcyG7a5scGla7fNewiHOKdt9yjRp2wOqvYVWQw2e4UJq0o8jjyO3Pi04ciZP5lv07mj8injzTnOdF6Zzm6xT5VHWbvbM8E0V1Wxij5l88sGi8eRWTyOeuIQP3scnV2OIp2NpoPM6TA5OZlhw4YZwXviiSeeeOKJJ5544oknnnxUJBLkNzDVjTPUlpiYyNixY3vouxXxbZvqx2m68bqbtuzHkqrPzlul7seZIlbVsw6r7Pave1Nq86ZThkvWrsIp05flwoTJdMkWc656duKUtZvyosq1ybdqvG2fLE7nZxOOkJxtjlTzzTR/TPNSh8m2zY2+yglHZBcAACAASURBVJ+bnw6YxC3ucOypdDyO7MTjyF1uVWecDJvYprJl0u0rvk37ns6n6tx2a1dm22nfaVeHxePI40i05XH04eHIHwzK/0yeyWHoe+grpO/8rrKhOkRkQevsqhJrUxyLsZhiFuOWYXO2y2JSYdD5ctvntG/Sk8WrwqvzI7Ori1+cMzq/oo5ujBOPOE9ktlR2RH5FEe3K8qyLR4dD99lk24RT1S/zKVvXNpuSindTmyqH4v5ks3fIRGbftAZ1uG192NrzOPI4MtnUYZPl3Hk+O/tMHIlnoqq4kGHV8SCzY8u57Fw3necyG05edBzJcmYTT6jd48jjyOPoo8+R3xmcmARdclTiBKaz4XwWgxP7nH5FPVWAJns6/KKfkF3nl8ymLOHO705RLQbVYSsbK8MuYpbZdeZbF0/os+67bnKKfSpspsWo+qxabDodVZ8sPps5JM4X1UagmvOyvrPFkTNH4rOI17SW+rIgdcYsihOHiNV2jxLt22LS7Reyeaaa07p5obLnceRx5JTecCTu/SqOxPzL9jAVR6pxMo6cGGRYZByZikZnrCJHNmeGjj/nd5mImHW+PI48jjyO5PJh5KjHn/mWOdK1qzZ+p3NZwnRJcAYms6E7pGQ4dYlRxaU6vE04TfGI7aKuLkabfKompyoPsvjEfJraZZNaNkd04ma8M59u5qiqT2ZLFZvqs45fnX1RVPNe9N1bjkyciWLCqxOTXx1+mT9xjA1HznYbGzosuo1ZxZGKU5ld1WfdWDd2TWM9jj4+HOlyII4RbYr2dRypfMnsmNpUHKn2WnFv1fXb7ME2fmVjVAWWyb7HkceRCafMjqnN46hvOIoUwTsVVGSJeqITWZBOezKbsqBV9nraqmD3P/7KkqMddJ9S80cMZNE9dzIuu4u2xu3869sHmfKbmxll8OOU2tJdbD1wiKjBi7iwv4+qExvZcryGtCGXMiXvzJhNB5wM+5mx7eWpL21m+A9vZGJiDBHCoW3i5z0eWyjfv56VTxcz4r7bmJJmvlC6Obh1RYZqMpsKAJsCQYfXZvGZ/NpeZExFka5PtBPqVy1kWztuOJL1hys2dnR7ixuR+bGZbyo+dDpOO+IY0Y4JizhOpe9x1BOzScdpRxwj2jFhEcep9D9qHJmKC5merKCRjVHt+yquVX5D7bZ7uIlT2XNvOVLVKzpstr49js4CR511nNj8Er/7x17SrvgM37xs8OmuurLdp+q6a7iwf+85OrLpH2wOzuTCUYXkJITLUTdtjRv5+388zDpnZ3QCaeddxi03X8P5Gc2U7dvKWy80Mvn/LWSwQ80dRyW88+gWmvsP47yLR5KuiLFPOAp00HjoFX7y09dpXfBFfnr9SKth9r5L2fDPVZyMHsrUyws48eRKKnMmMP2SieTHnWlLtGPDkd/Z4EysLslOfdnBpBKTTujyJF6ixIXuDGr3E1/lD8dymDztfGbOnMnMmefTP/pdvv6L5ZQTpKvtJJue30KZcJHQ42mn9uhGNr62nCO1PqCFir1r2bjqLU409MQqi80mzlBcPXNZzpZ/baSovYuAZJws72J/MBhFQvoARl8whtzYMznUYRP7VIvBpt1UqNhisBHVxm/yo1qIOj+6gsmNyGzZYOgNRyInNn5UhaPJv9gfik+M2zZW2RhZDKq1ocJl0rHlSBeTTQEkG+tx5HEk9rvhSIZNdk6F9JxnmumsUWFT4VDNDbHOsJ13JmyyWFSi48iZa9PZYBKPo55ytjjqaKjk8IbFrNuygwOPLmFTbUjPWdfp/Yj25RzVcnDFs2zYeZKGjt5wFKCrvYRtL9VReMUVXHHqa8GsiaTtfZqf/t9iDtBBQ8VRtr2+j2oBqzuOGji2cTcHDlbQIuRPlY9wOQp0tHLy7SdZffAwx37zBG9V9/U6auD45s1s336Cus4k+o0by7Ah2SRGinrhr6NI1Y1Tl2zZASSzIQtad6CqkqdO6E6W/eogcQ/+lLnz8oiJeG9845gMUg6lkAjvXTS626nb8wzfeGAx5amTufLOO/nERVl01lWw64W/8dgrGzlJApn9ZnHt7TcyPX0Xrz3xEI++Wkd+3c/onF1A7bI/88S6TgobCki65zYuLShlw+tP8fTS7RyLHM6MRbfyiQvHMaD6TR7eUE5g/yZOHExg8ufv4PJhVax99nEWry2mJnMKV97xKa4dk0NKVJCqvc/w94deZnN1CwNuupjG9jOvRsFggK6ipfzfX+CKhV1sfHEztUkjuOr264g/spRXX91JQ9ZYZt9+I7MyO2isOsK2VScZPTSTsiOr+ef2ZgYf2UVl+ngKL0hg/45KMo4cp2vyJ7jt5jwqV69gxdvHqSOFgefPZ97c8xhSt46/bCyifu92Kg9FMurO27hq9vDTbxzEuWDiXFWwu7lkiHPP9lCQjRftOF8M9BajyrfMrw1usc9NPlXr2ORH1DHZ1rXZ2HfTJxbEvZlHur5w57cOi2y/9Tg6UzyO+oYjHVbbfKhEhtFmX9IVczqsqhpFxlc48eiwh8uRTY49juzFzFEr1SUbWbOsirFX3kX2jif5++qrmHLdUGqPbOxR10VdPoGI5pO09LuUT13Qj6ZDb/DM63vxjZjHjXOHEdizlGVH/KTho3LdK6w8UEw9eYyfexN33DCVwNZf8viLa1nfVk1d+w/4zs3TGdC9gWcff5SXN9bQlH8BN97zGRYNTSZuz2PctT6VRcee5Kn9s/jGk59nSqT/FH6ACKJjRzL35puZeyquQHsVuzPL2fedVeyvns0IgI4qDq76I088/DYdAy/iutuuY/55adBykn1vr+CVVYeoIYn8SbOZd9lMRiZBU9kmVjz5NMvWHSVy+iiij/kYMe6Uk7ptvL74Hzz/xhHKkycy/9Y7uX5Sf7JifFS/vZh/PPYi6yvraWMQMz/3aT5z0XBSYpT/MsfBURdtLZtZ8qdtDLv5V4xd+V/84qVPcuFdo/B1NXBy91s8uwomj2lg65pDRAyawiXzz6N112useacI/8jzmXv1xUxIBZqPsfPNZ/jnkvUcDBQy8fKbuHneVIYlOr3Wc3zzFsrzJpM2KJ/unSt4/onnefN4BU30Y/Jlt3HXdRPIz4h2Ne/8qsUvuwQ5J2RIJ/Ql3h7F8c4bmzqpdvK+bT8RMVWsfP5NNhUVU1Lynv3kvPO45sIhxAcBOmjtWM3yXRFMvvlKRqTs5rcPvczezjpKtr7GP5+qY9SVd3LztbNIadvMI4+tpjS9gKHjpjJx+GAmnz+b6RNGMXz0BCaMHsW06eczPLuWjS88zkuvn6Dfhddz7bSBlD63guUrd1Fdf4JN/1rCxqYCJi+az6QBtaz8xa9YfSKR86+8mStHxrLuB0+z9mglrVVv8qfvLqFi6Hyu++RCBmx7gjc7mukQ4yVId/1+Vv3xAR5ZfoKBY4YSUfEP7vv0p/jD02XEjSyg/ciz/PiBZ9lHJ01VR9jxxnZK6xsp3fgGr688ROyc67h0SgYNa1fyxoZK0i9ZxMVjgux46lWWr4bhFy5k4YUjYc0KXn1qDUfKitm2+CU2VKcz7qoFTBmcSbyBMxW/4sVX3CBVh4BqTvWcA/oLtekNiOzCJOu3FdklS9YezuEgG6t64aDTla1F1VsV0YezT6ajOsB0YuqX4ZfhUdkUn3VzxzQXbfGacmYz5z2OPI50eHX9Mlwy/DIdU3/o2RajbXwyUe1vskLbliOx3cSRrOjXxaDjyePoLHPUUkfZ3p28lXQ5n/zE+Uyb1p/iZ19kQw3ECXXdpEExtOw5xI6VOymiiRM71rDsL39h2Rs7ONHUwOGNOzixYw1L//Uuh5uHc8mNd7LooiTeeXkZy3adIHLk+YwfmMPo6ZcyZ2IhqXGHePaBH7O2cSCXXncrCwd3s/Trj/JudROdFTt5+ZdPsH/E9dxy2wX08ztfmMhz2t3RTs2RIxRHJJEQD1BLRe16tlZlMu2aGcQ1buJv/3iLo61FbHrpVV5Y3EzhBQtZOHssCdvf5rVHlrGv5ABvPvkibx1OYNL11zIt6hjHirdTBMAxXv/D71mxJ8CEBTdx1bgUtv36edbsKqLxwGK+/+waagbP4Zpb7+TOy5PZ9LMlrK9spN2Go65OWrev5qmIq7n92mnMvX46tX9/gjVVPuhup+HYO7zy14d4ZXs9/QcnU7Tlt3ztS9/mhbfbSBgQwaE3/8kf/7yK41Syc8XTvPD8DtJmXMv1s0bStHwNyxZvoqxHxho5sWUbew+U0Vi1hecfWUdZ5CQW3nQnV82M4LUnX2Tl0XKaJHNPNqdCnyPFRaS6MIkT8n1y7f5Igcq+6s2CjW0o5IZffZ/jDy/ma3f+gdhgHPEJPiLGXsHnvvoFrswD8OGPSGXA0LlcNTGK4vwG9n3+JDX+OMaPvoBPfncWhZMLSfKXkhvRzFNPldGWks2AoWMZMaidQROmMm5kPYHdwxle2sC48RMY1P4mi/c3Uz/4Su6+4QoKAo3k1f0v64u2ciwJiM5myJSLmH/VRDKOPcWPj6Qz7pPXs2j+RBJaKojfdTdb9s1hQNeLLI4cz8+uvYqZQ2JpyDzIU3+oQ8x8ECDow980iMk3LGJOQSyFCVt47p87yf7qIhbN9HM8s5JD33qTA1Xz6PGbnhEJpA2YxIVXXsLw6g0c3JpE1tApzLnyYrKPvcKvjx6lfsRNzL9kMgm0EF/0Lk8fe4s9GfkQncWgiRcy76rp5OhfGvSYF06eZBcQ1RzQ2bPRUemZ5rQMp8yWrY1wRZYbm3Zb0V0wZW/53PqT9et41h3g4eY51C/zKcZl69u0R8pi0s1xXQweRx5HfcGRqGu7T8q+q/zrbOjisuFPxpFqnMyvbR1jg8k0B2Vzz6Qj0/M4OlPccdRJXcV+1i5fT/bFv2LKoIFUzJjPkE1/47HVV/Hb6/N61HWjRpRRW7iSg9s3sPvkWCKasshNjqeuYzv7TwwjoiGNnLwxzLp0ONlpWRQMTMfXksrxVa8SaGgmbtAEhudnUDp0JlNH9CP56J959PhArr39JhZNHUJEQwmR717Pmp3XM6UTiCtk8oIruTgrlgifM9cAHTTVPsf9l+8m41RsAZ+fYPYwLn3gbibFQSV+omNzGT72Eq4Z0kh+dwsvLC2jrPwIWw/s5ljhjXxp3kyS/G2k1e7hqc2rePONMo6Vt5A44xY+eeN4Io74OfTGGiIAjm7l5cOxZF5yLddcO4OUthpSDn+RXQfPY/LIJqo3F9F12UWkjb2EmXmTGTCknuy0+DP+stuZHAXpbD/Bq4++QOrCvzOjIIWOC+7kkiVf5KEXP8mcT2ZBVzSJ0SOZdt3VzE+sIbp+Oxu3BCm88mquHlVFTssTvLZhGycPJnF4byXH8y/n/htuoNDfwsD2h3ir7G0Oli6QT5q4/lz4qZuJysonvyCJYFMse5asoL2llU4HZtl3cZ5H6g45caBOQslxo6O7xensvd8XR//J1/ON+0ezv6iGQCBISXExJ5Y/yf+77Tg88SCzIyKJjhrPhNEZJEQ0k5SeQS6V4I8mJj2HuPJ3WfrLpzl+eC/bNp+kecCNnHFD6emdxrISig6uY8nutex49WGigOay/USen82k7DRISCU5KY6YCKg9eoCio2+y4X+28PJDcUQA9cc2kphZzEVppWSOn8/A9Hii/DFkTJ3N+KhlZ07AU//1R/Rn8KgBJHa3kJlRQFa8j4mz+5MZ20hbfj5ZgSO0tgmDo2KISUkjJfrU5+g4YqNTSIwO0tXaQnRKHDlDC0iI9gEJ5A/LIb6uk+bWLohPJjEpnjiLy5GKp5DoihKniBdjUyEl86m7XMvsmPzK4tGJ7cVFVQyqDk43RZZOZIe589n2UJLZdLNvqDhSFa46H7pixo3YxCrTk7XbPNvY9zg607dTPI7MZ6UMn8qH7IJnKzYXatMeLmKS7X82fk2Fd+i7iiMVb7Kzy+Tf4+gccNTZRPXBdSxespH9G/6Dq56LpaO5mqIT5WQEX2L93HtJdTqIymTwiMH4D25j48q3SGnuJm3WbOIS4ji+cQNxCUmkjZjCsKHt7FvzKqv+uptj+zex8t1krroToU4MUnlgN0Un1vCbr+/kn/HR+IHaQztIHV/MfSO7ITWXzHgfPh+ULP4adz68E19kNJP+4w985/wIYhKmcONX72FCdztNe1ex+IlnqBn3We5dMIQ0aqkkkeSk0YwakkpCTAepyalk0E13WxuRcRHkjhxIYjTgiyOnMIeUk03UVtYQm5lJ7uABpERFQ+EYhuUdoQGoPXGEoiNvsWzLRlY9kkAE0HByK/Fcy9XTZ/PZu2t4aeWv+d5nf01URCQj5n6FL00cTLaJo0AXHSfW8OSL+9mT+xUWrY6ju6OF0sPHaKl+glWXfpUcoomNH0D/oQUktXSRkTKIftlJjJmSS1ZMkNysdJK72qgtqaBo/zpefecNjrz9N6KAlsoj+MZdT+G8xvf+iIIoMVlkDq5nx8rFLN+yl6P7NvD6rmwKNHNStY4iZYrixBWLSJk4x6neZIg6OjFdlt7HEUfB8EkUDH/vU1trK41TU6i44wu8ffhBZg/34fPFExcnOGip4MDLf+T+J8tYeNOFDBpVSEraXvYdALTQgnR2ddKZN5p5583j9hnvpz0uaxBDGlfztEO7vb2N7pEXc+fs2UwblHK6PbH/GJLeeoqyonq6urvfs1xXS3UwIP0DDY7AT8Hz4/clEBtnuM85xsk+N7W2EWxpPd3c2txAW2sXkMLZEtNBItNR6ens2xZCNhdzmzddKmxuCjjbQ6q3RaZJbHkAOWax3caWm9h7w5HsoDVduFX4bX3bXO7disfRmb48juz0Q+26Il/kwjYmGReydlmubfOuwuYUt5fScDlyi1k2xuNI32bDUUtNBe+sepmGa3/EE7eOOdXbTtnuNTz/4nIeXzWXL/UoayLJHDyCwb4DrH/ldToXTmbE5VcSfO1tDv3rTXy3LKR/xE4e+d+XKYrKZcLU8zhvQn+aiw70vGiFPLW1Ehh/JfddcyFDs97/BwlJg4aRdLBnKZ825Xa+/e16fD4/qUNTgQiiogcyef585ga66Tx/NAMKY/n1g4/w2Pzp/NclUUAEfn8cMdFBxHQ2t7dT29R8OhdtrU20NDcQG51KQ0srCa2naryWFpra2mgFOjra6RpyATedN4eLR2actpWQP5LB+VlEX3cz/adOY1FNG8WlO1n5gx/y9NhxfG3hAFKi1RwFujpY//Sv2DH/xzz7+fNO9XbRWL6d537zOL96cT4/yHGMAyCCiIhYomN62uzq6qQjcwgX3DKfL8wZeLo9Jr0fgwvbeFPCA4de4Wd/XEpH7iBGTZ3K9In9qDt4EOc/WbJdR36ZgmmxyS46Yp+4qJ223BxU4vgebZt/x5ULfsLqA+0Egu/px8bFkRZfR3HqhUwc22NAj/EdLQ0cPbaVoqHjuOjyS7hgYirtgcMcVKI6HQHJBQMZGhFHR0UHscMmM3tiIV1rl7Hmta0UN/f8cUvGiHGMrKqjpCWBwkkzmDMmi6JH/8yqzVXEj57OgDdeZsVb+2lqK2LruuW829FO13uJeh/6GQjUcemR95TEvH70b4ui5a0DnKwPEmw4ycG1zUS09qd/nmM6OTgNCs8iz7J2Z7/4rLokqPRlfWK7iEHVZsLn/ArNW5lflS1xnZjWhmys6FuWB1msqj4Vbpucq0Rc+2IsqmdVPDJ9HWYnDlFHxZtuL1PZVmGXYbTNrWlueBx5HKnsyWLR6cn0ZXrOPJv2P5Oo+Bdt28Yl29+cNYtt/k3zVBWnDKvsAiDLt8fRWeSos4GqvSt49Y0Cbvnc7cyZM4fZs2czZ848rrnqShaOiWPTCy/xbk3P8ZEZhYwc7KNq59vs3BfBgMJC+qcXs726jhrfANLbD7K7s43kGbOYv2AaQ7JrOBaspRbOKMyyxk1m1IkSDnVlMHbaBcwZmcr+X/2clfvaae/2OR0TWzDxFMaLmFAQ29OQP4KolIGMm3UrN83z88TPf8fKip4qzrIpLiuH/hEpdK/ezZFaCDaVcuzdGjoq+zPh/An0r63ixKtvsK+kiGMH1/Nu0TEqgLShoxjR2EZVYzR546YxZ2weVf96gtXvnKB2yzN85Wevsr5pGBOmz2bRjIlk5x2nvLGD7oCOo246j73AXx5P4fYv332KgznMmXMxl126iNsXDGLnE0+8H484V4XPCbkFDElIw1fcBIUTmX3eMKK2vclbS9ZytCEKmdSc2MFOgmTPms2CBZPpn1bKoWADjYJ9m3XkNy1E8btzsbxHlPqtgq5Nd7g5faoKaJ/PR3DYlXzu2ihW/vA+PnfvZ7jnnnu45557+cL3mrj6Wz9hgfNtgc/XI/eRqWkUzppI3uafc8f8T3DvN5dyOG4EA1rLqKqOIyt3MLEtu/jND/4fj2/sIK/fUAKla/j5Tx7kxbKh3Pypy5mTvJQH75rD9Ivv5XfbUxk6fgKDU3v6jB54Ofd/cxbZ+37M3VfNYtql9/Oq/yJmjc0le+xN/OKLuWz4yWeZP+s/eexAP6YFooh6L8gz4paKi7ecosXIjPFcc9vFTE1bzU+/fA/33PdTViWfx9zbr2VCpuOid8rHwRe/w70/+gNrDtQo3+iENkLZJVt1KVbNBdnc0vmVYRDHqGyL+FRvF0RRxSWzJ3tLIebKhF2GRWxX5Uo2Rlxnujd0OhEPUdn61eVcxYEsN85+cU9S7TeqFy66fUcWg2m+2Mx/Vb8sXx5HHkcyn6o4dXuEGLuzT/Qr2tBxJCveVXudDItqnDO3Ml5EPDLbJn5VIo6VxSi263B4HKlz0xccdTbXc3DTGvb0n8/CsckOPBHE5I1k6sUzGVizjuV7uk/XdU9sqoPIDIaMGkK/88aQkjuUwRkZDB3dnxHzpjBg4BAGTjyPGXlVrPnZF7j+4i/w0FpIjvQRqG6mtS2T0ZNGsfupb/LNPy+nKPUqfvi9qUSs+gbXzZ/JtMu+xzu5N3LZ6CRiI3sAFzg6M7Zg0E902nCm3nIvV8Q9xy9+/zqVjvFOiUgdzrwbFrJg+CZ+9dXPcM+XHmRJ+yBm3nM7F4yfwS3Xz2Bg8RN8fuFn+PZfjxLVnkUBEN3vYu778hyGlP2eL11/EdPmf43nGicyZdxAskbNYW7BZl795tVcdsF0Lrz6Z5wY9X0+e2EuKTFlvPiNhcz5v+U0tnf35CjQzfE1z/JG7lXcODnVwZGfqOR8Rl1xHXO6l/Gb5zZKYxElIn0MV96yiEWFb/PQvRczfe5d/PiNIAUTZ+D4oVcPSZp8PrMyjrL4u/dwzdyv8MedyeREtNNa0UZ7h48df7+L6370L45WtRrXka+2tvYMemQHUl1dHWvWrDk9IQsKCpg3b16PMbKDS2ZXXBCqQ04nId32xioqy2pp6aGfRu7ALJJjgnR31lO6r5mUcQUkBgN0tddTcbSNlFHZRLVWU3SsiPrWCKLjU0hOSSCiqYPEQQUkdjdQVVZERXsc2fn9yIxspry0mJruJHLz8smMbaeuupSyygZaOmJITM0mLy+dROo5UdVOXEoaGcmxRADBznoqS4upqG2jozuO1OwCCnISiY704Wsu4+ixCuo7YkjNS8Vf0UnymHxSIvzvbzJAoK2Swwc6yJnQj6RggK7mSk4c7yZndB6JvgAdLXVUHG8iYUgBcR11VBW3kTggA19jNZVdSQzMTyGys5mamjoagsn0y0167yLW1UJDTRVVdW10EUlsagaZ6cnEd9VxsqqNqMRUslLf+7dTLVVHKWqJITszi9R4+e3dVmSX57Mh58qPrejwuMHal3GpbJ1rjtz6sy2idT5t2004znaePI7M7SYc/84cmfYdUF9cbXyeDcx97dfqpathTvYWm8eReQy45yjQ1U5jZRElHWkMGZhOdI+R3bQ31VJWVkNXXAqJndWn67qcpCi6Wmopr24gEJdBXmYiNFdR1RwgOjGd9PhOaspLKKuop60zhqScTGKa24lOSyMtPQl/YxFHSqoJJPVnUG4qscF6youLqajvoCsQT1pef/pnxxPZUsKOsiiGDs4kLsIv/DZPkO6uekr2NpM6roAkJ/KOFqpLjlDjz6Ug3U9jaRcpw7JJoJOWugbqa4OkFGYS191Gc20VlTUtdBJBTFI6GVlp7/0/gdrqqSotpay2i6jUFOK6/MSlp5CSmUhUZwPV5SWU17TQ3hVLcmY+/XKTiY3201x7goriWho6uukmnrTcfvTLSSDS30H12h9z/bMTeOmHl5Oc8H4tGAwGaKs4xIHGdEYOySCmB48ButobKT9+jKrueJIjkskenkNCoIPmmhqqGiLIGpxFPJ0019RQVx8kuV8uSf5WGmtKKSmvo7kjmvjkLPLyMkhJ6KK2qIo2fwKpObG0FlfRHpNMWmYUTeVFlFc10d4VS0p+FlF1zURnZ5ORGkd7xQGOd6QzOC+duKgI7Vw9fUFyLgDZ5SR0QQoZKygoYP78+cZLkUxkbw1Uvm3tyhawiE12iRNvjbp4TG1ux8jeBjmxixdKNxuhOEZVqNhs1OfyktGXxU9fXEZ6kwtbDk0+PowcgbsiIlyOnH7CWQfh4tLpqV7o2OI6V8W6iNFmjMfRx4cjna7Ob7ix28QTzl5nGm/yebZF9xJA1PM4+mDE48g83uTTKet/dBurzv8xX7kgn7jIvntRG5IPC0c9/uVYSNHn0/86lOwQskmwrFh3fjZdJFTYnLhNmGWJlT2Ltm1jUY2R4ZblQcQjy7dTT/ZdNsaNqPLrVlS+dTm3uRDLxshEtgGYxojYepML2byVxR5Ofs8lRzLfOp5k69mGI5UfG79uNledf9XeJOKQYTWJcw9S7Xk2mE3tIR8eR2diNcnHiSPdRcpmn9WJm7PSqS/6dbOP6Xya5ptOdHqm+sB2Tqv6PY48jmz8ifofNEdj7/4Rn5ueS0yEusZS2fgoceQXDzhn8a26pZkOKKdN9zqaOwAAIABJREFU2YEj6rk5uFSfndhlftyIm8NV50OVV5OoDnxZAaDKi6rI6O1CciM2h7kMr80CkRUPpmLEVs/m4uJms3didcarWrgfJEdi7OKassEV7ryX4VDZDzdu3cVY5ER2QTbZcdqzwRHO3udx5HFkEhtfJo5s91OnrmyfFTlycx6L54JqHw/nQizjSGdX58PmpYCsz+PI40im+2HnKCG7H2mxEfh9H2+O/CoHsjbZpcf53ZkY1SXK1oc4Rky683bo/CzasDmgZLqiHZOYYjZNABkO0Y7Th9hmc3lSYbPFIWLojeh41+mJ+uFuGDoJpyAKtdmsG1WbKH3Nkc1lUlx/oTUWTm57M9bGtu5zOPZU+5qtqA4Et4WtaZzHkceR7RgnBtvLmXhWhbsP9TVHbuyLuE2xq+oHN7G7vQB4HHkcubXjRjyOzDZMHPllA8MhRLxcOMG60VHpi4GYilGnPRVpujh0uFTjbG2Hk1fVZ5VdWR7EflVMsjcAOv86GyqxteMmV7ZvGWwvJeEUTW4KGZsc9SVHOv5tNj5b/zI9nR9Znw1Hbi/q4Vzs3YzpC949jjyObPDY7nW6fUn1sk3Erhpni9UGr4i1tyLidnPu27T3VjyOPI48jnovZ5sj6f8HSXXpUN0mbQ9NG1EVmKqDxHTpMCVK5cfUZ3NgyW61tgevTbsJnwmjzp94obIZZzMPbPIg2rMtgHTFiu28crMZiL5NoltXsn6d3XA5UumIa1zkyfQSRTbXZPh0b3pMmEUsthddG98qUcXnRmQ5cDOnZVg8js4c43H0fp/Orooj25c74ZzxbnCoxM0lMdRvc5G0OZNkhZgbfB5Han2PI3vxODq3HEXKGlVFommTDn1XHS7OPl2xGrKt+6xKsu6gEUVVoDp9qeIJtakOPpVP1XhbO048IkaVX9WEkRU+Kl86kfl2jtNx4pwPMn+mxeTEoMulqk0Wn2ze6XCq4lPNYdkakGE5mxzJbKk2DF1cqnknzlHTeNX81+VJ912m62yTzRcRm+yzTF+GX7XOZKKbmyp/Khsy3B5H/34cydpU+4Zq73X6UHEki0sXhwyH2K+KR/Sr8qean7oz1ga3SkdnwxSTx9GZscr6bXGrdHQ2PI7k/jyOfGdekHSHmU5X5kSmIwvAGaCYGNlnE0mqRJieVYe27iBV+dflQ3fYqfqcdmV4ZH1iLKI923hMBZFKz/RZxCp+V4nMv26eyvw79W1xi3lT6dnYdraLz+L4vuRI59tkxzZnpg1UlTvTJm7Kk/hdhkMXS2j9yfjV+VbpyJ5tcmEa73HkcaTCJTtvVJhk+ro82ObOxJHsTDJxKrbLYtTtx07fobG688g0t2RjnLhUuGX2PY48jmRjPI4+eI5O/5EGMUBn4mX9TocqZ6rxJuJUhbMqCJlPVb8smdLnxgNseOIb3Dp7NnPmzOG6//w+/9pX9V5f3WZe+cVVzBgSQ/SwWdzwu9fZXncKc+VqHv/2LMb0iyFm3OXc+8w2jrX0tF28/udM/vbT7ChuNB68utzp8hSawDLbIi+6iSIT3YGtwi3T1XEh4tfxKtsoTJh1MZuwm8br+JOtCRnHZ4sjGRZdv2qNycbKNjmRTxXvoXGm9WvCJtozYRTbZAePig+beWLSMcXgcXRmm8eRmSPns6yIkWFTxWE6Z3XPKo5E227niSxGnYjzR9avq0VUz7a4PY48jjyO5LG5wX2uOfKLG68YnMyhzUVGNl483MTgxEDFg8XZ7vQvHhohHVVxehrPe40EAt10d3fT1dVNIAhQxoZXXuS5F1K4+5k3eOONx7lvsI/NP/4Ha6tq2fjiU7xTWcgDy0spfulrpK58lj88torjgXJW/PVP7E5ZxN82VHH88es48evf8+iqnVQGgxAs4t2ff4bLrvs/tu4rJwRPnPzONlmOxHyK+jLeRF0Zj2KenJ91RYB4gIsxybhyii5GmY4ous3BOTd0i9Sm8DDlQYdNhdW0UPuaIzFO3VrSYZIVb7JYxTEyrm0wyfRkuTDlQTZHZPuWiE82x8RnXc5ssHkc9fSpavM4MnPkxKuLQZYfG65M+7HsvBHPfRVfqvzbYhPzINYNKj1ZbLIzVqbjjC/0LLPpcXRmfE48Hkc9+zyOPliOevyRBhlZzkE6sLJ2sU0EKkuSyZfzWTYxQmNNBydAoLWG/S/9lOsmJ5KUlES/kbP48u82UFxayrGWDqoXXcO8HB8+kknL6SYy5TgVmzby+sEYGobeysyhGWSNnM2dc7tIqd3F0Vdf55miUWSMu5LRBcnkTryKL110lIYjxyivgk2/fYjfHzufX3z584zrn6XNpW6SqCaCLIfiRJDlVXYgO/VEHdGecyHbFCdiYaATGW7dGFV8qsUt05PhF3GLPk1xqHDLcJ0tjmR6ITuyNeX0IYtR3HRErnTzVIZdtU5FkeVClQenX9M6cq4XE26bw07U1XHtceRx5CYOE0fOeNwWZzqudIWQyI3NOSU7m1QcOeMRsak4UuF0fjadDTJR5d+JwePI40i06cTmcfTh58ivIk1mUBa8DfEqXdmhoOuXJVGGTzys5L7qObrtUX72jSVc8j9HaGmpZv0/Pkfahgf5684CPnH3t3jkznFAgK7aI+zbWU1Jy1DyMoMEM1JJy8ogNRgEMsjMSaWtu4rqujqCeVlkpyaTGAzi8+WS1z+RmsYymppbmHrfz3nst5/h0otSiYntGbeIU5wkMl2V6A5pU4FgkpAN2eIx2VDxbZoz4lhTceZWdBuJrs05XsaRjFtVvsWFLvPdW45kc0r0LbNjEt1GKuZDpavKm7hJ6taCG45Eu068qgNAp+O069SVxSqbyx5HHkd9yZEMv6oIkWGwOcNVY0WMqn1NLHJE7kW7qphtdEy1g2yu2WBRiceRx5Gs3dnvcfTh5+j0/wdJBsRNQSY6VemEEqUrip2YdDrOflUMou9Qn6+hnqq9J9g2/2vcsCgfiGPg9Dv5/qNLeGBBzqmBATrbD7NqxSMsLmln2l03McpfTU115Rk+/H4/NVXlNDTU9cAT6usxaYU4bXPn1NNNLF1hEk6B4BxvyqupmHfjz3Ye2sw/m37VBmRjV+fLNIfFz2eTIxUuXUEo86Xyoxpn4lPly+bZhEflz+bwEfWdB4CsQJZxYsLiceRxJPPdG45UZ4YsHzJRFT82otsrVbHKsKr8q7gS+8X6QIfHpmi0nQM6f6YxHkdqPB5H8j6Po7PHkdX/B8lGVEmXFc8yck2HhC65oq6zyHROEuehGQSIiSGmXx45Ej8EumivOMiqv/yGvz9XzZwrvs5nZ2bg8/nxA4FAgEAwCAQIBAJkpWeQnpqKPxgkEAwSAHy+AN3dQQpyckiMj38/VkMOxZh0k04mqvyqigPTs9NmXyxupx1xEquw6fps8mKz8HS5cWtfJbqN5IPmSHZZC33X8eTWVzjzWCW6w0HcW8TPJvu6OaIbK87NcGJX6Xscmf17HLkrBpzYxMtiqM85VvVZfHaDxaaQtNmzxT7bXKsuxc4Yw8m3TjyOPI5kn8VnN1g8jsztbjjyi4NkDmxAO29s4pdYpIufRf+yC404XnrpUdx0pYeh34+/u4vAgf0cae0mGAzQ3dVKQ0MN1Y0ttFVs46U//y8/f6mdWff9ls9eMxyA1Mxssn1+aouLqegO0t1ZxsmTDdTVR5HTrz8ZTc2UVVRS1x2gu+MEh4+009oWid/vwK8gTdamuxCK+ZfpyfIr65c9q3yLl16bQ1uGSxeTzKbNGwdVm2o+qDCIcakWlNOGavH35uIlju8NR73xqxKx6NNtOqrPKpsmLCaOZJhM60CWT9meohObuSbOZY8jj6O+5shWZOe2aq+VcaQrfkx7re0Z4NTVnXUiRzL/urmrqiFkMdqcqX0lHkceR7JnXZvoV9T1ODJzFCmClRmSGZCJePlRESE7ZGz8myaOrGBXjklMJXf8KGb99lGe+cdobr0khbqydTy3eitlKbNZVP80Dy8NcuUD/8vCgkaOHWskIjaR1OwhTM1eTPGmZ1g5IZ1R3Vt5aksyWfMmUHhxJpcs+xdvrF3C2/2iya5dwWN7RnPx5YXkZDhiEvIWDAZpqyuisjuN/PQEInxn5kRHpBi3mGcxj6b8iD50FyDTJNYVLqoNQYWpN22qflPsqs9OjLo+nW2b3Nvq2XAkmx8qn2K7WMCpcNnw4YYfWz0dNpU91RjZWgoXp4oXjyOPIzEmkw03HMnypBIRi6wtdIbY2HHDkZsiyM2+qdsX3c5t1Tx1g10mHkceRzo7Hkd2cjY58osKoc+6JIq3Stl4FamhPrE9dHCobteysSZczjFnTqxE+o/+BF/82R2ceOEOFixYxD33P0f0wOv52pxk9u3fSXHVLv543wIWLHjv65Zv/JwXd6Uw+457WDSri2e/9Qlu/u4rxC28gbtvOJ8ChnPd/V9mTu5ufvXF67jtZ9uY+KW7uWnmSNKc/mPT6J+ZREzk6R/gseNvd3Ljr16ntrmzR96cXzryxcPXmSunjiyvIgeyXMpyK7aLfDp96myIuGTYZSLzp4pD1i6LzfZZnFdu8OpsqPKpi80NR3Bmgafy43x2zimb+aiyE04cNnGq9hWVvo4v095nmvMq/zY6HkceRzJxy5HuDDZxpTonbHIXGi/6lp0DtrhkPlT+bWzo8Is4ddzKbKj8eRx5HLmJMTTe4+iD5chXW1sb1N30Qop1dXWsWbPmdF9+fj7z5s3rkRAZWNGmKokiMKfo9HQXAZW+ypfu5u5slz2rxpsw6d4MqPDo8qsSU39fi86fLC+mnKvsmTgSxQ1/bp6d43VyrnnQYbDhyDmP3awPmT+dH6d9XZ/tfFAdJuFwJObCDX86v6a8eBypxeNI7keMQ5UXG+wyn6pz1LRHmrCINt1g0Y1V2Vb5N8Xntk2GRWbf6d/jSI7ZiUsXn9s2GRaZfad/jyM5ZicuXXxu22RYZPad/vuCI39ooOjUdGg4xakv6pkOLtG3LHCnT5muOEbUETHIYpNNRmebM8lizLqkizbEPjHvzi8xFl3ubA9oXf5Uohqjs6crpEL9svzrFrtsDuj0xXzqig5xnG5DkPmRxaiK26RztjkSc60Sp55q7tvgEPOjmvM6HGLenfPZJn+6vDv1VWNlfm3EmTsVDx5HPTHI9DyOwuNIzIsMk4ojWWyyWN2charxphyqsIhnpemc0dlyipui0aSnwivD6HGkt+UUjyO7dhssHkfyWHr8ip1z41Vt3qqEyA4onW3ZoaG7TDnbZH1O2yGRkSObBGKsuiSKdsXPqtzJ8iDG4/QpYjf5FPHqLi66wsFN4SKbpG792uqbFr9pUdkWN7o86zCIfW5jFT9/EByZ+sQ1J85p51rWjddxpcq3LLeyjdLZJq4JWZsMoyn/NjpiTG7mjjNGlT0dNpldjyO9fJw5cn6WnRGqgkNlz4Yjp57KlgyTyb8N57KxtvuxrE5w2rDhyM2ck332ODrTpmjD+d3jyONI9rkvOIoUA3I+qzZiVfJCfWLBb9KX9Yl2ZIl0flZNNqd/nU9Z/CJ+m2LemTNZm40dZ9yyWFTxyPCKdmR8qDgSxaknw2djQ7Sn86ObG+J4Wcxim8q/TN+ETzfOhFsXs0q3LzlyY9smj7r9QcaRDXZVv62uyp9sXdqOdYPVRnT7gMeRx1FfcaQqIFS4ZPhkn20wuYlTlz9TnaAbYxOfs193dtvgshGPo55jPI70WD2O5HK2OfI7O1QJUvXLClVnu3iIiM+yz87EmpIqFtKy77JJE7pIOL9kMTmxqApP2UGuI0kWv5hHGXGqw1jGgWpS6nTFHOmw6ya9aqHZ8Ckbo8qzM36ZfydvKttiDM42mW2nhLMB6uaFiPdscGTKu4wj2SanwieLT8yjqOtcgzodMQabOaTiX3Yo2XBkiltlQ8WXmBuPo/fF4+hMe245csbm3K9UHKn2NB1HKrxuOBJFlQcdXhuOxLyrOJKdrab549TxOPI48jj6eHAU6eyUJUM8pGT9usNLJc4k6A5C08Ei0zElWDYhxWTJEihOBlnBoMKni1n0qfMrm3Q2B7bTh2qcqk81kcQFZNLT8SnDLOZJxp8s/zpuZHlX5ccpsjmms6+bSyoMMr2+5Eg1V2R2TOtY3IRkOHT8ijrivNdxootbNg9s9iQZHhs9WZtuD1Lly+PI46gvOZKNM3EkPou5sinGZHHocMt0dByp7Mg4kvmSjdGdCbJ549SRzTHneBmPHkceRyrxOPpwcRTpVLTdoGVJc270MlEVjqZgVGNUdp1kmSaFaFNFlKpAUPlX+ZRNIjFvpkPYJDIeZDbd+FNxK/MjTj4bvp1tJt82C0K34HS+VXhUc1fFvY3YzNG+5uj/s3fe8VkV2f9/PyU9gfSQhBIgoSMdVJAmqKBib7uudV11dS3rrqLrWtd11d117W0XC/aKICBFBFF6b6EkQCAhvfc85f7+CIGbYWbufRBcv7995vXi9dw7c+aczzmfM2dmnsQok1Gtczu5p9Kjwmlem6q8F/2V+ajCoMNkp6nWoU4u0HiKOSaLQ5AjdQtyZJ8jVTzs7ENWHKrwyGIn02eeK9OvircqJnY4ks3R+WbGpuJFPFCqbAQ5CnKk02vWHeRIbeOn5kj63yDpnNYVbZkxmYzsXdwkxKYbF/XIkkB3EBV1WSWQSk5McBkWcfM0YxcxyjCosJl1qZJC1m+Fxfxsh3uZHrFPzC1xvgqnmGO6RJfFQhU7FYdWMqpiJpNXYZK9nyyOzJhVMZDloMovHQ7xWRVflV1Rh25dq+aLc6z0qHwS7VjFSbcexCZbK0GOghz9WI5EeXH/VMVWxYEYN3FPU8XPijNZDRVt6WqyKGuWV+WNzBddXALJP7M+sT/IUZAjmV9Bjn6+HLX7FTurJivqIjizYbMhEYgoJ9NtljPraB/0Bkq2bmJXpQ/jyLyO9B46iOQoA09zIdnfVpB6zgCSJLZUG05zXSmFFRW4YvvQpYNBY80hCqubCI/rQXrMsb8yJia41WFBZtPhKGPb/EISzuxHSogLp2YzVfPSQl1ZAfu215Iw8hTSIo7G79jY2bt8me2Y5cR5Im+yxSOzbSdGKq5EPaIN0b6qT9Z0hUHmhxhnGXazPlVBPFkc6Z5VfOj0yDCr1rBZr6qgyvzQ6RbHdLFU+aziSIZfLNA6P1U+yPTL1kiQoyBHOux2ODLXI5UuO31WPsv2dCubKp0yGZVOEaNd2+KYuDfq/FbtRzL5IEfHYvxJOPI1UVO4m3VbywjPGsLozDjpua5rxx/PUeWhrRQanemaFEd06PFyZOBtKWDT3LUcNE90hRKR2pMBA/qQHu6hvryIAztbSB2TSaxUjx2OainYUkhLh3hSuycSIcF4wjjCT3P5Hlas2Iu350gm90s8weuojoKt+6lxx5OWGUP1tn00RKWQ3r0TMSFqzIFwdOSPNIi3KtVGJl5qZPPbgqTaLGQHdpVNEXzb3DbZ4s0f8NEHn7Fw4cIj/z6b+Rovz82hzvDRVL2G/9z4DtsEfCIW8xh4KclZzuxPZvBtHjgcXgq2LeCLLz5iVQGC7NF33eVHdnESm2Fs4+3r/82amiZ8ChJluNvj8VBbksOGRevJbzw2lmacKs5VHIvzdYtJpkemS9dk8+1gNs+x4kiGTdQlKxQqHsSYiLHW+W/GdTI4ksnr9FjhlcVNVczMn2ZcsvjIiqeIQZZPOjnZPLEW6PSIm7OoV2ZTtumo5IIcBTkS338MR7K6rPPPquk4kmFS+Wwe13Fu7lPJ6+qlykc73OjyUhYPmc9Bjv57HPnri8le8Cz3/eFhnn31Gwoa2zjytTvX/XiOGtk69x+8s3Qnh+p+DEc+mmpW8spV03nugw/44PC/d999m5dfeZlXZ2dTQT2HdizjvYfnkPOjOMpn+Ruf8/XCHZSfZI78nkYKf3iB+/9wP48++SX760/0OjrEirfe5IP3V5DXUM3+1evYmn2IGu+JW0fH/IqduGFY3RrbFOrkxTGRADH5ZEGSzyli4aNPs+bir3jjykzC3U4Mw6Bg4wz+/PU+GhzdWm/Ifi9NJVuZ/002deFp9BkylIHdo/A11lG8Yz0bdxVQTQiRHTLoN3gAXSLz2f7dLJbP30/n2OX0J4y8pXNZ8X0D5fFnckrCYLI61JKfu4Utu4qocibSpe8pDMjoRFzDPlbl12GUFVBdHkrayMH0Tmwgb+smduTV0BiZTu8hQ+mXEk24E+pLtrLhh50UNHqIHeii2We0OQ1tcQN81TtZug569/KTn32IxtBE+g7pR0jFbnbvKaY5KoWMwQPIiAohKjGDAWPjSHZUUZC7l81FLcRVlFAf0Yn4biGUFTcQWVGJL20gg0+JoX5vDjkHqmginNiumWT2SCOuMY91+dU0lxZRX+Ekachg+pq+cZBxJ+aD7LIgzhGbLC90eajSKcMlXmjEnFfZkfXL/JGtAdnBSlZsZTpka0Y1V1Vg7MbG6lkspDI/dJuuWV70SzamKmQ6flScq+Zb1To7OSfilHFkXgs/BqfVc5CjY336X+VIV2Otxu3EWeVjILZ0OqwwqGq21bPdPhVuVR7K5FR9QY5OJkceakpz2LI6j8zxE+me/TkfbpnAPaMSaKzY1+5cNzg0FUdLFZ6OWQzr1pGWin1syymFpEwG9kjAKNnF7goHETioO7CL3LIamomhU/eBDB6QjlG4gO8WrGJLTBrLO6eSPLILsf6DbNu0kZ35jbR06MqA4cPpmxBOSMlGPs0Pp1/lFraUduOMK0eS3q7OhBIVO42HP36GCYd7vLWHWPXOn3nwqZmMP/+PdAXw1VOeu4avVh/AF5tB/8H9yUyLAE81JQdy2JVbTiNhdEjrTs+sLiSGGrTUFZCzeSu7D1Ti7OzkYKWH6Lb4NRWRk72J7XsrqQ9PJfOUIfRPiyXK7aDhwA42bcwmv74ZL3F0HTmM4RmJhLut66PDYdDSdIBVs1aSeuG1DFj2Lq+sOZ+nJiSDv5makv1szYX0lGYO7SvHGZdOz8w0PMU57DtQhSOpKz369iQ13AEtlRTt38rm7HzK/XGk9h7IKT07kxBm5j2GLkNOIS6mEzFuaCrMZfum7eyvqqeFDqRlDWZo/050iGz/S3NWOaz9FbtAioFsEzKPyxaLKKMaE4EfPeQeYN/OaKit5lBNLYnuDsTEQOehN/LmUAAPtfjweHayce0PlM79gb3lBh0H38jfnzgNx541fPb3D9jqbaHe5aGmtgO9zrye2y72U7BvFzn55TRs30x2QifK83LJzWvByN5O/qldCd+9gNlfzWNDiYt6RwJRa0u4+JJJjHd/z2uvr8HX0ESCO4szMmJpXjOP+T9sYn9VOHXuRJI21HHjr8cxsEMJi2a8xtyNNTSH1hORHUZuUxTjW509Gg/Dhyd/Po/dsZGptw0hZG8+OWVldFwznp7eCvLL8jlU3ULcuJu555ouVO38hncf2cG4V27G9d2/+dO3Di7uHEl4bDKe6H3MWwdnpnQkcYgLd1Mzu7/ZQoG39YeJfncOAyeOZ2yHdbz99neUVraQHtadkSkZ9MhIIELCtSxPjncTCUROzBfRvohNPJDIckx12Zf53CanO7zobFj5JMOjir3MZ1HODg7dlxyBvOv6Vf6Zx2SHSNWXKmZdMltWsRC/bRIPyLq5qgOBzE/Rlk5exGPVZ4VNpV/VH+TIWl7EY9VnhU2lX9Wv40iF305dsKqpOvt2cFs1XV7JarcqP3X+qGR1umQHQV2TYQ5ydJI58lRTuGclC3N6Mu2RafgWPswXnyzh8oGXEVNT1u5ct6dTOflrfyAv6SIybx9G1YbZvPivhTjPvIuHbxtLy8qvmLO7GV9ZCJ692RSE+Kitq6UqZAy/nX4lvat3sLeokv3569iUcz5nDwrhwOxXeH99DkU1kdSFJrNyYxO/vf0Mem1/n1v+7uEP/arYVX4Gva8YSdoR/O2cO9LhCA0hJjWNRH8tTU0AjdTVbmftqgiKZq8jry6eAWdfx7239qJh0w98O38deS1OcILfsZveY8YyYVQ8BUtn8+msHzjQ6CMs1aA8J4qRY8cBlexZ8j6ffbuK3RWh1LkTiV9Xxa+um8DwqAJmffwha9blU+3242/y0ryqlOkPXcyAhCjcVhz5PTTkLeLtlalc9PZVdImdw0MzvmTvyJvo4aohf/1nPPX3g4y9sAfeffkUNPtJ6jGY5OYy8ksOUmwkMuDcX3HtlFSaty3mq88+ZWWxgwbiCV9TyLnTzuLsU80WC/j+32+xN+tcrrjOoOjDWSxcuZ2iUD+11dVURZzF9McvZ0yfRMz3Kqt1ZPnfIOkKuG4xqg6hdjdDcQHIF3cPxt08mG8XvMOzZZ1IdaWQnOzA2akvp449jX4dALx4/PspdE/gzzOuIG/BC9z34PfseXw43T1NhPa7hOm3n0Nn916+nvkm7yxYT9Xd13DGub+goGk9GdffxtUDa9ji30pFVA2DrrmBCSkbeGvmKnYYY/nt366nl7eAz595nU0ro+kxFDhUS8J5N/GHq06nc90Cpj+5GffUX/PY5ROJLtnCq3c/y7LTe5IYPpuXF8C1f3+Giwe7yJt5HRc5wvHJYuX349+3ldK467nnrvPJnjedG+79J9MeeJmb7jqb/fNf4Nl/vc/mS+6jmzlEdc1Ehg9kyuN3Mqp+DW+9tJOoxNO45K830q/qO/796nfkhZ/FPfeNJ5kSlv3rnyyYX0/c+DgoqiNu9DXcccNEuoUfe5kV80B1ONJdikXeRf26g5JsjkpehjcQf0RZ2ZhOp8p2W5/sotOmx85c2TyVz7JYqfSomtVBWCVrlpfFUseNLkZWuafKLdkmbuWLyp4sN1V1zCovgxwFOdLJmuV1NcmqjqowWtUU1YFYV7vtNlWNN9vQ7Qs6jnS6RRvmmAbiiwxjkKOfgiM/jRUH2fHDVurG/5bzT+1OUe3ZrHh9Fh9tnsDDICD/AAAgAElEQVQfThvY7lx3adZ+FuVu5FDuenZU9cBb2ID3UD5NhdvYXZSJ74CTxNAYfOlpdB17IadPzMRZNpvpv17KroPFnH7xdUyb9zUdM+/j1otOJb15Fo+9uZ2udz7IP84ZDgfW8M+bnmLROafQzQ/sLqfzS6/xh+6RuDBzBOCjuXEL8/7zH3IP++htrmX/9n24p1xF33jw0UC9p5KkjIt5+I1pfDfjbT79fiO5lzvYvWgZK2rG8uDD55LuKmP1f15l9pxPCHGdQs6ybJr6X8Pjt4wmbMPzPLx+PZUAFZv4+NMN1Ay5ggf+fB6JVbt46/7nWbGpMxldNvDBkv0MuuQWfj11BL3cG3jrn3tp8vvx2+DI31LO9lnzyZ90BxcPi8Vw38Swef/m1ZXn8/QYJzTV03zoIGRey9VTvCyc+QTP/nsvV0x/lCuvqOW7Ge/x/fuLGD1iHAe//Z5VlYO44fE7GOwqZd6Lb7Jj2RJ69h8lyUzAU0mVqxsTfns5o07viv/Qh9x21UqySyoY2juBUEFct46OuSDpDpx2F5fVuOrbArHgW82HRMbd+TSPpr3HJ0t3cdCfz7Zt1VTXLeSbreU8cNs5dCWEsLARjBvRh+SwenxZfRnGTnDHkDzoTC5KzSN//WL2lueRs6OCDqSCtmYYNB3cz+6icnY2H2Tpp++wBiiqWc++gjQK0jpCcne6pifQMdxB/dqtbGqA5F3r+WLmPkKASudKDm4rZLh7K7WjL+LUrh2IcEXQ+/xrGX7vsmNIaYXjxB0ylnOumkCqtx5n3xH06RjL+BvPYGBCLbGjTmXgS99TUUn7C1JkLB26ZdKtAxj1QEwC8TEZpEdDY24JlZHQYWgPUqIdQArdh3fEsb6S4rIwSOpGenoS8RHgoP2Bo2H/Shat2klhVTPxAydzeoc8VmzeR0Wdh8Sh5zFlcBrRYS7tN0Ui50ciLBQ/2cX7eORkz2Z5Ve7rdKuaGZvVmlHlvd3Dk3lDCuTApcIg6tXZVI2JOlX+yzZRXc6oaoNKj8wvqwOxrsn0qTDI/BHnBzkKcnQyONI1HUdWOlV1MND6qGtWtS7QOW3z7NRQ2TkkUL3W5xbrFuRIPa7kyNdI2f41fPnlDzSMGsyH/9lBfdEeiirWkfPZEi4bNNWMBiI60bNfAt8V7GXj6mximpPIOO1UqjtUkbN1MxGhScR2P41JZ8RRlbufnd/Op6JkKy1lja0/hWjnpoP6LetY54vAvWU5HxRuxAU0Rv7AD+vLuCbND90H0z/ZhdMBNVtn8/73h3C43HQefQnjU/z4PMXsWr+eOr+X5uI9bN2cjXPKk7x477n0pJLdxBAfO4xR/buT3KGEnl2703eFj+aqCsodTUSe1pv0GIBEugxOJLJqD3u27qEqLpGuQ/uTERUNQyYxNLOZOqBhTzZba1rw5W7nq/dLCQOKfas5sPt8pvQdyrRee9i0+l1eyVtDVnI46RPGkRETgdvhUB6RDcPAgY/m0rXMfHc5zhFj+OT1PFrqSqllK0vens1NQy4EYohLHsfY806jS0MefTNGcErPMMZcMoKBHQ9R378XB3IqKdtdwN4Dh9he5mblrJlsAUrLN7K33k9e/mA5iA4DOOumThzavY9ti7ZQUZINVc2EtCaMFLtqHbllm4OuCMsOcLp31YZk9Sw77Mn1JzL2sjs549LWsbLSUg4tfIG7Hrqf2eecw+3pTlzOFBISBBAtdRRtWcKMuVuICXXRWFVGXnYJ9dH9JYFq/97QUEd9cyX1lYXs39HQ2hkxgJ49+5IS2e7vkFBTXUELtVTn72dPQ1FrZ+dzGdQ1nqgSP+GhIUfjGhJCmMmWqtC09rpwuVJIiDewcWY41onDze1y4XC7jthyuUNwuUSDxpFa0CbnrS1mX+5O9hY3kpY8ilO8BeTu2UlhZTOdO4/H65f7IB6KVBcC1eFIzAvVs6ypvpHTfRGgOujIvqVrezd/qjCI8qq1ZOdAKMqpsJn7RL9k4zJeRNwqe6rDhdVBVzWmiovqYK7CbufQocKo8u94/LHyNchRkCOd/UAvjLKaJ9oUdevsqDiyM1c2326dE/Gr/NPZk2EUD9ziuy7PjgePCp/MxyBH9jhqqS1n5+qFbI8+jdHhh9ix4xDgJaFTLxq3zObjTSOY1g5fOKk9+xH/XQHZc74maUA6nSZPJTl7H6Xzl9PxtBGkxdfxwxffsGNvGS7DR2NhLgXlfvoc6y1VFWV4XfVU7stlV+nhP6OWeRXDO4cR0j4wtFTsZ8eOHJzuEHx9WyAlhMgOk7n7lWeY4GuhYf9K5r/7PLN35FNTWgtxAKGEhCQS2/HYM5/b5STU7T4SY6fLjcsdCgaEuFyEuA6f8Vwu3E4nLqC2poomfw1NRQfI9Ze1KkqeQP+MVDomD+KyO92kfzuL5Tv2snl9IUs/20BNxye4clgSUW41R36Ph71L3mFZ1FlMjitmx45iwE9Uz3F03voxr68YxXXtIgcQRlhoPB07tPetqbGe2sYKGmvDyNvR0trpzKBb1lDSo33slyVS2Xa+WrqMvENV4PPSWJBLYbUb7+HYE8A6css2Id3GpJMV56kuR3b1W+o7uJxX5jRz5qXjyUwOwemAxKQkYs86jf4zFhEV1c4w5qujr76Uncve48PtvXjuyatJdZaw/v15fLv2GBTH4AqPjScpZQAjBk3hnhvG0S2sgd3LlnMgNI348LJ2NqNS0khJ8DHikl9w3dn9ifeWsfbLBVR1SyE5KhPfVyvZvnsA6SNiKdm0mg0eD2eb/JUWrvZB0f/Ay4RFlAvrEEtonYeirQeoGtOZOCo5uK0cT20icR1Nv6l52IaZuw4DL+TuUy4yqR/CA+MDyyXZgUnskxVCMaHFZ9mY1XwZXtWYDoNo3yqHZYcoMRaB+qrzz8pnO+8yP2WyOu6PZ8zOHLvx1s1V6VL5alXTAh0LchTk6ERwFKicrGZZHbLt1B47tgM5c8jkrear8Ng5/9jJ9UDxWOlTtSBHCt3+Zir3refrReWceu/bvHBhxuGRFip2LOLVp59nwRdLOGVMex0RqT3pn7CMNfO+obHLNZx+7nD8ezbw0foceo45i7SmdfxzwTIiRk7jVxcMIbRoBYXbN7b+lk/7gxjRaV1IiYtn0rXXc8XpPYluKuT7j76isVsy7nyn2TBJ4+7khXFtPnupMx8bnSFE9jyVSde3kH/nX3nylT50fmzyUXOO9me+kOgYwjwuKjflUj45g0RXDYU7S6ktddF3fDp7l6/iwIatlAwKx120k+0lhUQAkUmdSEkcSJcJl3HTBUNIMSrZOG8xZd06EVW1ha93+MmaeC+PXBNFw6Hl/OOKX7B6531ceEoyUW4FR4Yfb9lGPpixjb53z+GFX/U6LOGjoXgTHz98J0/NnM1pU47+npTuPBvaIZak1P4M6Xwmd9x+FlmRzexduZLcpjiSOkRKL0gNuxfxwfx19D33ci6e1AfnwW/JXbMN12H9YH8dBfT/QWoXCJNCmYzs2wwRhPgNQxtw262ljpy1q2hqOkRisosjHJWVEzPlfqZkAaVHxc2qjdBQwjOSSd66j6WfzSE2zE9JZQ11nhrq6kJI6ZBISMshli6YRZ+OY0mOTcKoXs/ihQvoOaUXZw/fz5xVc3jthZXEepyU7akgfeKFZPZtDzGm9yR+NeQjlqx8i+d3JBJR56VgeylDbhvPiEEX8tseL7L49efYsqQLUdGVhHkPX2QMA2kkJP12QyaKhaf2Z+LwIr5fs4pPZu4lkkZKSjrTb8Ro+qfuYbbUvLwQm8dUlwZZXljNkdkR9YkFX/zmzUqX6rnNhrlfvJiY7Vr1i3rs4lRtbnbm6OzKfNP5b2ejUvGh28R1usR+FT6dvNm2nQOD7EItG5PFyDxPFT87ORbkKMjRj+Xox+LTYZDhkfFifrbCboXTak+xGreqn7pcEjHo9AUiE+ToxHDkb6wib8MC1jRN5MnxGSbcIcR3PYVxYwex7OOFfJ06iqQj57rJjOrWicz+iYR3dFLTkESXhHiMLBdGv65ExGeRktZEWg8nuXtXs+C9AqJjqyhsqiS5vpmWlmhSO3eicN0XfNE5lRuGTeXmwR+xfMGrHFqZSGhNMwc2lzB64OWSM5uZD5mPoXRIGcUFt1zM8mde47X5Xbi6k3n+0eewpJ6MHjGcxm/W89nMQqJcTZQfiKbHsPGccXpnelXk8dXij3iucA2JybUUVfjoDcRknsFlQ4tYtPF9Xtq3kKhGP4U7yuh3zRAGd2xg++r5rPvmaxISwnDWNVA18HzG9u5AhLuazZ+9w5LIM7l1Um/C3KbLn+GjdM07fF5yFs+d28vEkZOI2J6MveBc3pv+AW9En04HerROaR+Ydu/hKX0YN2Ig5YsX8saLG0jwu6nMrSRh2Jl0HRl3TH4A+BOS6drD4FD298wvyiE6voKSlgqqaj14vQYFa9/hq+qBXDJmAInRodK8a8sr1/Tp0x+RWhFaU1MTeXl5R95jYmLo2bPnEZLbiBWfzX1tTSUvNpWOI33xWYwYGE1DcSFVLS14PB48Hg/+sGFc/MtJZEUCBjicCWSOySTeAeDAHZZE1hm96ZKYSExlGeUVENYxiyGjz2BEejxd+vUmrUMkIW6o94WT3r0fvdPicDh9NDk70CVrCCOGdCW1QzNlRWVUNMXQY8y5TD1nON0TXPgikumTlUGX+Ejc4Ulk9U8hxldBYXENtb5EBl94Neef0Y3YuDQG9o2hpqSc4voO9Dx1ImO7ZNB3XG8SQ91H/kexh2nDCEtnyNisI364ojtzyuk9iXMAhpOQiBQyR/YhOcxFeHQneg7LIjEqgri0ngzqmUgoBkZIDMldejKgWxwh7hhSM5KI69BIaUkVDUTRZfRYxpwxgPRwP76IRDKzMshIisYlFDgxmXRcisVadnBR5YPMTlsTC7kur2SfgeStSqfKH1XeW+mxWgdivM06xE1IFTuVbyouVXrFpuNDhkcWW5nfqlioxsQ+EbPuWdy4dXmjwis7oKjWS5CjIEdiO1Ec6d5VNURlV8eRVZ7YmW83jiJ2cb4q9jodOj9lMnZjL/qr81UVqyBH9jgyvB4a6hsJGzies4Z0Itxkh9AIouPiSYyJIrH7YAZ3jT58rutFt/gowiOiiOnam/5DhzOkWyIdo6JIyuxPv9696N41hQS3gae8htq6SFJPOYPTMrvRu18mXVI7kRIfRV1tLY7ETPr3HsDIUamE1xWRX1xHvdGJUVfdyAWjkohwG3g79uSMIV2IcTkFP9se4skak0lcm5/uMMKTupIR30BzaA8G9k6lY0wy3Yd0paPDwDBCiIrvRMbgXnTvnExyoofSogrqjQhSh53GmEnD6NaxI2mdE4kOaaKoDGJ6DGVUv1MYMqQH6d170q9vJ+Jc1RQVVVHtSaD/1Ms5f3wWSendyUpuwFdcRGldI43OFIZPuZ5pIzsRFdZE/rcv89DyFK47sxfhoa6jvBjQUF6Cp99ZXHhaOpFm3twhhMankB5t4EzqxxnDB9FvaFc6AoYjlJiUrvQZ1JkOh32LTupCj8ED6JOZRpdEH5WFJZQ1RNF5xGSmnHc6vTu5MfzhJPbIpHuPJKKcEST3yqLX0D50dbfQVFpHXX00XYZPZHS3NLIG9qZLUgwN+1eyqS6ZgRmdiA5za9eRo6qqytbPHyorK1m2bNmRBE9PT2fSpElHE1TzDYpZRvw0z9G9q/qOR97cr5MRfZDNFcdVTSxIZt0qPTJbVjrM71bfDqn4EOUCwWm36eIhkwvkGzqVfzI7urwLNEetOFZ986fCJZt7MjiyWieq2Ol0yDix8y2kKo+t8tlunRFtiD4FslZ0dnW+6GIW5IhjbIg+BTmyz5Eqvqp4qMYC5Ujlu9XeacWR2Y6d/V3EasdflT+6WOhs6J7t+hLkKMjRz4mjfR//kecar+aJKwcQGeo8Zs7/Lxy5zeBlARSdM8tZBV8GXjZfFlRVkHUbmgxDILjE97Znqw3ZrFO2GcuaTLeIwwqrLAZm+UBsy/DL4mVHTuV3IP2qd6uiapZRxUFXoFScqnRZrRlRl9U8EceJ5EhnU7dOrNaX3RpghdfcVPlsGPK/fijTpfNbt17s6GzTYSVjNWaVXzIdsv4gR0GOdGMy7qx8ssNRmy47etqeZbzawazTqcJxPPxb9en67dgLchTkyArXz56jxJFcPaA3YSFH/9MWO1js9v9cOHK3vchuXXac0L2LemW3SHO/Tp/D0f5HtCodZrx2bqeqRLNzuVHZkPmg2gADxS/qlGGVXeZki0vnq4ornR7VfLFflm8yed2lR2y6hSPLIzt5qcMu40i3YFUXWdklxs5lXIc7UI5k+KzyVYbLzlrQ8Sm7CKrmqHDo1oI5JjKuRB2ymIhz7Pgiw6f6lMVMhk8VBxmeIEf/exypfLWqGbpaqNorRf0qvq1qvO7dDm4dR6JNc1P5JfPFTt3X4RYxBDmStyBHP2+OMiZeRjfDAI7+1bn/Hzlyig6YJ4pEyIix66jYp9Ml9pk3YqvNw6xftcGKGFSEBeKT+KxKPPOYrAi0ybc9y5JM1KPCLtpSLTDVopP5J3KgiqlMh1Uz+yfGyCoPVLkhi5GYG7LcN9vU+aCaq7JvZ2M4WRyp1o6uGAZSdMX8leFTFTSxiMrWi+xdps+sV+ePKKfiSJYD5piKuSnqFdeubBMKciT3R5QLchQYRzJ8Oo5EG3b8EWOv4lvcz3R7tGwvk+mUjZv3CNV+K9NjVefNuERfdDiDHAU5CnIkx/Vz5+jIT5BkDqr6xXcdQVY6xCbOMzsqNpVTIoGqzU6mS0wIKx/s+me2r9vgdDpkOmXvKnyy5G+zG2gO6BaJjD/ZAUeW4KJd3QFKxquIQbY4Al3UusOZlT6ZrNW6MWM9WRzZ6VOtGdWnap7Mdzv4rXCIz6JN2bNVbZFtEnY2Nx2u462vdvqCHAU5soq5XYyB9AVSR3W5IdP1Y55177p4mzH+mHxS7RVBjoIcBTmy1m3WEYhNnW6VvJ0+09/na23irdOqiQdgs462fnFM9inals0Tx2VzzM6pbopWfpqDJducZJjEf6rEEPXI5oi+yrCrYiRiE30y2xKTQqXfilsdFzIexFjo4ir6ZW5m/CIGsQCJeESduli2xUrGsyxuol4Rr8y26PfJ4MjOWlPFWrdeVGO69ajLVV3+W+W4bK7ZnmqT0vVZ1R2djAyDzt8gR0GOZP1m3+1wJMMRqA8yP2QcWeWJzL65yWq/zAcdTpV/orwdjmS4VP5Z+R1oDgY5CnJkNT/I0U/HkVvs0N1sZaTKbopWN08zEKubtMyObL4Mi+4mad6orW7iMr9V+mUYVbZVmMWxtmeVf6oElcVMjLcVb7p4Wr2r4qaTt7qUWvVb5Z4Oj1UT4636lsQcc903KbpcNus5kRzJfAlE/49ZGyo7dvg+HhtW/ToereKpw2Jnro53sT/IUZAjKz/s+KeqRVa47eLR6bZbc3U+yHyxi83uXiE7JP2YGASag0GO1LZUOoMcHduCHJ0Yjtw6ARl41U3Y6jBolhGDoLuJijZVB33dYdwsa+5rmye71Ij6RBuyQ7AOryxmMlndpml1mTP7IuPKTvysYmclq4qbzgeZLVkcVD7LMMrm2ZGzE2OxX4y5qmCofLLqP9Ec6XySYRV9lNmyE2vV+jHP0XFnteas4qCrTzLOVbZV86zmyNaHqua1jQU5OhZvWwtypObIDmarvUulTxdrseliYge71buVfZ1/Oo5kOO1ypPNd9S7TFeQoyJEOZ5Cjk8+RW7UZqZq42ejeRXkxkOKnuYlBkDWZLnG+LqBigrQLalMhe9Z+w7xvcqgAonsM4IxJZzMqLQajLpeNSz/lk/mb2O/MZPh5l3PJmAFkRDkwqrfy3dyPmLUsl6KoAYy/7JdcNKQbyeFg5MzjzdfnkEcMRGQw8bIrGNkngXCXekOX4TO/qzZq1ZjYVItNJqeao4q3auHImt1c0h1IVPpUGGT5Y7dQ6OIu802lyzyuyuUTxZFM1kqPqlnpNeMU/bOybxeXKq+s8k0s1G19Ii6remYXnw6PHX1BjoIcBcrR8XIWyDxZ7O1yFAj2QPYRK+x24tRmz+psZAd3IO9WmI5nXpCjIEfm9yBHgXHkNBdeO0bFpjr8tQXGfFOU3XTFcXNA2zCIt03Vu2hP1awDV0XO6m+Z99FuIoaMZ/z4AXQs3MGyd75hZ209uSvnsHTNTuKGns1ZgyLZ9MUXfLx4G6VGNVvnv8fynBp6nD6VM3s1M/+Vj5i7+QA1FWt48x9fsDO8P4PGTWL8wGbm/PVDfiiooFkSNzGW5liIsdd9myCLhexiKLOp4kYnI8Mt6pDhETHIElmFVYyFnXjIPlUxUM03j+lyWpbHsnkyf3R+B8qRKm4yHaom41pcqyo/ZO86mUB1yXyQ+S/G3lxvRL/EjUq0F6h/Os6CHAU5OpEciXasONP5oOJI1CHDL3KkqpVWvuj8UXGk407HkTnXrDiysm3lV5CjIEeijiBHPw+OAv4JktmIjFjxWXbQ1R1+zTpEeVny6PDLcJh1ODwNFG5dxH/eeot1ByEqMZNxF9/KZac1s2Pffralj+GJKRNIDisj+tB2vly5jtzt6RSuKyI/YSq/vfICuvr3EXrwGTZuX8f+zkXMXefBPfxCLrlgLPHN22jY8Ag7tw5nZ/EqPm3szA3nXcjUYZ0Ja0lm88w7+W7TZAanxBEe3v6GL36asYt9ZjnVRaOd3xJ51a3cHGNRzipvVHPM+mRyKnmZXR1uK/90OSfTpfLZ7jcYqgu/SudPxVFb0+WVKC/q1eGzaqp5Vv125qkOzXZ8UBV9nW6dz8cboyBHah+CHOnldPG2y5VKt65mi3KB6A0Uiy4+dsZUHInzA62xdnMvyFGQoyBHP0+O3HYKtAqIjDDZJcYcDPFgKB6SRSwyZ8Q5uk1SdRg3jHqKc+bxziPv0HD6Zdx0TjQV+zexafazfNLhD5x35uV0daSQFGpAfRVlRTWUNycT4a+k1NWR8PR+dI0KJcTozoCsSNbvyad4r5eCyC6MSOtBcoQbd0Rfhvfxs7Usn6KmQ1TF9Sc5NpIwpwHhCSTFlvD97gKaxvfACHNZJoLZD6tLqlWfmKDmw7j4Lh7AVbHVcSQ+y/DI8Mr8Mye5Hd0qPKI9EYPuMCbDq+JKp0N1WfopOJLhVvmkKnBiU61v0TfVuwqnjGsrTLK6Y8WnzK5MfyBYzU2VU0GOghzp5gbKkR3cqvqiwqXa38V33eFHZU/WVH7rsNrhSLXfyDCa7YnyslzX4VLFS4c7yFGQoyBH/z2O3DJFonO6QJmV6UDKwMiCpJMXm2yOuV8298h7QzWFW9azIPwMnrnhcoalhNBYNZJReUU40lJJTQwlzeHAMErZuv4z5u6pJH3i9fQK28mipnrCQkMJBQxCCA0LwW+0UFpWTL0vjFC3+3BgwwiPcONpaKZjZj96zd3A+hWn0D9tJP68xby/rZqyzk34/X7AdQxGO5tkm5zs8KDaeHWx1b1bbeS6JtqS5Zcu5wLJR9GeeZ6t3KB9TtuJk5UvMn6sMP9UHKlioiqabb6IOWhV3MxzVDXATtEX5+qKtEzOzlrRrR0Rn64oy5qIR2VPNSfIkfxdh+9/jSMRh66OyObqOFVxZGdfV/UHcsCza0+GT+WfLMZ2OVLxI/YHOTpWb5CjIEc/Z46kf+bb7JAsQGK/KC/bXGTOqjYf1QYibn46HDo8hmGA10OLx0/TwJEMSAnHMAwiYjvTK7bzUT0NZWxfNpMZX6whYdCvuXZKb6Jzt+BpaSFMsJ0QF0t4iAev13OM3ZTEBGL7jeHmq0t4+80/c+V//KQMvYBuPUJoipT7LEsWna+ymIsxkPFoh2/VYUWlX/WswmTlux0/dHJmO4HOsZLT6TP3iYs3kHifKI7sNKsY2fFbXIM6nVb67Ni2i8vcjocDHT6dvJ04BNKCHAX2HuRIb/NENTux0+WMHf+s/A0Un04m0JgGmn+B2DxRLchRkCMr2ePBp5P5v8yR9M98H8+hSrWZyQ6Gqptb25jqJimbI/bJdIu6ABwAHg/eimpqDIMkQcZoOMCaz1/n+U/30eOSu/nNOUNJ6xiCLyaWjriorGydF0MNVRV1NDeGkNQjnqgtB6isq6fBMIh0VFBW3IiRFIo7Ipmh035DQt+plDd4CEuIZuPTS0ge1JXIcLfyQiSLnTkWdvrsxEsVO/O7yIEVn7obutkvs7zKD9WFTMWz6PvxXMwD+SZGhk0XE/Oz6lsXqzkyvVYcqfJFhl33rvuCwu7lXhYnXb8Mk9W6UcXGKgdkz3Zx6vpFfCpbQY6CHJ0ojqxqotWznTirdKrmBoLf3C9rVhzJ4ib22em3wm7lf5CjIEdBjv5vceRURkvRdAFua20G2oy3AZB9mv+Z+8RxsyNmGd27LghExRDXvRO9lv2bud+WAk1UFS7ljTf/wgMfLGHtF6/w2hd5DL7+EW6dNor0pEgcDgeurt3pF15O46q5bCyopfrAGmatNKgK70HXcf0Z3rSVfSuXkVPWQPnuJby7KoWwlE7Eeb/jxd8/z5KyOLJGjCH94Bd8UDGAUzKTiA5ztvNR9EWVcOZ4qDZRFT+qZ10sxeRT8SnDJ46ZeRH1WNkw+6zLH9EHVSxkOSbOk8nJYmPGpoqJKi46XmR4VT6o4mVlJ9B3Hd8iLp2cWVbHgS42oi0ZB7qCb1WDZHhUPKvwyuKhe5b5G+h7kKP/TY5k88Wmwq/TJ8bTSqcOg138shgEwpEqP2R4rHzSYQ/UF1FPkKMgR3bnWvkZ5EhtOxCOHFVVVdY3HqCyspJly5Yd2RzT0tKYNGnSEWV2bpMyWVWTybX1HY+ONkxH5/lpqdzPuk9m8OKns9ld4SYiLoHh067l7EERbHjuZp5eDHGdM0iIaJ2ROOx8brz1Vs6OWs+cD1/nw6X7OOjsRlx3SssAACAASURBVNbEq7n5iimM6+mmduPnfPDBO3y5qpjiyCwGnXsTd142hkHxLWz5z/O8/v4iNtc1UJ/Ug4unP8AtoweSEuZm40vTuLfqZj66czIJUSFS/LKbr8w/MU46ORlHKjmVrIojmbyoS+ePLnfERXC8/tjxS2ZLJaf7RkTmg65IngyOVDZVuGVNdRlU+WGlw6zHCoMqDla4dXE2y4jxDsQf3Xq1Y0v0R7Qf5CjIkU6HWc/x1HyZHhGPXZ12OZLFwKpG6vYAnT9muZ+KI6u1EOSovT9muSBHQY50mH4KjiwvSG2G2i5IbX3p6elMnjxZ6YRdp3WHPNUBUyVjZeOY5vfRXFdBYVEhNU3gCgkjNjmV+EiDqsI8Suvai4dExZHUKZWEsBZqK4spLqul0RFJh8QUUuKiiXA5wFtLRWkxJZUNtLiiiU9JJblDOKFOB57qUooKS6lu8eIP70BatzTiwkJxGgb1xbs44E0hK7UjIa72P9iz46fOf7B3QLGyZZcvO892/dIdiOzGxS4eO/NV86yw2TkcnmyOfooWiM2fGt9Pae9H16aT2IIc2bcV5Mja3sm0/9+Kvx37QY5Ovu4faz/I0cnX/WPt/5w5CvgnSHDsBUl1CNfd+n4UaM2NV3er1GGSjemwBuKHVVxUugKJo05HIN8IiHituJXJWtm1a1Plh3gBkF0KdN+g2G2BYDpeXXZ0nCiORF2ijOpdNybzUYdFJWcVD6s1IrMh6xexyeYEuuZVflvZUMUhyFGQoxPFkVW8ZD7L5qtwmseOp95axVqm53j2Zau9VOdfoLVflzNBjoIcBTkKHMN/i6Nj/sy3WUDcBEQDMoPmMbvzZbbs9sl0tj3LZGXBsLKnS3C7c2Sbq0zWKpllOkV/VTyo/GjrV8VL1nQ4rPrNcZBh09m0OoCJOuzEWtZ0i0dl26rJMIk6TiZHdvDrsKlkVfNVc63qxPHG+njmWcXTnDeqPBBjZf5UzZHlepAj+3OCHAXGkd06dTycm8essFrFWqYrkJp3PGOqOqyruYHYCXKk98HOWJCj1hbkSD7nZHGkvCDZMSLbdOzefFXj5j6ZLt3NUYZJllAq36w2USsfZDZlc8y2RH9FX82JZfbDPGZ1IVIlrgqHKh6inOijym8VDpETq0uMLq6qvFB9syD6rcJn146IT1dA2uaqcKow/liOVDLmpvNJJSPiMftmtquKtRgD3afKLxXPot+B+KCLn0yXyrZVHIIcBTlS+Xe8HInjqmaFSba/yXBa1W7ZXmGlV4ZVZlfmi53cFDGquFA1q3ov8zPIUZCjIEd631UyIr6fgiPlBUkFLpANS7UZqmzYSQIdrra5VjjNzSzTZle1IYly4gZmJs0OZl3yyfSadYgYRBvmftnGKvNHhUuGQRY/Wb/dxSKLlzhX9MdKvxm7CqNMRoVFhU/Gg1U8ZVhEWRVWlU67HKnyQOWnWVa1NmTciDhl+W3FkarZ4UgVGxUeGWadDbubgKpGmHUEOQpypLN1PBzZ2YPFfh0/Mp0iXrscyXy3aiqssj1CZkflk6hTtaeK+nT7q6xWBznimGdVX5CjIEc/B45sXZBUgVNtXuLBUQVAnGPus7Ox6XSp3mU2ZfZUCSKSp0pkmZxsUzTjki0aXQztbv4yv1TxUfGgwifTocsXGRbzs0qPzI5Kl06neUxXdHS+yuxY4Vbh1OE+0RypbOqwW8UtEF/tjOs2i+OxpYqNXQyijB07dsYDjU2QIzUGUSbI0fHJ2Jmr4shOXyB8/Ri8Kh12bdrNQZ098z59PPMDbUGOghwFObIvY9d2uwuS1UFQbOLBv02p6nIgu9mpbosq8FY6ZHKyhFO967CKc0R7Vgdus6xZTnX71d2KVZcunU+yMdm4CrcOh5Veld+ivE6PDoN5vqxfZUvnhyrXZL6Iua461Mn8En1X4f2xHKk+Rf9VNnTxldkxy8jyT+a/nZwJZH3Lirlu3Vj5I8MgxlS0IeqWxT3IUfvnIEc/jiOZfpl/VnVGVetUcbIbP9GmGB8r3lTxs+OXjh+ZrGyeHUyqmh7kKMiR2UaQo58vR9KfIAUSAJUx0TmVPtXGotpIVDLmDcSceCpdMuziPCu7dgiT9avs6DZfu7p1OI53jgqv2CeLtyrOqoOErljY8U3lj93F3BZrGQYZDtnis+IqkHVh1wc7HFl9tjUZR7rCrurX5a3KJ6vY2MkD1Zhujev02MFgle8qfHa5CXKk1xPkKLBY263pOr9UWMU5VnGywmU1TxdTqzqr2o/s1udAMalakCO5H2ZfghwFOdLJHo8NK47cskGxYOua+WIi9ot6ZLc1lT7zs1lW1Ku6RZtlVJug7kInG7PCLmLWzRdtWl0YZD6q5upuxaoDvSzWMt90eMy2rW7yOjsyzLp4WOFWYdD5JPPBCocVBpU+O2vnZHAkGzPr1/EgzrUbCyt5GU5VQZR9QSGbI8t/0YYMt1XOWuWywyH/K40qHoMcBTk62Ryp9kGV31YcWe3HsjiomlVtV+2pVhzpfJNh09Vau/uM2Z4df4IcBTkKcnQsXrM9O/6caI6conGVQ7Km2hxlAMR/5sCqQIqyoi2HwwHGXhbfM4XJE8YxduxYxo4dx4SJt7MgxwC81JXO5q4u01mmwC7zyTAMCnd/wxtv/YWZ21rtHdjyOS/NfIHPd8kvcSo9bc8yoo5dHN9yX+e7+LK8Dq+gTyRPtqBa/1WS8/0b/HHc75ld2D5pZZupyLPImbnfKulkPIl62vrE3BHzQBc31RyZLVn8ZH3mnFXFwCpX7frfZsc8V5bf5rETwZFZRhUT0R9Rt+ibaq74LKsJsibmqWzTMOe/zrYVBvO4uGHp6l8gOSbak+WNKBfk6H+BIy/VBUt4cLibkJRejHxyhRarmqN9fP23h3jozhmsrcxh1gP38eifP2Zz1bE4VXuGOK7C3h6Dn8bqWdyeeB7/3nfsXt72KePIbKMgez6vvf00H+yQX5zFOSpd7TlazdOjr+SZOXsob5HnzLF++miu/4o7Eu/hG00uyHDJfG+dV8OmTx7i4Xun8+We9vN2fX4fFw924866gifnbKP2pHB07J5wPBzJ9uYfz9Gxe5g1R/KzqZSjqlyWvXYP434/i0ItRwdY8vxL/GP65wgUtcN58tbRCeCobhdf//1x7rj5XXYcw9Fe5j72Jx657102VP7MOBLsqzlqPya2k8mRWzSqUiADJBsXNw5x4xTHxGDLHFORZhh+Ft9zOk93m8/svw0mMtSJYfjZOe8ORv/uddbPv4FEDAy/H8Pw0dLsw3A4cbnduF2tNvxeLz6fDz8OHA4nbrcbp6OWqn2byF+xk26DPHh9tZTv3EjhumoSh3rxG25cDgOfz4vP58dPq06X04HD8OP1G+D3YxjgdLtxOQ28Hi8+v9Fq3xWC2+kADAy/F6/Hh98wcLj9+H0GSPZ8w+/F4wWXC/w+PwZO3G4XGD58Pv8Rv5zE0nP0jTy52I/T7cfv9+PzGzj8rTJOlwP/4XecblxuB4bPh99vYODA4XTicjnB75P4gZQj2WKRJaPq0GHuUxUSmS3ZIUV2cBNtqQ43om7V4UuWq7o81vlqtRGpsMniqltHqgKoKtKyuKuw6fp1dUTFmQqPKh52bIuxUhV6VYGV2dVhUzU7Y0GO/hc4ap3bMb0XD/0rm4fOAAwDw3+4ngMOhxOn240T8Pt8rXXfYeD3GTicLlxuFy4nYPjxGwbQk/Mfe4LzcOB0Gfg8PgwMDMOP3w8Otxu3y4kDWvcNb9ue5MLtduNS7NeG4Tuyf+F04Q4JwX0Yv+H3Y3B4nuHD6/XiMxw4nK06nRg4AL/fh8frxW8c9cvlqKUydxP5q3LIGuzB53eCYeA3/OAHh8uF2+U4ghMcOFytPjsw8Hv9Uv+cjhH8/tuZ4HLhchpgGPi8nlZfDXC6QnC7W+Mg8mH4/a17ra/VntPtPuIrhg+Px8yNC1drsPCbeXO6cLlcODDA8B8+fzhw4MfnbT1r9Lr4KT7vO5RbX8nGMFp1yNaaOX/EdaTaf1XrSHVg1Y2LB0vVHi3DK7MlzhMP4TI/RdtWh20Ah9Gq298GQ8kRGP7WM6LP56HFe3RttR7R/EfPbjhwulpzDPz4PH5wtM71Gw6cblfr+nI4MHxevN7Wc52BE1eIG/fh8xOGF4/Hi88POF2EhITgNAzAj6fZj8NFa247Ds9zWHCEyVfD33omNQzwGzhc3TjnT49xDg6cLlrri9eH7/C6dR5eM/w3OJLUbtV9QYVJZvtEriNn24NZWHUwVDXZApJtEjLgoj1xAzIHqE3H0b7vWPjBAM4cmYHDCX6/ATjpe+6LVMy/mQwDwMDwVpO/7K+MT0wjI/MXPPrOXnyGn8ZDOXx19+WclpBIYmJ3+o+4gxe/zKdwyze8/9yfeOqtj3nk7uuZ/vQbvP3q0zzz6ms88Me7eWtNOd6SH5j1zDTOGJBI4uDJ/OLlxWwq92Fsf5+bnniMGy4Zz7hel/Dk3M0U7v+CF+4YQf/uiSScfiV/+GoXhxr9YHjJ+eYxftGvO2mJCUz4y7eUNnhb70ftYuWnOftFzp78T7747Fl+d865XHLZdOZuLGLFzKe45expXHrtX3g3pwW/o4qc79/g3vH3MGdrNvPeupfhv7qVW0cN58IL7uL+1+9n3C+u5dpho7n6/s/ILl3H18/fza+mTGXqlKu567n5rC3x4t/5GXc/9QhXX3YWk/tM4+GP11EkJJrIj8iTjGsV5+IilC1OUZ+YgzJMdg9HdvPejE13AJLZUs2TFQkr3OZ4WB2GA+FI1CseBO3MldmQyagub7rDpQqrzIYYLxVWXaxVhw8xNjIf7MZBhyHIkRy3qOP/IkfmZhh+/PX57JzzKL85ZypTp1zKNXe/wpz9zfiMYtZ//G+mj/4tf7zxPIYl9GbEpY/y0bZi/O205PDlg9N57M8fs6V6Jx/e8RSP/ep2bpw0iqz4oUx94D3WF9ZiOPy07PuM524bRt+MRBJGX8W9c3MoavKDqf62YvbSsuMl/jAtlU7JiSRMvp0XtjYJv+FggKeKQ0v/zDXjEkjs3JN+1z3J+zkt+B3gry9h2+dPcsmpCSQmJtJz0GTufX0t69fM590XHuXpGTN56J6befWDz3juxQeZeuUVXD5oIrc+/TW7C7/ns7/dxi+nTGXqlGv54xtL2Vrhw2ArM655nL/85nauGT2YHvEjufCJL8gua8BgDc+c8Qv+/tUeylv8NO9ezMNX9qVrWiKJiQmMv2Em66pbjsSulaPDz54ayj6/g6lTpzDtiit4eNEePH4Do7GInPl/4eZzpjJ1yiVcfdvzfLG3Ba/fj696N2vee4Abpkxl6pQruenPM1mc34LXTLPhpaX4B974/e386nevsTSvWkykY3JK96WEuE/aWUeys5jYL16udOtCzHvZgdOqBpl9lV3KZOtItffJ1meroBVHfnwV63nvT1dxSkJ/zrjoWeavKcfAT9GSj3h08qn0SUwkIX4oU66fyZrdtRiOTbx6ycP89Xe/45cjB9AtfhSX/GM+uVVNGL4Wdr/zOL/M6k5aYiKJCeO4/p011LT4MPDSvO157piSRGJSMp3Ou4eXtzfjc3ioKZ7NXZ1u4cnHb2R8YjoZA37J49/uw2fFkdnXA8t5+eU/cfZVV3LV4PH85smXePHxB3nkvvfYWOGl8NuPefTsVn8SE4Yy9d53WJNfc+SS9VNzJNZFMa+PoVKxH1nhFsftriOnakGoNjYdWLGZwZk/dYtalG97Fg/XrXq6M2BcLs9Mf4lP16xjw8ZKKisrqaxtoNnXNr+Z+uZZzDo4kXdLdjLz0WQ+evY9VrWUc2D9V8zePoHX99RSkvcND17h4NO351A0aDK/+v1TPHDjlfzlhXf5+/23cMPt9zP9ttt45tkXuHFEBV+9+gYL9wziiUX55H35JIO/W8K8T5Zx0A+s2IR70mPM3D6bP0/18PGd/2JPtz8wd1spe169loaHX2Te1jyq9r3Pn+/czPA3VrOvMpu/+d9nnq+O5lZHj5II4PfQsuoJ3tkYzz0vPc0vRv7AVWOG8OziLlz53IOc12M1T1/1NKva75iQX4yzOpXLFmxl7n+uoX/uQZwhQ7h56Vo+eKAnG/81h6V7J/OXTxax6NO/cnbed3z17AdsrDRgzTZco+7h1S1f88RVI+kkcCEmn4o/2UFKlytiE22qZMU8DvSib8Zqt4lFQ6ZHlvuB6DKPyb50EHWqODLrMOMSdagutbox2RoVm6wYWsmJPpjHRT91zU7sdXWsTUbEruJJxonqOchRe3vHM/5/j6N2lqGplG3z3uaRp+K4/d1FLJrzJg8Od/LDLX9i7iE/sJ8C5wFirnuW2bve5bJu5Xz+5nfs1pa41Wx2RTP59XksXfNHolav4KtVuZR51/HCbc+Sm/UAC3eUsvvlX1J9/7+YtyOfWlGf5xvumfgX/LcupaSyhq0PDWPe6bfxtccMv5nKgi/48zWf0f/vO6nYt4UZ4yKZd82TrPBUsmftWzz/yBKm/iWHurpilv/nGqLX/oMl9SO49q7HeeCm6/jr8zO4fUwiZOfiTJnC/SuW8/pNsSz+ywK2N13OPz5fzOKPHmLUD5/z+etzya4xgOWsd3fi0o+XsfyHW2icvZi52/KpNOP3fscjF99G9eAZZO+vpK5uBze3PMbjM7Np8Yq54aHZ/yUf1k5n8eK5vP+vq6i/7X7e2VVGzuIZ3PtgBLfMXMSiuTN5fGI0q264h1m79rL8gw95/ZNe3Pv+YhbNeombE4pYMv3vLC0+zLWvhcLts/nHv15ge+9x3Pe325iYEStlTHWgVK1XlQ6rdaJqYv5anf9k5znVoVW3jnSXMtW6VJ1TDcNo90s4Rv1+DUd+IJv1B/bT8aKnmL/1eU6L3cuXS9eRV7GaWZ/toeO5L/L9oTr2rZ1ObOEqvtqymxID4FtWuzO4du5qVnx3LcVvf8W8nGJqVz/D5Z8fYsLba9hbVkvtjt/ie+JTvqtvxudZyO9GP0bIH9dTW13Fqjv7MG/CXSzyADTSyDy2ZP6Gd4u38/Z9SXx0z3ustuJIJGbnPpzxZ/KHH1Yw48Fz6dHWnzObf8z5lrKLn2LxgRpq9r3E2SX7Wbsml9L/BkeK86IZh6zPzjo4UevIqdskzIqt+mQLpe1Zd0A0H3jFZ5nN9sR049qPlvHPcVu4/9ILmDqlD1lZWWRecDfPbaimyQ/gJjxsNNMmjKFHZCT9TxvHBQBhSfQ+/05eXfAb+kTX4nW4yerejzEgXMnbfbkDOPDv3cOmuiQcgyfSLbIFX2wm4yaX42nOJi/fDz2GMbBvZ1KiHfg2rWVxzFh6D+pPuLcWd9fTuOj81ezYVcKOhUvYfPZlXNQ/nhh3F8b8+iFGR8YQctho+xi4CQ2/jjuevJGsrF5MHDuN05PGc9GTv2LSwEFMufRyJrXsI/+QQExsJ5IHj2JQyuH3xK6knzKEvokOag7sJTukkZBJfekZB8T2oO+ZYTSFZZObVw0Zg+jbL4P0aPl/l2NOWPNhXce3yKfqQCMeqnQXo7Zmnmu2rTqkyQ44IkbZAhcxyy5lsgWqwiOuG6sDperAd7wcqfTK1qN5rhgf87uOK1Wt0DVVbdEVatl8EYcOo+5iIBuzc8BWzQty9L/GUTsJmmur2LN3CyWXjmFYmgNHZALJw3vQZdBW1mwuBhLpmjaW8QP706NzV0b37s/I1qma1oNhAyYwPD2V7v0Hc25KKl0B/4bVLIydSP/BfQn11BLSbTQXX7CCrTtKqa1rf2jxffs1H/S5nYsGxVNZXkb0wAu5/pJ3mLvId9RMSzM1K1azYMjtTM0Ko6rBS+eRQxg/cg7LF5RTvLuI7LPu5KJzU4EoMk6/gcdnfMx9ZyYfC7lTJt0H9iMzDipzstkR76TDuEy6dgQS+zBoip8yz04OHqoDenHqkAkMSU6m++ARXJCQSCeg3Ylx1XJm9bqFS64fTExMCK1nhr3Mvn0QESFOE0cALkJCTuX8M7thGGFERI9kxDnrmL8gmz0711Fw+VhGpjsgrCOJQ3vRc8RWvlm4mV0VedRPG86AZANHTCpdT+9Ex27b2ZxdBkDp2i/4+73/ZFndBK647AqGyO5GikOomEOqvcjcVOtI9tz2rjqg2tmD7Bw4rfYjKxttOnT7t0wGoKG0SMNROZBGr+7jGNMrkx49spjQPZMBAAmnc/NLf+J3vxtMR38VoSndGBubRBc4vO76MGb4BE5JiKfH8FO5ODaWRIBufTj1UBlrv/6Kz1cf4GDI2by04S+cExcJ38zj3QH3cMWgDpSWldFx8Ln8Ytr7zF/iA0KIDB/N+ePH0D0ymgGnjeV8k69KjsTApfQkY+AAsuIEXhLT6OVxUr18GbOWbWZLbT9ueOGP3DRtEMn/JY5k+5Hs7GZnPxJlT8Q6OubPfNvdDK2aeNuTBU0cVz2rNvLWvq5c+/gnXPNYq719+/ay+8XbuXryNCLXfMO1sW7c7ky6dj76Y3QA/F7qKgtY8f0iNs5dQ272DrZtqyRs7G1cZoh22r1RVVVO5a6veH/Gu8x56mgIu57Xl9GdHe0mlhTl07DzfR679k2eNhXkvr+p4ML4Fvp0TiUsJKTVx7R0urs24DwyXVd4Qghx96RLF8kCkTVR1+H35NgYnPGxR/iJje9ETGzLMdNllwfzs3gZEheb6I/uEqDnWy5jlbe6cTE3dRcMGU6Zf6KsbIGrdOrmiHZkOGS6VHrFJjs0quao1rZVIdPZtlN/VJzYna/DIbto6OJqx7aKB91YkCM1jv/fOGo70UeFh5KZknJELiKyA0kp3SkGoAMx0XEkJUnNKVoKSYkdiYlpv0cUFR2kMfsjHr56Bn91H92T+t1agc/rweEIPeLrgbwc/DtW88vTX8XZFnNnGqdNyD8yz+f1cjB3I8VLP+P8IU8d6Y9K68OFw4ohIpywtBTaoNvi/7BManwsybExR+IWn9SZ6OKEw0JppCTHEBUl3BNF9V1TSQsJOeaw054jACdOZ3c6pwscOSAiNIReCZ2OdIWFR5Oc2hOAjpERZKQkHZkTFRNPfGIX6g4DKQvpxymnxeH0fMfC5WMYfuFAwlyGgFm+j4vrSHX4s5OLYi3QrSMdRypb4plPbLo1prOl0t9Oh+Gjqa6aGqJJjgk7Ro+aI4A4YjsmEx8vTPI0sn//ZlbN/5YdK7eQs2Uja/Z255dXXHBYoDOpnaKJCBf8TbuYh16Gt19+lL9d/zj3NzTTc+xjPP3yjSTv3Y2x4yMuG/7qEb5dYSmMHV8AuHEdPqvKwhMIR4cF2udU/KlcehdEzHyKGY++yd+LPaT0u4rfPXw3l4zOINZ1cjlS5arVOUeXU7rzmU7O7jpyyhQF0nQbsOwmKANtflYuAFM70t9cRf7BCuqbj/5eWUZGd858/HHuGrKbQyXtJrW3XZPPlrcf4La/riD9huu4/s3neOCJ3zLKhs9OdwihAy7gzlcXkbP/AAUH9rN780a++utNjM2MaSfrCg0j9PTbeH3uWvYfOEhB3l52rF3DR3dPpHunjuzZuZuK6nr8fg/Ne3ay3evB1xqQI762Qy69ONgALfXDTUVFLfkHi/H4DAyfh+L8fGorKggxbZwIHKq+PZIVYFm/eAE51p/2P4WRJbRqjmy++KySF7Gb59rZEMT8lcVDhUM2pvKhzYZ5zI4N0UdRv1gwxGcZV7Kio4q5yl+djGyO6rIouxyIOlTPMj9EPbIYWPElw63zWeZLkKP/AY6cTpq9Bnt27aPZa+Aw/NRVlHEo7wBhoa5j5I8aVg+ZwLXbI9yh4YSOuYP/zF/H/gMHyT+8J314xzjSOoa2w+cOjyBs6tOs3JZDfn4++ftz2Pz9d7x2RTdzIAiJS6PHDTPYnptHQf5B8vZks3LWu/zpnHRcHg++3TvZ2+DFMPz4PPVUVpVTWtv+i7j230MauEJCKC2p4NChcnyGA3wtHNp/gIaa6sP/obyNFhZO5J5sdlXU0+I3AC+NtcUcrGg8Yq+VFwAfft82snd7AQO/v5nmxjAiI0Lw+B3szt57hJuGqgry9+4nIiKU+sYW9uUepMUH+L1UlRRTcqiQ0MNfiPYbNpBr75jO5Qkedsz5jK93N7f+Nx/HcHTsulOtI/FZtu+Yx8z/ZOPmd9meo9It2yNV+6DOD5msah2JuhwOB57qApa++hvOfvJ7mr1Ga575fTjcLkJcLkuOjnJw9NW3+0v+ef9TzM0PZcQD93Hvpy/w64kjSIP25Im4mqtxdJ/E717bSHZuAWtXfcKoHx7knW9q8YdEEHbes2zctY+C/Hzy9+1h49LFPH9p13b62oXMiqNjotJu6tHmqceR0Idz//gRizcUsHXTYm6M38aar1eSW3ryOZL1qc4zMn2q/Uil40Sso2OqjNUtTCYv2zhkC8bqXRcY6ZyNb3DBWY/y2bK9HDhYQP7/Y++746SsrvefKbs723uHhWVh6b2DIkWKKCAKqLGEmGjUaGzRWL5JjPpTYzfEiEaDUbFgi6AoIEhRBKW3pZdle+995/39gQPv3j3n3juzu4jmPZ8Pn5m57ynPOc+5bXZds7KQnZWFk1s2YEvCLbh4bAvwLfq4sbkJJc5GRE8ZjNSYCLiKM/D93tX4zmhEc7MNTj9/2N31KC7MRVmtAadfANBYhcLCQtiSemFkgBuZKz7BR9/uwOFtG/DWnbfjsWf+iz2FLesTN2gcJhRl4LPPvsD6HXtxeNMKPD/nSjz1/n74DZqOqRkr8dGSVdi1dzNWrF+PjIYfLkimRaZFdUV+CE5IES9aNhvCUnpheGgsAjbtxJaMbGRnbMHOb/0RHTwcvbqEtXLRUJGP7MISVDc0tzgMnHHZ8nBBfSug4tk8zt3wKV8tU+MPJzJ96pCjY0fhpxYFqs/FZ7Ixbg5R8888zuE3zytZXmZdqv4Uz1S+oi7HscqGceexPwAAIABJREFUOohSwj038809p/qA45Ra68RnFK86vWxx9HPlqIUmAkKj0KfvGPTduAlrd2Yj60gGDmzORGnxeJw/iPhVtDOmarF5LgCnJG7IeEws2INPPl2Br3fuw5FNX+DZ2fPw1MeHUVzbsn6dx1+Oi7d/iMf+uxb7Dx3CkfUf44GRk7Bgyxl/joBA9Bg1BUPWv4UnPvsGhzP24Lt3XsGfL78R72VHIblfd4zc+zY+eGczjhzZg63fvoG//fMRPPrFMTid/rA116C4IA/ltc0tMEd0H4BRjiA0btqN7fuzkLV3M7Z9G4EucUOQmhSskTiA4RNxXf0X+GLRl9iz+wAOH/4ay/59E6Y8vwG1DW6BIwNNTYeweeMuZGUdxfHj67Bz9zTMntobvQaNx+CN32LN9mxkHTuIQ5sPIz9/IqZPHYwBXfqi08bv8c3uLGQd3I19m8rgrh+L4X1MP5IIH4hp8+aie2guNnyzEbn17tY/QZKs7bIe5+akOCbuB7IYFBbzZ+o9FZubjzrYKX0xrkf8A4LQJa47HJ+vwiffHsH+g8dwtLgWyf26oktssoSjaLPjFvOkoqYazb3ikDS0J1IC3Sg9sAZrCw8hq8nd6gLTQvYuxtV3/h2vLduFfQcOo/54EYyRSYgOd6DLhfMw4/u38aeP1+Lw4cPY/+USPHjedCzcJuZs/mCgqb4KhdmZyCmvb80JWznBz8kNeOHZF/Dnhavx3c7DKDueB3fnUIR1DobLYUNdeS5OFpSgpqG5QzgCWq+V1JrL+Zf1p6gjfvZ1HrX6FTsxEVkRzHriK7W5iN/QcSImZI7Vwtfoe7F00RL855VH8GB94w9/lcYGh3M6/vDkHRiDRtQ4QhDfPQ6nllM7nP6hiEuNQXh0PHpMvxjD7n4CN8x4E/F9xuOCSZfhotp81JQGoU+XQUiOWIp//+tvCAv+E65IH4aoVV/h3X8vQOTv78YVd1yLyPcX4B9/vgaP5idj8ORf485fXoKhtjVITIhBVLD/qdtn3ET88QXgzX8+g0dufgb5lT0w6brHcP+sXkiIHoBnnj+Ju//wNOa/noLJt07B9T3zEO35U6ync7XBFhCFLum1CAZg2OxwBkWhc5oTQQBsNjucARGIT01EmNMB/8BIxHeJR4jLH46oOKS4Q+AAYDgDER4dh2QEw2kYMEJ74ZKbDIT/dwnefmw5ihGN9KlzMXf2OPQu/Bzx8TGICQ04fYs+uvIpPLqnM66/6lpM6hVNciK+F3uE41vsLe5gpBLdbws8eERs4sFMdkCSfTFAHco4nDr1oS5fupuP6qKki0H0Sb3ncuTicOuEbizVpdSsI9pTHFH8cbUXMXM2HG7Z4YUSi6OfE0fCg4BodJ84D38MfhsvPnMv/oMgxPYcj0ufvw3jYwqxJywC0UkOuAAAfgiKjERUXCj8DT8ER8ci1h0Bl8MfobHxiLGHIcAegPCEGDgiguBnGDDgQkRyLByhLjjiJuH+fxh4Y8Ez+Mtvn0JhVTounP8kHpjRHXFBQj6d5uG15cBjf34Ac5+pR7N7EK58eg3+fB5QXxWChPTOiHC5ED34l3hpURMeeeQmzNjnQkT8RMz/0yu4cXA4jLqrcNOjdvzt2d9gxtNARHJPzLzxLvxh7jC4jtQgIfhzvPXqMwifOxFRMXFIiAiCwzCAiMG48h5g1bsfYNGjH6IMseg7+1pccdFQdAs+iG1JMbCFuuA0DMDmQlTnWIQH+cNhuBDTNRkI8YfDNhS/f/Ml/P3xu/Hb6wpQ3QD0n3U7/vuX8Qj0t5t4ssFmi0BK799gROePce+9R+EMjcHQF1/ApSmALfFK/OXxxXjhuXvxJgIR1e08zHrx/zApzoBt9uUIingXrz15L/IQik7DLsJlD12KUVGVyAiLRWx8I0L9DUT0nIYrxx3EB/u2YMfRoUhu2Tg//Plwef+p5rBs3+X2A9mcoEQ2j2RrBxef+zJFtR+2OGcGxiBl2u9wx9bf4y83zkBISCdcMOsePDh/AGAYGM5ylINvo6IQ3RQKf8MAbP4IiY1GVFAw4oZNwIx92/DPf9yDXxSlYMT8ORjdxx/xzW401rkQ2SkWQcH+cNhsAAIR3SUOYS4/2Pv/Dk9dcS/+/bdf4fWSetSjL2b+/j3834QwuAKuxhurbHj4gTsx4zEDDr/h+MXfPsf9Y2yoKgpFfPdYBAEwDBuc/mGIS41BIBpRenwt/v7Qk9g64ml8dsfwlhzZ/RESFYOEhDD4+wUhMiYWieFBp858hj9CY+IQGxwOV4+puG5WId574XH88d+FKEIKRs64GXdPm4Q+MQb2vfso/rq/L26/7iqM6RbR/hwx/SD2ltkH9Uy1tou2bZlHtrKyU/9HOQ60x6i0tBTr1q07rZecnIzJkyezwbkNk5pcqldKuM1Wd8wbXc6eEpW96kAiawrzZ89YW+J5m4/qEKTTdBTHuvF1semKrzaAdxuIL5g7giOVf44rQO+C5yv+9pa2zlfd5zq9oIots7c40tP9aXLUiLKs9XjllltRd8+p/w9SR3Dkbf4dvSa2NbY3e7nuc531WnZw81n2vYubX8pA58lzceuMvgizODr3ODLF8MZve3PUXHkSW9Z9hP8WTMTj1/dvc2yLI706tfgVO0pZHLPZ+P9+hDo0izpiAc1FM79yWKjYnjhmewobh8UXoTBzeMSYnJ0MK6dL5cA1PtVAYs3EOpp1VYcQKicPPqo3dITqD5VwnIg6XK+KtRBrZ85JjMdhNNuretWjR+XTFo7M/3QWEV29juRIZkfVwoNH5ZvDRPHC2VLrEbf2qOypnCyOaEw/J46aG+qQc3QPMnKr2p0jar2ndGT7lTjOrVU6a6Lu2qiKq7NecjzJ8hRzMPv15KjDkYiV0q8rzcKRo8dQVFHnCcT6sTg6Y3M2OTqX5lF1eT2qcmsx+ZJ+FkdnkaPTFySZY07ERGWXKXGc0qOKZx7zYDIXm9IRY4j65vxEonQuHBQGWd6iT7M99Vx2s1flyjWmDKv4qnvgMr/n7My4RU5FPW7CcJOJqiuVk/k9tYiIumJOIn4uB/M4xTHlm4pN+RRf28IR1eOcvpgHtybI6ina6PYnh5PKiZq7qhqJuXG+dYTiUrZoq2JaHJ3B8fPkyAaHfxgi4uKxY/Gf8MQXR07rtxdHvuZEPVMJt2eqOOLWSTFv0Z9uz4nrvuhb9KmTryy+at33SN62D7Hw7U9wstKBpMhASP4MB5uT+EwlFkfyfLj358I8CuvUHZNuuA8T4yyOziZHp3/FjhMPUM+v2HkkKSkJkydP1gJFHUq5TUp8Lt5aqfcUXsq3LJ75s7ihcZug6IfaCEVcnB71nIqlqqNqgxVzErF6Uz8Km1lXNplkdRd9cXUWY3H1l/WNN/5k3FK1kOGV2XYUR972papHZXl4M5e5vCjRjS3iNYsur97g8gYbx7nF0RmxOGpfjlT7D2cv2wdV+6OuX5me7jMVRxyvsjy94UiG0eLozLgnrsXRGbE4Onc5cqqC+rLpiMDMzygw1CYg6ouiSpzCRfmk4unYqfxwGx1XV9khgcpL9KEzuVQbtipHEZdKl5s8Mt50+RJrI+tXWY+o+lzVu5SOiItbNDj/VIz24IjqG9GnzsJL4ZLVQ/VeNsbh5uxkuclsVGsJh4tb5yjcKs4pG5m9xZFaLI5ofJxwhzeZLZWHrwc3Kg639snWRNk6K8ZRrecyfDr1tziyOLI4+mly5NQJSh2+PePm4lDPOB3PM5WNiEHmQyRd9EnZUTZiblSNuJunDm4qD5WtimxPTlxNOTxcbqpYHH9UTtQkoyaT7GLBYVN9A8DhofCb9UT/MhvdXMT3si8WzDm0F0ey2JQ9d7nVFcqWqwWFUeRMtVlQ9tz6YMalyleWt+4mpVs3iyOLIxk+XY5kPsyfzULtfzprpEw4zG3xK9t3zL7M+yG1H4m6Or0kw0j50PEp+rY4sjjSwS3G8tavxVHreKJo/d/WdJIx63kOZxRYz5i4sciS8GaDk/kU9ajN2fyPwiLGkTWqOabZH1ULcxOa8VE4qfeqQ4YMjzkXc1OJdeC4pPQoHbN/EbvInblpdRcBil8zHmpCy7gW+RAPJDoLjAwzla95vL05EkXkgutlrrc4XimfVP5irtxcUfW72ZdsUeRic7lxOhxWEaMMJ8WbxVFrsTjynSPzM7Hm3L4h28u9EdlaxsXTXU/FfVGXI4obrt6UTxlHIj4qJ4uj1j5FXxZHPE7zq6hjcYRWuu3B0en/D5I3m5YIVAxi9ikWnzqkUj6oA6OoJ+rILgtmn9zhVoVV1OPicnhFEXOnLgoqH6I910zioVrc1M3NITvYUHxReVONyuEUOZH5lcVR5aeqr4iHw8HVwfxMdx5x+h3BEbUomMep/EWuVLUQ8VKfZTmIuHXmjkzfm/WM6zdZH4p9Im441HrHrW0WR2qxONLjSJYD997bMRkmTo/S0eFIFk+nRpxQHHE5qziS9YnFkcURN0Zhtziix842R06VMgdKfEZtNKKtuDnIDvI6MahGoPS4TdHmrkdVwWHs21+IagDOkHAkde+NtMhAGI2VKMnOwO6MTBQ1hSKmW2/07Z6C2IAzPuorc7Antxqh4UnoERd0Kn5dPo4f2oP9x0pR5R+Hrn0HoHdiOIIcNFmyGnDNyuXE+Rc3blFH9M81O9foqslD4acwivq6wsWX1Y8a5xYSsx7Vux5b8bmsp3XlbHHELW6UDoeP0qMWOFmfUjqqz1QOHt/U/JLhpERWO9Xiz20YshpxYnFkcaTLka84qJi6+4ZKKDuurr4c1mTnAPG9Crs3/SyzpXBbHFkcmWOp8hTF4ujscXT6gkQZU+OimAOo9KkkuIVelhiHQbQxE92a9CZUFezF+jfew/riQAQE1qPeDUR1nYZrfjEWIflbsf7DhVi6px6VzaFA4hBMmX4ZrrwgBaFoRGX2EXy76m38bZsT02dch7snpwIox7EN7+PDlV9hV74dlY2hcPW4CDfMn4wx3SJ++L+gy2+1XH04G+6QTOUuiurAoWpAjkcZZqoRZb6piSPmQGGhnosYdYVaFMz+KZ+69VbZnk2OdH3q4DLr6NaFOwTqYOBiqNYjTrh5yG0OOs+pmLL10OLI4ojCx9VFFU9nH6B48ZYfbs2lMHD10D1/qOLo7juqmnH8Ufg4XRGHxZHFkQyjxdGPzxH73yCZi8IV1zBa/26057P4So2ZkzP7Mn/mnos+qQKI+bSwaSjDyb3r8c53sbj8vofw17/+EfMvSEHp0vfw9dFC7P1uI9ZmdcHVD7+ON567BxcFH8e3/12GfeUGqnL24+ulH2Lph5tx8kTFGcx1h7DyrW+QGzYD977wBhbddzGCV6/Ehi1HUNrE/89BqbzE+lC6sg2TOxyYn1MNQtWe6gMRs9lezEHEK/qkeBcXB2qie3IQY3P9avZF2Yr1puor48K8AIh1VC1QlE5HcCTyI+ZkHhMXIDFXEYvox4zJXBtZDcT45meyPKg+EGvArR/U4sphozjh5pjKzvxqcWRx1N4cUVxRayslVP2p91x8zreqdjKOODuxjpw+pWcep9ZREQfHEVcT2V4kPrc4sjgS41scncFNSUdz5BQTporACbWZ6OiYQXN6VJHFxKmYYgw2j2Y7AkI6o89vBmNYJIAmA+6GOtQH1KC+MBfHc6uQ0+lijOgcjiB0x5gh8chcuxeHjtWjm6MKNUG9MOPyeNhO1JyJ2+CAIygSYTHhCAhwwr9TGGLCDNgamtHcbAMcrZvQvClzzSnjwZvNn9qsuUMLxYus8UVfoj8KH3Vw4Djl+KRyp3BS+XAxdDBzzzl/IiYV7o7giLKR9QyFlXpujm1+5fgQn+vwJsNJcSS+l+UrxhHz5jBwcWU8cmJxZHEk5tcWjii8qj1Thl2WL3d+EPPmfIhrOxeDysWb9Z36LOOAW6fNeDiMHBcWRxZHYgyLo3OXI6c3zqlnuoderlAUYWYbEZ/ZTtxIuGTJWIHR6DZqDu4zDNhs9SjN24ZvNu9GefJk9I1pxA40wxUZjjAAhuFCUHAobH61qKisQtz5Y3BZPwO2Q0vxVdHxMxhCu2PI+cE4+O0yLF6QiaDKQzgY0hNzeiQhPACAQedINYy4EXJNxh1YqIaj4lDPOW44fTNOETsVzyxcPqoeEv2LOavyovLjcuY4oQ4yurjFBY2rhU4ulMjmjvk9VxuqLqp+kvUml4M5hsqPbK2QxaNyMduZ41Hcqeoqm6MUzyIe0b/FkcVRWzlSrZNcvXTXGS5Hyka2TnE+uTqKayKHQ8anGJPCz/mSYeTWbjF/i6OWehZHFkfnKkct/kiDGJgqqs5ncWOiXqlYZuDcBmN+zxWF8ssWv7kepSe/x7Jlb+O70iTMvGEG0gO2YX15CRDa0qcrwB9Bga4zvsSYJTk4WRGD6upqlB89BL/GWiRFBiLUcMBoxOlqUzlSxFOTyWxPbcyUyDZqWeNzzcZxRGHhJrd5nOJV1vyy/qLyM9dKhpnKmcpLlh/HgeiLqxfFcXtyxNlRdaRwyXQoPc6HqEO95/xwIounWnxFodYyrg9la5UKt07fiZ8tjlrqWxzRHKnWGipPVT6yw5TMp7d9wcUXfYsHOK6GujjNdrJDpQyTbK+xOLI4MutYHJ3bHDm9PVhTn6kCcBsXJ1wBdG3E2KIvc/KnfTfXoGj/Orz7+sfYiS6YMfd6zOofjvoT/ghyBqCxqho1hoEgWwPq62phN4IQFhICm40mueboOnz4TSGSp96CO+b0RVxDBhbd92es3JSCtO4XoXe0sxUu8WJEfZZtzFSdxIO1jBtuk6YakGpMWc1F/1T/cPmJeYl1keUrYqBEXKBUc4DKlcLO1YrLi3vWURx5Mw85XNxzWf0pHyI+KlfRhqo/1yscBxRGyid12JaNU3l7g8niyOKI0vOFI0qfysP8XrXOULhl/HJciNjM65eMI0qP0pWty+IrVxdV36p4EPO1OLI4sjhqjflc58gpS9IX4TZTjlQKJKVP6ZjHuCYRi3Had1M1ig58ibf/9TZ22M7H7N9ci5n9wgEAAVExSIkKgmPrBuwqGojBATnYmZGPYxVJGBllAKAP1O7mZhjOWgT4N8JptwEOF+JdxaipqEJdvUGSK9bfWx64DZRrTLERxDpRk5A6+JjHOU444TCSPElE5NebhUnHRtWPKu508pHZtzdH3sxz2WKug1vFrcy3+ZkuDzIf3n6W1UlnXDUfZO8tjiyOzM/aypEvnIrPZXyKr7I1VCeGt3E5X6q9Slz3zeLNfizbX3X3M4sjOV4PTrNYHMljWBypx6nnom6rnyDpEMMlQy3wKlBUfA4shUNng6byqC/Pxab3n8SCd7ORftkA7P7kH9j9CRAYl4ohEyag37BBGLP/v1jyj/+H5XYDmZWRSB8zDX3iTFiFGCGpYzC1z1F8/dUbeHbvcgQ1FKGwpBdGTuiP5Ah/5GxejM+Ku+Gi0YPRKdIFmXB1oTZLnQaS2cjsVd8QqPQoGzP3nIj9QXEti8+91114ZL51Jr6MP11pb450sVK6VP9wdfElJpcDx70Kv47I7NrS36L4yrnKt8WRxVF71qA9RLX3tgc+HZ/ttc6qMHA9r7t/qPx3hFgctfZjcWRxRAn7EyTZmAqkjh6lA9AbhvkZJbLDK3cgNhxBiO51Ia6+CQAa0NBwyt7R2IhmdwiS+0/BzPkB+HLdLhxviMW4cRdg4oj+iDVjj+6JSaPjEZwQcco4fiBmXwfEr1iP7UeKUO3fDUOum4CpI9MRHwxkuZvQ2OyGYdA/LtX5pkB1ABF1xFeVyBrUF2zmPFU8ieMUDm8nXntfDKkYOuNUD1IYdMRXjrzFxmFV9Zq3OagurZx/X+LKDvKyXHRitNdmaXFkcaQr3q5ZlH9faqK6ELcllkynrYc4lV9xv/B8FuN4s+ZaHFkccWJxdG5zZCstLTWowCKA0tJSrFu37nSiycnJmDx5Mmmj862fahPRubR5c0DV0aFIpHLzPOeeiT4o/1QMTs+sL4tF1ValJ45ROZv9qLjzpgZUHrK6iD5U9eNylfmQ5SnT4/BwtZLF7yiOVHXnhOs72Vz3Jh+uB3S4E5+JsWU5ifoq37o15XqR8m9xZHHUURxRcUTfoh5nI9uTxOeyNdU8TvnV4YiriSwvWV24fDgsoujisDiyOLI4+mlx5BQdeT5zizaXoFlXVgRR1xvRxeKLL2qM28wooXLi8uQaS9YIstp606iif/EZx6P4nvOn61tWH84XlxP1nDvkiL5Fnzo1keVE6chyEnPoSI6oGuoK5Uc2j7n4FF6ZDxV2brGU+eVEzEdVM3FB1VlTfPGvKxZHFkdcPBkWcxxf/KhsdOurG19WC5V/3b7ztj/F/ub61OJI7d/iiB6zODr7HNllYClj7iZJiVnXDEinWCodw+D/r+uirVlX1JfhVjWgzFaVO3VoUGESD/SiP3EzleGVHQK4Wuni5XzLDi9ibrJvPyjhDmC62EQfMj0dDKrFR9Sj+qYjOPKm51RC9bDOlwkykX1x0B6+qGe+zsmOEouj1s8sjnyTjq6VuHZ7E1dc87zN09vc2qvXxWfmvdiXXCyOzojFkfdxLY7UMXwV6QWJEu7ASi3ysguW7FC3cOFC3HbbbTh06BBraz5Yyi5osufe4KJie3uLFi914oWGuzyKlyEKq4jNHEtsOi53Ea83OjqXMg43ZSu72etMHm8WFg6Hjp7qIuXtZdwXDN7o6GJTXbo4DkSOfIktii/fuunYUVjachj1Nha3KXL6Kl/cc4sj7+TnxJE3tfKlrtSepbvnevvtMmfviemryPZFWQxuj5JddimxOFKLxZE6nsVR+3Pk9QVJJwh1EJYBEp8tXboUOTk5eP7553H48GGpvsqveAkx23iz+ZkJ03kVY6guDJQe9dybZxxm8b3sxm6un+c917iqPGU4xAuvLi/iJZj6LOLmbKgcRHvZgYfzQy0IFEcyP+3Bkc7ip5OD7sIt62/VfKJqLftH2ckWbAojNyarp8iNLBeqLymfKrE4sjhSceTLP9FWjC/L0axHrbe6vmUcyV4pXLq56rz3hiuRE4sjiyOuDmIuZj2Lox+fIycIkSVhdrBz504sWLBAmSwAzJw5EzNnzmxx2zU3giijR49Gc3Mznn76adx7771ITU1lfXN4VeMcBvG9mVhz/ty3fuKYGYfY/OKrzFYWh4orvoo4ZAcB87jqQqrrm6qBaO9Nbjq1UdVftOF8i9+AqHCK+rq170iOVGNcncyfPWOqGsjwiJjFVxGLLAfZc06f4l6Wn6yXuXFdPrzlzeKo5XOLIzlHongTTzZmHtddR33dt2SvFEadODL8sv2so/CbxeJIjd/iSC4WR+3DkZ26OXJOxQU5MzMTGzZsQGxsrPLfypUrsWzZslZxzBuhWd59910kJiaiW7duePzxx3HixAllg5lxUsVRNaCoxwnVVFws6tLDxaA2O8onJeabMFVT2YGfiyH6EW/flI3O5ZrjncpPvOFzouPLHNv8WeZfNcFkF2aZrgejtxPYY8f51eFIJ57IkWwRp/z7UlNvv3zwVbyphQ6/3vLeHrg87y2OLI68wdgRHFH7nxiPy6uteLzdJzkfsrVclyNv4locWRyJcSyOzj2OHPfff/9DOop1dXU4ceLE6c+hoaEYMGAAbDYbSkpKkJqaijVr1iAnJ4f8FxgYiBMnTsAwDKSnp0u/0UtOTsayZcvQu3dv7NmzB2FhYVixYgWGDBmC8PBwrQKoLjEUiTIyqc+eHLiLiTe3c91bNrXZcs85HQoLF9f8zFwn3XpQ9ty3qFQtKW4orGJ81WVQxKrjx4zdjIsaU/mkYlD1o3yI4g1H5hxE/LIx7hlVZ9lFncuP8inWRoWPs1PxTNlyfSji5XybfelgoWxl+VocWRzJOJL516mLmJ9OPh4b2d5IrXkqLCK3uhypelg3JxGniM3zmas5hZ+KbXHke04iThGb57PFkcWRTE/Mh/wVO11JTk5Gz549sXLlSoSFhWH16tWs7vz581FeXo6MjAxccskl7KYGAOPHj0diYiIAYMuWLbjlllvw3HPPoaysDCkpKS2SstkKsev1l/HR0Xo0uU+N2x1dcfktv8bA+GbUlm/Du/cexIiXr0HfFnb8xcEwDJTm7MKWAwfh320OxqUYKDy+CVtOlCCy+3SMTDJaEcJ9ljW55/0Z2YO3bvwOvZ79BYaEBMDBbJoU9jNj1cjL2IiVb2eh912/wvBI+lfXRD9iw1J63HvulcNLfRYPKrr+ZHi4Q5M5DldLbjGR1Z7i2TPO+aYWIw5/e3BE2cv7qbWo9GWxPGOemlAHVB0/lF/dHqJ8yPqCW8RVeLh4srWH82dxZHFE6XIcyWLr6OjgMwvHjYxnbn1TidmPbH/RxS+LS+3T3vaA2ZfFER3H15w8GFvlUZ2PvRtX4N2c3rhz/ghEsb4KsfuzLThWEolh145C4k+Ro9psbF+5Edtz4zHlpnHo3MJ3HrYsWY3DdZ0w4vJx6BbcGoM1j/h8Wl2QZJcHSnfUqFE4dOgQtm7dissuuwwfffQRqbtmzRpMmjQJR44cwezZs5W+d+zYgby8PGRmZuLll1/GpZdeiieeeAJPPvkkOnXqdFpv16Lf4aWcGZgzIQV+DjsMw0D2tndx51PJePupCxFcn4Mdn+5CV+D0BUm9MdWh5Nj32LZyCxKumoNxqEXh/o3YtqkYveKnn9YXNyfxQCo7VIt1PKVTiF3LdiDs8XkYFOqCQ6lPHcr9EBrXHUMmxyM6kD446Pij6qKXg1qHujxy8XXjiTaynDgfqouzSk9my3274ku+vnLkjej2i6++ucXXF7+680wmsl6R4VX5bGutZGJx1Nq/t/h+rhy1RXzBJeODGvMmhmztbY+8uW/I29qvHrE4+hE4aqhCwZEd+OpAGG6Weq5B/sHDOJCThJ4Akn6KHDVVIu/APmzv8oQOAAAgAElEQVQ7VIdRrTyGILn/IAQ1hSLK7xzjyEv5MeZRqwsSt5BTYrPZkJSUhGuvvRaGYWD79u3sJSkzMxNffvklpkyZgpEjRyqBe3QWLlyInTt3wu1245JLLsGdd96JF154AUlJSQB24fMFmQh/YgrOGxePAMepza6qVxQij4UiDEAzADTXoWz3Ytx+/4fIixiOS3/9G1w1IRYNpXnY9f6/8O+lm5GJYMR2vgBz5l+JMdG78fkbz+LfX5QjsSgFteM7o+yLhfjPN03oWpqAoJt+iYs65WLzireweNl2HHP0wpjLr8VV4weia+EaPL85D+6M73DiYAiG3/orzOhVhPXvLMKH67NQHDMCs66/AXP6JyDCDyjY+zZeffITfF9cjS6/mIq6+maiGgYaMpfioYXAzEuasPnj71ES0guzr5+LoMPL8NnyXSiPHYAJv7oCF8Q2oDxvPzYty0S/lHBkHf4Sb2yvQtqR3SiIGoS0ccHYv7MQMYePoXH4VZh/dRIKVq/AF18fRxnC0WXsNEy7cBi6l27AS5syUbFvBwoOOdDn+vmYPaFni29iuL5Rbdw6FxeVnmqStPUbBV3fHDbD0P+LLTr4ZH7a64DH/RTO85m6UHLPOhqrWdrrkMn5Ui3MssNve+dqcWRxJMZob2kPrmQcUfoqf+2BjRNqn5Gt8d5cLDqKJ4sjBUeig7pcHN78OT78NANFCEZ83/Mx+dJJGBjxw/Pqw1jz2l/xxMfHEDFsFq65ejKG9ghB+e71WPrmO1ix7yTKkIgBE67Cr64cjR7J2fj04c2oji7F4Z3fY2dOCAb8+nrcMKU/4oP9UbDmbbz62if4vrwajeiOCX+4Fbec1w2BTjuQ+yn++fwrWL7PgLPfxbjx9pswPaEJ1aXf442btiJqRg02vrsJ+bEjcOk9v8aVfWLJWpBSsBtLv9uKb3dlIfBwPlwTJiLdXo7Kus7wT02B7eAGLHvzHXyxN/NUPrOvxPzZY5AeFegrNa1w/ZzmkeO+++57iHogAvL8N0ie8dDQUKSlpQEAQkJCkJaWhoKCAhQUFCA9PR379+9v5bOiogKFhYXIyspCRkaG1r/MzEw0NDSgoKAApaWlGDduHBYtWoQJEyYgJKQe37/5L7yfl4pBgyLhrA5DaKgNASHx6NEpAn42Nxqq9+Kz5xfhyIgpmDiyH1xlm/DWZzUYeXk31G3+FK+9nI+B187DuKHxKDu+Fat22TF8Vh8ElZxEUakd/S79HWaOSIRf+XGUNEZh2KxfY0o/N/Z/9BqWfVOAlAvn4ryuITi0fB/KnCHoEnwIby5cjtyIgZhyyYUY1rcB3z79LDbUpGDslBkYEFGHDa/uQuDQNKQY3+GFu95G5cjZmDGtF1xbX8W7GyNxwZ3T0SvQz/Q32A00ZS3HI3c8h8yodJw/qCtKjizGsy8tQ05+IrqMjEP5vmVYssKNITNT0bT/G3y+aB9iJg9AzYZ3sGh9I8ZfdQXGpzlwYuMKfLYnABPmXYbz0+04tPJrfLs1AAMumoDh3cNQsnoTMrIbEB1WgGVvfIojfr1w4YwpGNG/C+LCAuEkeoP7yZC5AcVmN+uJOrJLAmUjxlFh4OxVNtQ49UzmzyxUPlRNVbmp6m22NcdW1YrKicIl+qXiUVhVdjL83uRAiZiLOOax1+kdMT7ln3pOxfAlP4sjiyPRjsqdGqfwcGOccLmZ46kOTzLc3GfVHqCTG2XPjXF5U1zK6mZxdBY4qivF8b3f46viLpg7PhInVn6G996rQO8ZUzGqdxzce3Zj+6aTCBnUCTU7VuCrHcfhGjsJw7vZsGPjXmQ7YtGvexlWL/wSh2u6Yuxl0zAguRQrPz+A5q5d0bNHNTY8/XesrA1B76mT0T/mJN5ZfBRxo/ohrXAZfv/vTYgdcjGmTTkfo7sV4aOn96PznGHoHLAbL82+DbtG/BK/nDYJCfVH8N+n9yLt6sEIL9+E1+96FvvPuwhTxw9CQPFmLF5Wi1FzhiBWxlFDMQ5t2YtDJZEYPsYf25d8hC9PhGPinEsxdlAI8r76BhnZLqR2qcSnny7HXvTAhRdNw7h+dmR8fgh1sUno2j0WLmsetdJ3mh1xSVCkiJKUlISEhARUV1cjPT2d1AGArKwsZGVlsc9lsnfvXtx777147bXXUFdXB8NIxbwX/4asv3+A269+EQFuFwKDbHAMmIlb77kds5IAwAaHMwZde07ARQMcyI4rwt7f5qDMGYSu/Sfg+scnoPOALgix5SC6uQJV7xSgPjQGyam9kNa5Gl37DEKvtHI0dE1DWlYFevfug8616/D+4XpU9piJG2dNQ6K7GrFFf8XGnO04EWYHAhPRfeh5mDhlEKKPLcajWfEYfM1sXHzhAATVFCNg93XYvn8iujQuw9KgoXh+5jSMTg1AZcQBvL2wCJ4KtyDMsMFZ0xNjfjEb4xIC0NW1BR++vRvJD87GrJFAZnQBDt/7NQ4WTkVvc9GcIYhKHYLzp45D9+LN2Pt9OOJ6DMO4qWMRe/QzLD95AhV9rsLEC4YgCDXwO/EN3j32DTLikoHAeKQOHoMJU0cgzvSzRq6JZX1i1uEWXdmhxyOqw5HMH7UxqHx7s5mYRcTDxaUOaFRc3ZpQ9eZqy9WB0zePUz4oe2+eqdYgWZ6yHKg4OnWQ5a0TT6dWqv63OLI44kTFkTe2sly87QVZzb2tt46Otxxz73U55bDocmqOZXFEx+Te+8JRXXE2tmdsQ0a3ebhrwkiEOuoRXXMUB1auwuaDPdEN/giLSMfgYRdiQnQX1O1ZipzictQG9saYa67AiMAoJHaOhL0uBMe//ByOymrUww4gCJ17nYcLJl2IrgjA9rdWoaGmHk3hNSjffBJ5PQMxqucFGJPQHwmplUgMDoBt62d4tngcXpp3BSbHBaNqYBrq18/A8m2/xq3Jdvj5x6Ln6Itx0QA7smKKkfG7HJRJ6kHmHRCJxF4jcMHUMUjxO4wTnnFnPWqO5qMAicAlgzGkx3Ck9y6BIz4OwT8yR5T/c2EeOUUF7jM35tn4Vq1ahdWrV6NLly5YsmQJC3bWrFmYNGkS+1yU559/HkePHgUA3HfffXj11VexYMECxMfHAwhA8sCZ+MMDvTE7twxut4Hs7Cyc+PR13HfFceC9JzHR6YSf3wAM6B2JIEc1QiKiEIcCwO4Pv4hoOLI3YumTb+DYoX3YsS0LdWlXKTFV5Oci++A6fPjBGmz5+Ck4AdQUHkHAeXEYFBsJBIUhNMQFf4eB4mOHkHNkNb69fyPef/zUf1dUcXIHIsKzMS46H/H9p6FzRCCc9gBEDD0P/f2XnyKlVa1tsNmTkJLeCUFN1YiKTEJMIDDwvCREBVSiJj4B0cZh1NULZs4A+IeGI9T/h4uWnwsBfqEI9rehqa4WrvAgBKUlIcgPAIKQlJaAoNIG1NQ1AYGhCA4OhOuHLuEaX1fMNrKDFiWqyxWly+lx397qHlJ0bWSXH9Fed76p8Kg40llsxM+qb7tVz3VF1R/e+pYdDjzrlm6OKp/tKRZHFkfnEkeqONw3xzo18iXXjuBWF4fFkXdx21O84sj0ubmhHg6ngaQeqQgNAIAARHWKR0xyGCqrGwHEIT42AV0TghDkF4SowCBUAIB/BEKTyrB77WdYsXA3jmZswdpN4bh43qU/eO6GHt2SERPihyBHOOL9nPADgJSZuOu2Cnyy6mHcs+T/weXnQJ+pf8I9w7qhYfcW5Jzciwfm7MSjNhsMdzPKsrKRvicXSHbCz68/+p8+q0YiFoVe5QoA8A9CYGjID2c6k8QMw4y5xXB/9BZe+cNiPNMYgLThV2L+TfMQG68sq5b83OZRi58gmR3qArfZbFi9ejUWLVqEmJgYfPDBB8jNzSV1Z86ciZCQECxcuFAboMfXfffdh2+++QZ33HEHpk+fDpfL9QNmFxLT+iPx1G/7oa62FlVDQpF/9Y3YdORJTOxpg80WCJdLcFyVhwNLX8Qf3i7ErOsmoteQPkjotA/79ooIWv94r6mpEU2dBuGSUdMwf0zy6XFXdGd0KVsF8/WwoaEezX2n4ZZJEzEyNeL0eFBiTwSuew85J0vR2Nx8KpfSYhS63XADgGGcviS1YOH0jwBtsNmCEOBC6wnCCKVXUVMLo6r6B9cGaqrKUFvTBODMn1OHYcBAy0OL+b35s+cCQOmJE4Ky97z3PBfjiDZmPfE5FZfyLU4ys2+zqHTNsal8KVtOl4sr1oTaADmOdITzK77K4lB1l42JdaD8m/1SNtQhlMuH6wEZLo8PWc9QtfBmTFcsjiyOdDgSY3mTk4p7Lja3FlM+RDtVfF/40KmZCq/Mtq21tDhqH46aKvPw3SfP41/NV+P1+QNanNpsAGrqG1BYXnnavr62CtWVxT/8ISwnnE5/OJ0GWrg/vgavvPARjjkTMGzsaIwd3RNGaQaiTysEwN/fAbtdsAuIxai51yJ17DhcWd6IrOxtWP7HP+LN4atxZXUtMO63eP7usXDYf1hH7Q6Ed40CjFNnOpcLLf0ZBnEK1Tj8G0bLQ59fGHqcNw3Xp/fFRUUVyCk4gg0vLcHKZV3QKW46enP/gTn+d+eRVz9BouSrr77Cyy+/jOTkZLz77rvIy8sj9WbMmIHw8HCkpaXhjjvuUPq99dZbMXbsWHzyySeYO3cuvvnmG9x5552YNm0aXD/cdmxbFmDyPZX440t3Y0JPFxx2wOVywe5XgGPhE3DNQAB1tP+G2kocO7kb+X2nY/xFExBavAVLVu9DBs4XbhKtf5IT1qkretg24duT5TA6T8HokGKsem4B1gSPwcVDWvwuGmJ6D0TvhStwpMSJS6cPRpeGQ3jjzoeRdclfcV2f0UhdsAwrR/RA4ow47N+wApvqAzBHVhibTftCJNqJLRCS1Bld6nYgY/1BZI5LQwpO4uCGajht6UhJavH3IGGD/q95ic+ocaq/ZAckmZ4qlsxGNwfOh2G0/B/0cjnJcjWPcXFluLm8KV/eiI4thZk6OOvWRtYjMjyijahLLe66tircss+y3tCJpRKLI3ksnc8/R458GdfR4y5zvvLjbV6+cCHrI2/8yvrSGwxtGdfR+1/kyGEzEFBeiG/fW4tdF/VHT3cdCiuK4UqMQ6eoGKSEJcGxYjsOzuyHnq4CZG3JR1lmV4xNiwR2nA7Q4mxVlnsQ+416xI8Zh8mTu6F0yxt4vakQwWJwwQ47X8O1b/rhF9fOxrShYRgYX4eNSceRV9mMpJHj0f+J77C2eS4eHJOCpiPr8eT8vyDo2VW4PqWFS96/Zk0gPju+Bn//6hAau0zE/Kmj0bdzMHJSF+F7dwVqG22t1GWx/lfmkVMc8Ka5161bhwULFuCKK65AcHAw+vXrx+pu2LABKSkpuPnmmxEXFyc9YN96663Yu3cvrrzySjz88MNYuHDh6ctRYOCZv7Zh9J6De65dgtX/72a8ZXfD+MGdrWkY5vz5KUwNA3tB8ouMQtq4oUj642OYc94iJKQNQe++/dCtNheFRYHompiGwJrX8dzDf4D7nj/iks494M55Gn977K9w334DfvGbSxD8/mt45OrnkFMch669p+JXtwxDj/ANLeOkTMeD/1eP/yx+DNdNK0J5RSf0HTsHdwxJQnyXK/H8Xcfwlyd+g38/nIoxV/XBaKMY5p+M2my2Vj/E8u07zdbijB6I2fNrEfbxcjxxy7uoRjDi+k/ARbMvxKDGVVgs6B/4+D48sbcTfjnvFxifLvm6gRHdg7t5Aqm+jfD4M38WfXCi2++qyayTl84FUibtkYc3ouPTm42Tm+86PLeHUPX2tW6qn05wcWWYfBGLI17+1zlq7/WAwtMRa05H+VbFFfuN460tvWhx1La4Mo7sQbFInXgDrvz8Plw+4TXEhERjwNir8fsHBsMV6sSYWZcCto/wj9t+iQq7CxFdhmPCHdfhgqRabGoR58z7kP5DMfrrL7HoiRvw6UOpGDD7fIT7O2ErqkJNTRgPtscMzE59EO/f+Hc8WteExsYUDLl0Ie4fF4aw8Bvxzisv4+kXpmPQbf6wN/XA+Zfdj/t6A6jmHNaj8NA6vPb0yzh63kN45dr+ukVDi5tV4lCM7LETS/71K8x9qAoV7likjZiBGyeNQ+9oYN97t+PRg31w29XzMLpbpF6MFuF+fvPIVlZW1mLX4xIrLS3FunXrTn9OSkpCXV0dnnrqKTzyyCMtbClZtGgR0tPT8cADD7SK5XnvATV9+nR8/vnneO655zB48GDcfPPNePPNNzFkyJDTOh79xpoylBSWo7bFxA1HTFIkQvyB5qZKFB6tRWiPOATbDDTVV6I4qwGhaVFw1pchLysfVfV2OF2hCAkNhL2mEcHJcQhqrkZpUR6KGwIQHZeISEcNigvzUdYcjNi4OEQGNKCytBAFJdWob/JDYGg04mLDEYRK5JQ2whUahshgf9htNqCxEsVF+Sgub0CTOwChUfGIjwmCn8MGW20RsrKKUdnkj9DYMNiLGxHaPR4hDtOvigBw15cg83gjYnolIMRwo6m2BDnZbkR3j0WwzY3GukoUZ9cgMCUeroYKlBbUIygxArbqMpQ0BSM5PhTOxlqUlVegCsFIiA6G02aD0VyL6rIylFbUoQlOuMIiERERAldTOfJK6+EMCkNU2Kn/dqquNAu5tf6IiYpCSIBD6zLAPRcbUabLXaR9+WlJW2107XQuS7oXOJ1DUVtqwsUG1IuPLzE64kLXUdKRWNvq2+LolFgc/biikyOH9VzIoS34fyryv8BRc2MDyvNOIq+yHna7H0LC4xGdGIZAAHA3oLayFMUlNWiEA/5BYYiIjkCwswFVxVWoa3IiND4MAWhAZUElGuwBCI3xQ21xPgqLq9DQ5IegqEj41zXALzQc4ZF2VGVVwh4VhpAQF5yoQdGxSvglRCIk0B/1Zdkoyq9AdbMBAy6ExyYiMdoFu90GNJQgNycPpTUAEISohCQkRPmdOaumxyMYp850JdkNCE2Lhl/5MXyz8n28kzURL985Qki8HpWlFahq8ENkrB+qy6pQ7whBXFQwnGhAZUEpat0BCI2NgL2uGKWFxSivaUIz/BAUHov4mFAEBjhQW3ISuXUuxEVHIiSg1f8BqF04Ohd6yRtpcUGSgTdfkAzDQHJyMurq6jBv3jxER0eTNmaZP38+7rrrLkRF0T95MMeePn06BgwYgAkTJuDJJ5/E7bffjilTpiAgIEB5UNUZow7o1K2UO4ByQsUVY8jiijqyb225gzOFReeSITa36rNoy9WJu+nLbFXxzOINfu69TE/MwfyZy0dlo6oXh7etHIlYzJ91/OliouYKN6bTwzq9JAq30avwUDaq+qiw6thYHKl9y2wsjvTWTxG3aj3ldKjY3FrO5Uz55DjSqT2lp/NMFo/iSdUToni7x4n5WRxZHFWc2Ie17/8LFZc8jmt6uVrEoHxaHLUPR7bS0lKDAiNKaWkp1q5de9pJUlISxo4di/z8fKUtAERERCAy8syP7ShyPTJ9+nRMnDgRn3/+OX7/+99j2rRpCAgIkNr4IjoNJsNKbW6yBvDFhmtSmS2Xo26+qhpR46p8VSKbcN5w4U0OKjw6GHTz9qUmZlug7Rz5EluFpb3npC/Snnmeq/l4aw9YHHWk/FQ4Otu1Uu1HlrQWi6NzX35sjpobG1BXXQmERCPY+x/u/E9IR3DkVDk0BxV1g4KCkJqaqrwAUKI63D/66KN4/fXXW1yOKGyiLxG3LzdaKnfdvCh7sy5VS9kY9VllS9lxzUNdwlT5yOLI3sv8cbXXtZeJLxcn3Rw8frzB4O0kbi+O2kN+KhsqNc+5Z6LdT11+KjlYHP004uhyJFvPLeHF4ujclx+bI4efP4Ij1L+p9b8sHcGR8o80qA6ooo6MbFHMTWDWW7x4MRoaGhAZGQl/f3/2pymiD5lvmY5KvLGjnnGXNfN7rm5mXdVPKGS+KRsKs6+XDm9+qqJ7GaXw6HKmk4evGGQ+dPD48tOk9uBIB6/ut4tif56Lm623fePNlx86vnz1Y3HEi8XR2RcZR23Fq1ufjhDd/ehs4WmLWBydHTxtEYujs4OnLSJy5OQemoX79po7+MoOfzobh/lX8WS42rq56WARc6f0PWOqn1DJxHwJ4jBSmKiLFJWr2R9XC3MunvfUBZPCJNMTY1Gfxf7h8lL1mQ5WCjOVA+VLlSt34FHlJ752BEecT28OqRQvVB05O+qAy132Od+iD85WlauOH1lfUfnKasId7i2OLI44PJydiiPVfuNNrtyeRumr+FPtZ9xaJ1sXZbg5X5S9GR+3t+hypPJP4RXF4sjiiMNrcXR2OJL+NiOXJEcKBUznGZesalMVm8hbHBQGUZdqapkvaqPkcMpwiRso16SUP+7AQMWUNTJnQ+XENb2OP9Ge4kHMj5qgXCzZosRh42y4RYHCRuGk8lP5bi+OKNGZGzK/Mhw6dVP50InJ+ZNtBFzvcjo6PdweNt48tziyOOJs2mtfVD33do3xtj98tVH50nmuOkiquPX40O1XFXadceq5xREdz+JIbaPypfP8p8yR3fPGMIwWYChjscDiwU0HqAqk2Z+oYy4YJSJ+HaEOrN4Syl3eRH1zjc06nvi6RJvrzeFW5SW7nXN5yPI0Y9K95FL+KI7NeXAXRNm3MVyOMjyqBYCykV1Idb/B6EiOdERHl5rvVP/6uh60RXTWEs7G20VXR3Rrb3GkZ2Nx9ONIexwCz4a0J0eqs4jK1vx6NsTiSD0u6phfz4ZYHKnHRR3z69kQcyy7edBz6KQOn5wjmZ7OpUtXdH4aYsZP2Yq4zNioMe4ZPO8NA263R6/1T1FEfz8cleF2u0//z15FXRkHqn8eGwoHV0eOP6o+Yu2pGnG+qJjiRZuzE3MUMVD1bo+8KWxcr3D9IrvQtSdWbziietxsI46JsWW5cj2n0pP1qmpecZhksXWxeIuTw03NEcre4sjiqD04UuUsq52IWYcXUVcnDlUTb3Fydqo4Ht5VsTnfVGxfcrc4sjiyODp3ObJDENU3daJDmYg/7ZDZi+M636J5g4XyRf0k5tR7wKjYj29fvxtXjR+P8eMvwOw7/4IlewtgAHCXfIdlT1+MEWkuuNLHYvaCldhW6gY8G627Gdlb/4WL/voqPt6R/4NfA82ZH+Dp3/RGSqwLriFzcM+qEyhqaNlkIk5PjlQtZd9AUj6pn8SY3/vyUxPZtwOqODoYPHmoetBXDNQ4d/H3POPmBsUDh4F75i1uboziSNY3Oj7FZ+L80fk2yFsM1KIm+jH3uhkLVTMZR5wvDoNOfaj+9YjFkcWR+NreHHlyE+sh48jzXrYnU+unaM9xZI7nseXyNL+KOVDrpNhbXFzVGk7Vypyf+JzyI45bHJ0Zszhq/d7jz+Lo3OGoxa/YicHE96qDKZUsZWse07kwqYgXfYmvIrmnC2gYMJqbUFdbjerqatTU1qG+sRludx6+X/4pPv4sBje+vxZr1y7GHT2c2PHMO/i6sATfLVuCzSU98cjqfOQu/yPiN3yIV99cgxNuwGjOwfbXH8Svrn0IX248fgaHewuev/4JHO3zV6w/UoGjD4zAiusfwwcHc1At5CM2BdfA1GexmcxNI9bb3EhUg4gTk4ot4lT5oWJTtlSTm32q3otCLUQiRmoy6uRLLWZiHLGGIjYu1/bkSDXvZGuAzpj5lVuMPdgooeKbuZHVgcpPxpFsY+HWOWp+ivlQ2Lg5olovLY4sjnzliDq8UHuDyp8ORzJbUbh8ZOuz5zm1v4i2Yu1068bxIe5THEdiHcRxlW/Rv8WRxZEsb4sj2rfov60c2TkDyoGq+OYNgyNcBEDZq0in4suajN5oDDTXFCLjk6dx1fmJSE5OQu8hk/GHlzbhZG4eshoMVFw6ExPjbLAhBOGxTXCEZ6Jo2xasORKIyu5XYmS3SET1OA/XXuBGeNleHDtpYP8HS7B4dwJ+fe0tmDow9Qye/HxkN4xF/yEDEREegKTZozE7uhiV2Q1obJRvtmKeVI1UhwqxycR6cZOGGhPtqYMIhUHsD/EZdzCh8Jt9e7tAcM+5gw91YKHy5SY3lb+srub37cmR57Poi8ItYhExUJybfVPPODHHo3KU9Rfli8NA9ZhsreHqwImqPlwOFkcWR6J9R3DE1dtsL/pQcUTtTWIs2Tot8s3VR1ZLzielz63t1L5F7Tkyjsw+uTlgcWRxZHH00+HIzh3YuM2DIo8i1/yPS0xMiNp0OEyccJuKuOEa7nIc3/EmnnlwOSb95QBKS/Pw9Zs3IWbns1i8LwmX//JevHxNPxhGMxqLDyNjdzHy6tKRGG3AHRWOyNgonPpj5FGIjg9HXXMRSssr0PuKO/Ds83fiyumJCA4x4U4cjvGjduPgzq9x7Eg2dq9cjaXNnRHbJRD+fi1z5A4JnudUjmINuOaSbbBcI8t6Q8QtTghZv3CT29xDZh2xwbnJY/bNTT6q10QbcQJRNaAWCdWhjZpPZ4Mj8bm4+FK5yN5TPjk/5lfZYiYuyhRO8zNxjMNF+edqwK0/KkxUv1CbkwovhVX0ReVFvad8Whz9/Dkyf1atURwW2ZoirvOUre4+Lusfsc9U+wIVi1pfZVyoOKX8Uv5FP55n1GeLI4sjztbi6MfjyG7eTMwOVYc0MbAI2nwA5XQoXzobk4xInec2mw22ynIU7T+JXRfegctnJAJwIWX4NfjLax/igcnxp/y4m9FYewhfrlyET/ObMeqXc9HLXozS4sJW+O0OO+ySRkdDKNImT0fley9g3vkjcNGvVmHSdddgUlwMAkEfeMVDgnhwl+VNHcJ1akSNcwdyERelq+olmQ11SaH6g/Ivy4+ajCJWCoOox+VGXXoo3NQCppsDFZPDQPnnDry6GKh1QxZHVi/zc524qjWFsuHei3OGmnsiJtVi7dEVa0/htThCq+cWR23niDvImP1w+zaXC6dHnRtkHIk+VXs9xT+Xs/hct25m/NUdbUQAACAASURBVNyabs6DiiPmaHFE52xxZHH0U+HILjpXCUWQbkJmfc6GKpAolA7VXEpMAQEISIpHLFoW2zAMwN2Iurz9WPXqi3hrWQUmXHwXfj0qCna7A3YAbnczmg0DhtEMd7MbsZHRiAwLO4NDiN207WXc9ucTiLn7E3x7LAfZ2+9D3ZIH8crXR1HawF80uEYWJ5bOBPLmwE2Ny3gW6y4eWqiJRzW3SjgdM/8yzDpxdHtInIyyhdD8WVUrDpPOuM5cbNHngLTnuIVSxpusF6lcqRqKr7L5zuVL5UnF5Pyqes0cg/LF2Yh4LY4sjihsbeXIUx+dOok6VM0pjsRYlH/VusjVURRuzTTjoHKT5ccdnkRMurnIcjS/Why11rE4sjiSYTVjOVsc2amCmImjAHMbggieW8S5BuAAczhkn6nYLT7bHXC4m4ED+3CkqgmG4Ya7qRqlZYXIL69GTd5WLH31cSxYZeCC217ADbPSAQBhMXFIsNlQevIk8pvccDfm4nhmBUrL/eH0M938BbzFhXmoH9wFF/QMRZQ/YIubgEsn5SDj4AnU1DaRGzqXg2oiiLX26PryXqwxF1M2qamJw+E2N7w5JtePnFC9KZsY5tzNY2JNRD1urnA2ZgzUQtWRHJl1xLpwNRafifg5e2oNENcajiNyvgp4xHGZPaXL2XgwUjmKeXH5cnhVumaxOOJtLI70OBLtuLxkrxweMS/qM8eR+M/Mp4o7GU5RqLWZ45LKV+RXVRPZHLE4sjiyOPrpceT0vDEHFBMSk9O97VHPfLEVdcyYzCKOc59tNhsQGo6EAX0w7qU3sWRxT8y9IBzl+Zux7Js9KIw8H9OL38Y/Pzdw0f3/h3FRhdi/vxDOoHBEx3TD8MR6ZG/5AKs2hKGnezfe3xWJhAsHITWRxx7ftR9Sj32M5Wt7IdzdA9Glq7Fugws9b+2CQH8naouOIrs5BqmxoXA6Wv319dNNqjr4cxsn1XxcPbmLC/VMFKqZOR7EJvX2AiaLyeGneofKXVUTnfnBjfvquz05onTFxcG82Iq9JI6r6qqDT2dcZ40R4+ni1/GrElWfipudSlfUszhS+1XJ/xJHYs101whKh8OvslONe4uvLVzL9gdd3Lrrty4uiyOLI4ujc5Mjp0qRSoC6qXmIFse8BURtGrq24ibDHVhPSSg69Z6Lm5+048lnb8XcfwBhCd1w8a/vxJ0DGvH5s0dQUgUsfnAuFv9gETtsFm647W5cefVvYAS9iBcf+w2etvfHhPm3Yf6MUUgyuw+MREqcgXDXDyXufx2efQpY8OdncfcrRahGOi584B+4f2ZXxATZ8P2rv8Pdpbfgo7unISbEn8xBNqlUdZM1tGqM2rx14+jYqOxFX6pcdeKo9LhDiYhDxCnOEWrB4GLq8tEWjmQHLN1aivbcgbA9RcaVt5deisv2xkth052vFkcWR+2Vs7f7ssoXh81XvOK66a2tam/xJl8d3faqpVksjiyORL8WR95LR3BkKysrM1SODMNAWVkZ1q5de1ovKSkJkydPlgZpa1FVG645EZVfXdLMReaaRqdeurmYY3F2ZiziOPdMhU/mU7yEmMc4rN5gp2w43zIfHDbKN5eLykaGk/OtwifLVZV3WzgSY1CfKfF2ARXnnLfzQYd70caspzuPZbYyPyJWX19l+VgcqW1lfkSs/2sc+YrRW+y6+wC35spiUXnr9huHncMo0xfHZBzJ8mgPbDKxOLI44vQtjvTFbOsE9Iukq+cJINsAfCmuiMXcKCo91aYrvhd1ZD5kYtZRbfQqv7KmNvuifJrHqUaidGXNTPkX8Xl8qCaCeYzzTdmK/qmFQ7Y4iH4p3+Y+FvtBrCU3TuHhairqizmIOt5yROVsHqNy4WwpO84HVTvKHzcfuMWP60HZ3OTqyWGlchV7hMpfFG/1LY4sjkQfuhxx+45svdDNWYxH9YYqLpefao32Bh9nT+0V3tbS/J7rZ4sjiyOLo582R05uY+PIEoUqELdRmn1xB0jKhsImE8qewuFpMKqxzLmIr9RBgTuYympL+VTVQlY/TldWH6qRKHsOK+WTq6mqnjLMIgZvfHPYqDrLsFDPZD1B6VH1omJ1NEccLq6nZeuBij+ZvsyGWwd0OeJ8ymKo1iHVfKZ0ufpSeC2OLI6oZyp9mb2372WHCY8ud2DRqQ2Hnau3Ti1EUR0UVT1k3sc92HTXbG6PEW0sjiyOLI7ObY7sOhsGRaJZ3xsCRV+eMWpT5HTFuKJQjUeNic+pzdlsKz6XNaJYF9EfhYvLWdQVMVBNRwmFV9WsukJNTFlvcQuDDLfoQzbhVZPDlz6lhMIgu6RQix4Vt6M4ko1RfcldAEXh6iVbR1Q+dGx1eTL7VPWG7GAse94WHBQeGUbPe4sjiyNdHyobqmayPZZaiymcOgc12TgX1xxD5Ytbbz3PuL2XylEVU8WxzIdMLI4sjkRbzqdKLI70OGrx59Kowz9lSCXIbSaicJsLdSCk4rY1jjmGeUyWr3nM0wSiLXVpkfkTfcsuobJNn6uJaCPelDlsVC6Uru4FR5a7GQ/lW/XthWxyiD645+bP3MQRn8m44S67XH66c4vCSuXizUFKR3QPmDociX2uOsxydeJ8UouzbF5SeEUcOj3WFrE4sjii9NqDI2/WQM8ewsVVccT5pMY5G1WdZX0gO7B5o68Tvz32I4ujM88sjtQ+fcGv0jOLxRHto8VfseNuU1xQarOUFVPUkY1Th0dqTBTZoZOKReVGYeFiqT6L9iKhVD5cnuJBg6qXbOPk8FKXPg6T51W0ES87VANT/WUeF/HIOFD5Ey+0OnxS+lQdxDhmLKreFXXFvM2fqZqY9ShsMo64ONxnlY3Y1yJuMw9UDUVbqvacT7H3qJqJuKn6qmrJLcCy3qBENg8sjiyOqFhUjrJcuH3V7IfjRHet5dZrEQ+1FlE4uBiUcGuyLBeqb6mYqn6lfFH4ZVyK2My2lA+LI4sji6Mfl6NWf+ZbDMYtzpSIm4pMR+WTKoAZG7eZUbocNspO5stcUKqpdWzFhhOfiz50PssalKqVDDuXB+XLLNREEsdFERuawsBxxeGhPnO+dOsmE91cZT6pxaYjOBJjcYscp8/hUfmW+RNrpjs3VfPC45vCLcMn80dh94zr9ou3OhZHvFgcnRFq7aHWAZ1YsnwojmSxVXuimIO3NjpCYfGGI5UvnXHA4kgmFkcWRzrjwNnlyC67ZXIbGmejIypb2cYh6ojvPZ/Fg3dbcekUlvInu5yZ34uTRPRBjelusBRGXyYHZcf1CGdj5sXc5FQdKNxm0Tn8e4ONsudEdqjzvJd9M6EjHcGR2F8yO26ee8ORL3i5eKo4qn7w6Hjq4S1myka3X3R8Wxyd0bE48g2f7Jm4L7bFb1s5En2JOHWE6yWdAyXli1qvdePqPrc4sjgScVgc6eMy45M9a0+OnDoXEtGJuCGKPiifHXFAPOWzGnnbtmBfaRPcP8Cy2SPRd8QQJIQYaKzLxu4VReg0axDiTHacP4/UVeYju6gYjqg+SI2woaY8C9mltQiM7oFOoa1tZDdY6gBBTQrDyMfOT7IRc9EAJPk7YNesdUufDagqzMThXRWIHTsEyS71t6itfbT+CY6IQbRR+TPriYcCboGQ5c75FvPjelDkSaZnfk5dvimc4kVW9EEdjMx17QiOdPIX5zDFhYiZq7WI26wvmwcqvrhnVC9R65UqBldPyocslix33T6knlkc/Rw4MtBQU4D9G77CvupgRPYchSl9YqT5esMRxxnPURH2fpGF0NE9kRQeCIfAk4ojboyO1VJf7InWuVQic1s26kOjkNTDhYLvDqE6LBkpaYkIddIHPFXdzHFtNhtguNGUsw1f1/TE+O4hMNyNKM7aiq37T6C0FHD6ByK55yAM7JOCIDSgIv8Idny1EzmnvQUgILITUgf0QK+EcDjKs5FbWgVE9ULnMAPVeRnYs3sXjtcloteA/ujTJRL+BB91uXuQURmOzslJiA1xknUT8Z8bHKlxmMUnjhgf1P6MhkrkZx7G7opYjB3SCS5i/z4lNcg/mI2y2kAkDeyEsDbPI5DjHcpRYwVyD2citzIE3Ud0RViLWJXI2XMUJU1hSO6biki/c4gjtF7raI7UWDqKo9O/Yicu/JzIdMRxrmAq36qmMvvK3foG3vvoOCr8gwGbDTAMVOblY01eCO77RTegYgv+c8tGXDpzIOJMsUX/LXE0ovDw1/hs9WZETH0KqRENyNmzAku35CN12oPo3IvHLhLs8S3mRcfeh8U3fYzz9jyG+JiQ039BQ3ZAaZ1LI6pLMrHvm2z0HDoEnQLPNB/VjJQ/MS/zcx177hm3+HIYzLXSxS3qUXWi7MVDDfWeq5O3i5v4matdR3LE1c2XuS3WiMMj2lPzW7aAmd/L4qvWIW7+qepG+edypmKL2Km11OLojL+fN0dNqCnZgw8f+S3+G389Zl7XE1P7xrYbR+bPsvqdeXYQH933MdIX34lLwgMRLKmjR8S1WbUOyvYLKpczkoNNby5DYdpwzOjRA1k796Ao2R/RXRMQ5sfXWbUWnxk34G7Owqa3X8cng/+EcV39UbB7OV7/4jMcLahDbZEbdlstIhK/xqHZv8OckWHI3bcK/7rzDRRf2BvRANDogOEIQcSIIbjkktkY538UOzZuQ1GCC5dP6oq6gsPYvvxl/HNbMqbdcAce6DIU/hA5qsWxVYvxQd1ozJkRj5hgR6t5ROE/NzjS6z9OX3dN82Dh5vvp/q7Kx75Vb+ChA+OwZHAyktg5VIQ9y1dge04SZg7shDDNPGRrHYW/Qzmqy8GOZR/is0PdcMuIrujboq41yD+4H0frkxGSnooo/3OII+aso4vlbHDk9DiQAaMOdaIj8zPOj0rPDJRKtvVhORcrH/k7ts9bhpfnpcHltMMwDOTsfAOPrMpGndENLgBwN6E2fwc++Xw3qlyd0HfECAxKC4G7tgq5uzbj+4yTKIM/gsNT0X/YIHQJysSutR/iq89OoFPoGvRsDkTmmmVY/3Ut8sPHo2/kUPSKqMTJA9uwPSMHJfZYdOk3BIPSkhBVfRhfZ1bCKDiJ0kJ/dB47HL1jq3FsxxbsPlqOmuDO6DN8BAYkhsFlN1CVtx3frduLkzWNiBzkQn2T4SkQ4MnfMOAu34eV3wJ9ertxcu9J1PjHod/wAfAr3of9+3NRF5yItOED0S3YicCIJHQfGoRYoxSZhw5hW3YDoovzUBWUiOhUfxTkViO4uATNnQZh2OBwVB0+gAPHS1EHFyK79kR6906IqT2GbzPLUJefg+oiG+KHD0Pf7nEI0uCTOnBwouoV2XPZZUKFTZxgYizZgtZWDPwFmRfdOG2RtvjVrZc5juoQq7O56MY0x1bpcwdUrj6+1s0XG4sjHosZN5ePt9LRHAVHJeHyO57Dn88HmmsqW+5HManoP3oQescEAY3lKDi+H3sPFqEG/ghNTEN6n1QkuKqQvSsTZe5QpAxOQZitAse+y0RdSDQ69wlE3sZMVDZVobw8FznFNkQPHIzhvTsjKtAP1YV7se3r3TheVovQvgGoqHPTueR+j7dOBGFgyVZsLeiOC+ePQWL5HmzcsAWHi+3wS+qDEaOHIz0UQHMjagqPYNOmb3GiFHC6wtG133kY0i8Wwc3VKMnaj11781ENPwTHdkWP/j2Q7C7A/syTOJpbgYDiCthTB6Nfuh1527dj39Fi2Dr74VhxPULSACAYib17IiQ8CkGOEuxfk4k6/xqUFGQjt9wP8UOHYkTPJIQFOFFdsAvfr9+Dk1UNCE8diK61hXAOvwA9o1xw2lvmWLrvbSzM6Iv7/xCDxor9WPXsi1jf+7d47sHLkR7djLqyHVj574fx0isfo1//XyIYEejS/xrc/uYdGGoYsNVXIG/7J3ht8ZdY+k48Btw9Cl1jD+PwnpXY2u86TBw4Ezf/zo7sVzeh/lRjET2Wh71bDSSfH4vY6ADotp6s51v6bymqgzjnX2deys5yHAZdoc6creK3NIDRWIHikwewJ6MA1fBHSHwqevTtjqTAH3QainDk+y+xc28JXJ36YsjgHugUE4C63KPYt20HDhSUow6hSEwbhGEDuyAmvAIZX55AQ1AtinKzkFvhj8ThwzEyPREh/g5UHd6O777fi5N1jXAjGmnjxmB01yj4OexARQY2fr0ZB/IN2BN6YeR5o9Ar1I2Gmixs/fj/t3fe4XFV19r/nSmaGY2kUe+yunvv3RhsMBjTDIQSCCUJuRBIuclNvpByCTe5JPcmuSQECCGUkIQaqsHGGLANxr3EvVuu6r1Yfb4/bNlHW3vvc0aSqbOeh0dz9t5rrXetd5e1z0j4GJFD2ij61xEa/FkMmzWB0SlR3eLU5qyhhJ1Hj3G4uBZ3RQOugnwS8/LJa4sl2gXNJYdOxVNaQzPRpA4fxfhhOST6XB8/R5L6PpT5oro/WGFRicxvj38o1krs3Bat3rqFAlpv4xhH9vlorazkWG0SSa4AMTEGGaO/wiOjgkA7DbTT1raTTevXUffBOg6WNvPWpg5+88B0HHvX8tLvXmCfG046Wqiq9pF7AO6+1knZ8cMcK6ug88A+DmUkU1F8jOPFrXgOHaSsIRffnsW8/tZSttX6aCYWz+YqGhfOYXbEav7y2Bo6WjtJ8Q5kxpBkWte8wZJ1uzjR6KfRGcu6LU3cesdsRseUsOTxP7N0VytBXxMRBzvY1RzDrFPBmSLtpO342zzw7xu46M4J+I+VsK/0BEvXTqcg2EBZfTEnqhqJOvB1vn97DrV7l/PcL3cy65E7cK54kp++7+Tq/AD+wBGat+5j0UYHF2Ymkjw6Em9zE3uW76Tc4cYgSNv6IopnzWRW3Gb+/vQKyms7yY7KZ2LuYAo1FyTdfJD1Wz1bvWUw2w7lUi7qqvyKbSofIgZxnK7QlMWnsi1r18XSV5Hlyk7xaeez3cI31LisdHqL007xEEpR318S5uizzJEwsLWBkm3LeOzpxVTWQ1tEJ23tm9lVAnfdMozmLat4962NnAhG4HAGaW8/wJET07hgjp9tb77DrpY8LhszgBhK2PD8Ykqzx7NgaAqrn3qcNU2d+NM9VB08ypEPDnPXd6/nwtwWlv/9aRZvrKA5ogXP/nb21UQzQsBuGAbsfI67ftXOj8e1sL/aYNzNGez7w3/xbKmDYFuARs8Bdu3u5K57xhFbs5N3//gn3jhSCx4vne2trN1YRN0dNzK+eRvvvLyao50RONxBOlr3c+hoAxeOaOT9l5/l2W0G56WnkNEeScvx/Xz4+hpOtBt4kpop3etj7MTpwHFWPfEMRUMv47qcVFY8/DDbYv34Y6Ds0FGOfnScH/7wOmak1PLOk3/h7e2NdHidJOzcxAtvb2f0n8eSG+vFaZjmYbCOTU8sxnv5SwzrbKP60DL+sWUI3/rd1QxKBHDhixvO9Bt/QPNbB+lslcwZb4DUKRdz8bES/vn6B2wsm88F+Vms37SKte/sY+yXRxBrNVkqD7C9JYnC2AQCHvvzy+56t1N42nnhYGcd2d1LdKI6G63Ov2Aw2P2C1FZPyY7VLHttHceCEThcp+Ze0bEG5l4UB1RRWlJG47pySj/cweHmHcy/9UZuuiiG7a8v5u33/0WZDxrqayjrPMhXv38D86eU8e6DD7E7Ixa/r4PSQ0c5trqEn/z4S0yJKOLv/3iOXXtqOOmDYFMzSzbWk/yrqxnoL2f1I7/gmaPtdLYGqPfsY/v2IN/+3nii6tbx1Df/jO9H04nYVcTBylaWHOrgf34wh1Q0HJljrdzDspee55WdBtNTUxngaefApvUcahjKlUkOKle+xrLlu6gPQkdHK42rj9F6x0LmjsuyVdv1K0fCHLN7qT4XovLnUnX2xwSX2bMbuJ0CNhjMY/Zdk1j5zjP8b3kiKY4kkpMMHOnDmX7+LEYEADpoDx6j3DObHz96LYfffogf3ruaA7+cTF6wk5ix1/D9O+aQ7iri7Wee5JklW6j53s1Mm3ctRxs3knPT17luRB1bW7dQ7q1j1A1fZkbiJp56egO7HbP4t/tvobD9BK/+76NsXRtN/higtImkS7/Gd66bSkb9Yv7jlzvxzr+dn159HlHlO3jsu7/mg52FJHle40/LXdz26//kilFOjv7jdq5wdtJ5KrjuE78zSGfRHupSv8HtV2awa/GPuO37f+SynzzC126Jo2jJH/i/Pz7H1i/9kGyzXmMbkZFDuPindzO+YR1PP7yDqKRpXHXfbQyuWc6fH13BkciL+N63zyOJMlY++BuWvNNI/Kw4KDtJ/LSbuOvW88j26Yt6cwFibjf36X6q7Kp86uarOH90Fxc7uMz2dLitLkkysSrwdLZ0FycdRyJXdmK0ypvYJ5NQ7IoFrazIFeeYjg+ZjtWcspsXXVFhhUFsC3P0ReGou06wtZbSvStYciDAd+//HrMHumnctY5V29qpqzrI+veXs7JmJj//+XzSXdVseuZxXln8AlGDrsejshsEKKMpYTKX3XMrY1nOT25dwf5D5Yxq+5BnVjQz+64fcd2sBCpf/w43/7WN1tNGgmfsnf50oJYBTzzGv2dG0HnwIS74SwU3L36eWwsDHF67hIfu/RXvXv4Us44s5tElNdzy8ENcMyGa2hPbWPnGMuqOHmbTjiUsOjqZ//nNQrI8dex45e88v+hpVkTPh9oWYjJmc+19N1JQsYyHHt5F45Ab+NmdM/D86xHu37yGGinzxTQmX86191zHkJY3+fY1q9lbXMPgqld5fDlcd9/9XDUujeYND/K1JTvpEL4kCwaDBGs38MaSBGb/OIlgRyNtB/awZewsJiSa542X+JSpfOm2aUAVe8wJP8O3F1+0A3d0GbX1EJmfSWJ7kD3rtnD4avkFyTxHKjetorQwhxnZacSAdD7K9n7VON18Vq0lWdEqO5t066gvuET7Yo6s1rYsrvbaI2x+fxlLS6fy3w9cQWZELVuff5oX3/w7vsG3E08N1a0uRpz/Ne66dh9/+ekbFO06ROUFBTT7Mpl884VMnl2Is+pNfnLHuxw4WkLdFAdwgsaUmdzwzaspbHiNu65cy57SOsZEfMCzy45x/h3f5Zq5oyk01vH4/x6lOQjBo4v56SPHWPjas/zbyBSKtyzj11+/jyXXvcHV7g6CzhKMUdfz/XsSOLTkIe792WoOnr4gKTkSk1fTQsyAOVz3k+sZFrWf1zet5xBA7W4+XLuD8vTzufWWBYyNP84H/9yFO9hJuw2+zgVHduoplditwfqyjlwqADpgvZEue1aFY2htCUy/8xf8Z9rzvPLhPmo7ajlcVENN9QqWb63k3m8vIBc3nojxzBw/kKSIRtoLBjGG3eCKImnELC5JOsiRNW+zq/wQO7eUEkmq+P0shvDccqyIvSdK2dHkY8nfHmMFUFq+jiMRaUxKD0BSDpnp8cR4oXHdNrY2tBH3r1U8W7MTN3CifQ3F20uY4N5O45SFTMyKxuf0UXjJlxnvWX7q1np64p8l0IHLPZ05C2eQ3NEEg8YyMCaGWbdMZVh8AzETJjL0Dx9SVUP3C1JkgJgBeWTFGBgNQFQCcVEDSIuGkwfKqfVDYGwuyX6AZHLHxeLYWEtZpRcSs0hPTyTOJ980xQ20i19Z8SCbvCKv4hwR9WVzQTU3RL2ec0d++RfbRZwyPdlGYM6PuV31rCoMVQeWrE83TuZPlT8VR7o8q3KjOlxVhbMKl915IutX2dHZtmPXqsgIFUOYo552dLbt2P0scARB8MaQPGg6c2Pf4v1/PMC6+GwKM1MYPHkM/rqd1HQ24p8yiIxoA4gnY0QS0aXHOV7SSF43n+YHgByGFo6kMCmWJG82o2ICeIHaw/tpHDmeUfnJBNwxBM6/hnGBZfhOG+kRffYohiY5MAyD6o+W85E7jplv/43fvw3tzfXURaxl9eoKJgaLOTDpS8yZEA9AIH0sl359DCePbuSVDVV4ZgwnK2AAAZKHpJK4bwNHjjcQiEkiwZ9JapTByd0l1AbiyRozjOxIP4w8jzGFDVT1YASggJFDRpIXH01SRB5j/duIAY5uXkXd2GsYnx3A7zLwT76SSwvfo97Vk/POfR+wpHkYNyYEMdpPJy7CjRvrOUE3/gVWvXEkpARxFx+jvEJ44Yl4DlWyaVU5hXmTGZAa08On6pzqCUe/HlXPqnUkfrZa8+LZZLYtO+tUccjGi+vITpwALfW1VLfW4p02lMwYA4gldVgycYd3cbS4gXhSGJCRwojsZBIj6xiSmEwRQFQBU66J48S+g+xY+hqVpZupL2lkwBnLhYweOpLcQBRJSfmMi9xGFMCA6Vw7/BDbVz7G/+0opDDRTcb588jwuKhfs5KPIuKZ9O5zPPi+QbCjjSb/aj5YV8vV09x4POOZPr6QJE8jbQWDGM3eHnnUxQpATDKJ8Rmc/s28s5I4mKlDB7F0w3v8/bG9vJcQS07BOCZlJuD9hDjS7aNim+o8sqrP7LSr4ur27yBZ3dhkYpUMcYyqwNUd8PoDLoFpV97JtCtPPVWUl1Py7sN8596fsGjBAu7OdOBwJBMfLxhorefE5nd4fNF24qK9tNZVcaSojhYv9NjJBGlqaqSpvZH2ljqqjh8/1Zg8ieFDRpLmL+o2tq6umlZnK201FZS5mgBwD76aSfmJRBVDhMt5NhaXkzN/c2p6M9UjdgCcOJ3JxMfpsVqJw+HAcDhMzy4cDnUCZBugblGo3j6o7HZ9FvV1byRE0RU3Xdh1G71oXzUndW9cVGtCdlHSFWiy/Nldb5aHu9DetyIvtL1AlifRvtUGLYtTh8mOPTFm3Ri7fu1KmKMvEkfdejFc0aSMuIjbvutmxYcfsvXYflbvXMO2TZVcdsMwHA4Dl9N5VsPhxHHm+STNzU00NwPBJhpbWjh5ZmSAmGgfXm9PzC6n8ywepxOXcfZi1A2roFdRUQLR6TQfP87p04+ESXcwNK0dig0M8Q4yuQAAIABJREFUlxOnYAfAYRi4nKazxnDgdMr/KUanw4HTcepvig2HE4fhwCEdGUcgxkNERPfWjvY2XE4H4lXP/M3YGY4qSjmcM5xEwwCHE1d6JgVb1rGl9kpmBs5YpKnqENs+XIUxfjYBuothGNDaQF1FG03tWSQnAnjxx3Tg8FZR3wiGOQBxjjTuY+eJLBLGpZEYQw9RvQhUrX3dOWPHtkqs9hRdbWdlxw4u1TrrOFlL0bb3WdUxgZunZPSwJVs/TqeTdgD8RPpi8EcKJVflHt5Z/D7bD1XhcRm0lB6nvKbttA5AHIGAB7cw94gbx/Xfg9XL3+CjfWXs3X2EVS9vpSXt90wpK4XoqFNrx3HKWeyUuxmY0QGcqlUTxFpVkYuQxZ/HjGsWEshawodbDlF0tIidyzdR0vJNbrhiIgP83Yf3N0d29HVjrc4jOxLqOuq2O4kFrZ3Lig607KC1s2B1vrpJ0Xs8+HILF94wh0Epp/6GJiExkcDscRRkLyVGstF0SXtjOXs+fI6X9g/lD7+8klRKWOddxPsbZFi6PeGNSyA5eTCjh8/j326fTZ6ngZ3vLudwRAIx/pJuilGpmaTGtjF2wQ3cOm8ECR1lrH7xTWpSE0nyFRB87SO2XTCMjElxlGxew6a2NuadCvZsDsz+e7tIgj3fYHkCcXgbOijeepiqGZnEU83hbZW01SURb/4l6NO6qkuE+CxyrCq4rCa8eBGRzU3ZoSD2y0RcEOY282fZWxvZglbNa9VbH1muzM928NrRV12wZLGbdXT5U+mYdXW5ldmTxaHiXjXvZPGpNl+rGGXYZYe9rhBRzQWruSn6DHP0+eSom7TUUr5nHe9VDGT+HZfxZWclG15+mKefe4e9tZOJD3qo2bCPsnl5JLnqKNldRl1xBDmJPqCY8sogFZVVVDbsZnvxMYyB9HjRZ4YQlZaF49kt7No+kmGpGdTsWM/mpkaGnh7YjVcBanz+ELIiM7nwzm8xJzuG1uLdvPfi+/gykvG2J5CxYREf7JjJ/GGRtDQeZsvWbeypiSYuIpr6tbspuaKQlIhGyveXUF7kInd0JE3Hz9r3xibgqdnA0fX/oni0D0/ZTraXHMc9TALGFJy5K2vkFFxvb2b7ifPITvLRuuM9Vh45yZAOUS0IcYmkH6+gOhgk6HDjGzyH61Pu5fEXlpNz7XlkxXTQevIw6955msee2M+CP89irGijrZGqbR+ycctRjIHXMyql6xIchc/bgd8Hp/7vDBL/QNPBPZRlxJKbmog/KPkVR8mzuPZ060jmVzyHxc+yPpUN2TpU+bYjVutIrCeCrfWcWPUiv17fxPnDbiC1vY365kZcgWji/VFEOiKpW7eH0kvzSXE3ULa3lMpjbgYlqf/ypqloNW++/yHOMQu49cqxuItXcXzrplMXdXNYYm11dBUvbXIyYe4P+dlXvDQcfZ//umwhq/f8mrnZA8nwBjj/ju9waWECHRX7WPrUG7hTJLciIR9KjjR63dJfuZvVRWV0ZC3kjnnJOGq28cz/+w5b9h+gvH4CWSH+EVLIHFnMXd28s7oYqXRl/brxot2QvkFSLRAdUJWuzJ/VpajHwd7ZTsmutbz19HFWJ519PROsqidhwb1cXACUnVHuPpMivETmpZGyZTeL//YCcT4n1bVNNLfV0tAYQWogCXfrcZYtepGC6AvIiEshWLOOJW8tIufSwVw86Qivf/QGj/xuJdGtLmoON5I7N4Whg7rHGD1oDl+Z9DzL1jzJb7fG4mnopHx/AxMGXETMyKu4e/DveffR37Lx7Sxi4+uIbA+eXoA9J02fxBDepQWD+NKGMWdSKR+sWcPzT+zFQwtVVQMYPnk6w9N385pEV1UQyIoO2WapKujFhaTSR8ChK3SsMJwNz7pw6p469Rt2WQ7s2LYaZ3UAqtaJOFbUl9kUfeo2Khl+K/siZtlYHU6zDZ2ejsNQ9yY7dqzw2uHcylaYo+62P7sc9QiGptpiPnrjdYqWJ+HxddJc3UTKjPlMGZZLvH8q9Ys38+ITx/G5Wqkr8ZIz+XImZmfQOiyL9Ts+4oX/aWZtgZOSk55Tv3YnwDXDjxkyj9uHPsq7z/2R/asGEJtYhqM5eOqbH01+AJKm3MoPxzzFP//8c1ZHxNJRcZKaCjcLLveTMGIOt456hMUP38fGFD+dndU0+RLJmnw1508+nxPHt/PSExVERrTRUNpO6uQvMT3fwdLNZ+37MkYxb9QuXn/rBX5331oS05sprQ5SIImpW3CmnAZGXMadg//Iiice5F8JPmI6iznY2MagM8PPxmgUTOHCzqfZX2MwPs6Jxz+MS75zObuff4E/7VqJJ7aDzmA19c0RZM69k+kDYmg60EDJwbd5/Od1vAXQ2kFnTQ1G1kDOu3IMKYYBzbVUljppd6SRlGjAcQHvGRyNHNhwEG/qaNIzE/CEsI509ZpqjFXdZdeHah1Z7Qd2MMvs6M5Nly9A9sgLGfXqIu67bz/Z3hbaO7O46LIhJMRGMmHKLCpe28qLT5QSGdFGfYlB5qSrmZrr58BZY90BJCSRmWuwfe9KXv3LIQJJJyltriWhoYXWNp8ZRPdp2dnGvo0vs3flW0TFuTDqm2ma/GXmDvKRnH4z9058kjeevJ9N3gSClScpO9LOgqvEPJmf2qkv28uqpSspL1jATZMzQsih2WgHxQdWsfaVRawKROHqaKPKM5IxYwaS5jco2fA8b5amMXvSePI1F8fu9u1zpNtbZf2iru48sjtnQ11Hzh/84Af/qZvQXdLc3Mzhw4fPgIyOjiY/P19ZGMuAiYtQXKQiBlXCzrTH5jFuRIC26koag8FTE9Vw4IwexxVfmkW+D8CJ25tEwZR8YjEwDBfeqGQKpw4kIzGZuKZ6Gps8RCUOZty06UwckETW4ALSYqLw+ty0O6PIyh1MYUY8breTTk8c2YWjGDcqm7S4TuqrGmgMJlA44xLmzR3DgAQ3zug0BhdmkxXvxxGRQP7QdGKNBqpqWmh1pTH2yuu5ZMoAArGpDBsSy8naBmo7EiicfAHn5ecxeFohie6zv3pnABhO3DFZjJ5WQCxgOFx44gYwYmIOAQwMw40vJo2C8YNI9rjxx2eQP6aQpOgokrIKGJmbgBsDhzdAenY+QwfEEeGKJiU7ifjYDmpqGmlzB8iZNp1pU4eQ5jMwolIYWJhDdkIkrj5MUFURYZ70Mttdn2Vvu0Ipbqxw6nyrRCx4dFh0Mer6VHnQHVh2ilq7h5SOBzuxiWJnjEpC8SPDL8Oga9fxZ+fyLGvXYQ5zJMega/9sc9RJc91hNr75Fu3TvsnMPA/+xAzyoippqGyiyRlJQs5E5l4ynwn5scSnpZCWBrWV9bS6okkfM5Gpc8aRHekjISWFgD+Chno3cYMmMXnEKMYOzyIjIw6vI4rUQdmkp8bgwcDhiCZ9WA5padkMLYyjs+UkNa0BcsfNZGbhQIZNKSDJ78Fhjs0wcCYUMH1UJn6HA0dkJqMnJENFMaUNTjwJQzj/5puZM8RPhDeF3BG5tDccpbLRiTc6g3HTL+XK6cNITElhwAAHNeV1tLj8JA8by7R5k8mPMjC8sWTm5DM4Mxa3O4bUjCQCkUGqGtzE549lysjRjBmdR0ZGLF5HNGmDC8nJjCcyIoaMYdmkJkadOt8cAbJG5ZKSksOIwQGaK6qobW0nfuQQjA93E7/gKiak+3Gbf93NF49jz5O8F30ZF+d7cTjdxGSOYGRcJxVl5TQaDjyRKYycuZCrL51AZgQYRpCg0U776f3YcPlJKJjEefMvYkJ+PBFA87FNrNq4n4bMGcyZlE5k1V7e23SMjuTBzBiVztkSu43GBhdpBYPJH5BEpLPn/OrNZUP30lD2rNOxY9+u9EbHrCf16/TgTRxATkITFQ2NePyJDJ10KfPPyyXa5SM2JYWMTIOaijpaXX5SRo5n2kUTyfUbGA4f8VkZZOUlEYmB4fCTlJtF7sh8Mj1ujIYWWtsCZI6cztQh+QwZmkdmahyR7hgyR+SSGu8/PfdiGTAml+SswQxLbqKjqpb6jiBB3wCmXn4bl46JJSI6kzGTUnBWFlNcZ+CMKWD2rV9l3nAfBg7cviQKJ+cRawCGC290CnnjsvDWFrH+/TdZUlrIwsnp3TkCHO4oErNzKByUSpQvjqycPAZlBHAFweGIJCk3n9zhIxiU5iG6rZr6pjbaIhIZOvVyLp4+lPRYFw3FO9jfGE1uRjpxfnf/c9SF1+Y5YfcSYyV9WUdGTU2Nra8oqqurWbFixZnn9PR05s6dKz1UZJcmWVJ04+wGoLPThas/F7kq3lDb7PTr8hUqRpV90W4oPsw6Mn92bYv6vS1urOZgKLGK80gVnyoGWV9Xv5Vf2bj+4Kg3G0x/2Oir9IZz3bNqjwF7c1Bmqz9yE+boi8RROzXHVvLYnd+k+fu7+OmMPsHS+gy1kA7FLljvi70p4vsiwWAQ48gK/vABTLh4AmMS/DRtfJzrvr6F2//xX1xRGEtEt38HqZPytT/jnr8Wcv/DN1OI/dzJfAMYRi0733uVt7edZMhVX2FeViTsW8SPH19Dy/Ar+NFN44kLwc/nkqN+2uv6o4az4/OT5Ohk2X4+evPvbMv6Gt+ek27pO8yRNTY70uMvJEM9bPsCxtynu+Gp8HQ963RUuGTPsqLUrg3deNG+eZydYrlLZBcSmU/Rj2ycLPeqBasrYlS4dON0sYnxi7ZEe6rPOh0RmwyXmJ+udhVfYo7N43TzSbSnyld/ciQWjWa/Oo5U2HU2zXZU60s1P1UbrVWuZOtbnAdizqz2OdW+oItfFptuLoQ5+uJxdLKmjKVP/oLolhv49gU5/caRaj9VxWuF2TxGF6/Ovyxvqr3a6mzTndWGYYDbR826F/jtuldJdTs5WdtI1g3XMykjEpej57xKHH8zX1n6e55ePZ/7J8dL/ctilp0HhmHQXLyLgyW1RA2cx8SsSCp2vcvS5/7Css2xzBgOBE/9xssXmiNJ3HbjVfkPhSOr9aXK0SfBkRERS9bgaQwYkd4j/jBH546jHhckMdFWYneceMjJQNqxIxtvdYjaadMdyqFiU2GyQ64sDtG/HdJVk001QcRFpfJtB6POnsqmTHQbgCxOq/jtxCrza7VpyPKhmze62M8lR7J2Vc50NkO1pcqLzrfOrt31LltjOltWdsUxYhx21q7Ktwx/mKPPM0dOfLEDmfuNnxJbH0NyjKffObLCqMul1b4V6r5rJTrcqrE6v6RP4vYv1/H25n3UNbdB8kDmzp5IRmTEqb/x7cYROJz5zL1pIS0NLqld3XyXYnMnM2j0DAamDiIeqPHFkDDkPK7PzmHchCwiFdx8oTiywKBbR/3CkSYPn7Z15I1NZOCUOdJ4rGyHOeo9Rz1+xU51IJh/xS4YDJKRkcHcuXOlwenEqgDU4VAVqnaKcJmu3ZusKgZdPFZ9sn6rmEXsdmxbtanisRKrcaq3E6qFEso487MdsRuf3VyGmsdPO0c6LKAvFO36CgV3qNIfdkPhqD/s9kY/zFGYo/7Aey6kP+L6JEV1rvR2j/40Spijz0aMYY4+PTF2+6cFdJcKs4jFqpXIxtm5xYm6hmGc+c/cJ8Mjs6+9KRpnvykQf6pikPmRYbDKqQ6DiD8YDNp6i2rnkO36abUgVXhk43Q2ZTd+qz4Zb7J8ivhEHmR5l8VkZ06r/KuKJBWvMn9WtmVilyNdHCq+rOaZDrf43F+bXqhxinp2ubBrWzdnrF54WEmYozBH4vO54ihUPTvcmPv7IirbvY1BFKv6QNWm2v/7C1+Yo7MS5ijMUW+lt/rdLkgiYDubeagFZaiXKzsXtlDwiEWsqghVkSMS2PWfDJ+oJ7Mp2pBhM1+MxBjsFP7ipcpsQ8a53UueiEl2gIvYzfriXNDlz4xPZkN1idIVamJMqlyaYxBjF/1bxSCKjsv+5sgKl25+ytpldlSbvtmWzKZuM9StMRlW1boUX0So5pLMvlUeZXNDdwCqsMpsq9rCHPX0H+ao57PMlgq3yq75p9VlT7Xn2cGnelbtwTrcMp8yfCp7KpwyPdk5J/MX5ijMUZijzw5HLjMws+hIs3pjphKzrngA2tGzi1GFVdTVxS1LtAqPecKLZJs/W+VZtCO7aIg2RT1dbCp9EYtKzxy3bJKrbIvtZlvmn7L8irGp8qbKTyjzTIdV1mcVt1lHx4l57LnkSGZH1SbDK7MnwyqzbbUW7T7bwa3rl+0lVnND12/lz/ysypGKpzBHYY5E6Q1Hsj3UTk7EdhlHqnF2aorePOvOUl1e7dq1g0M21s45pXsOc6RvC3MUOl7dc5gjexw5pKMsRHZTVP0UC0CzDTEoUUeVLFHHLF0kqfTEsar4ug5oHTFWE0l3Czbb1pFqzoeqX4ZTZbc3IpvwqvzY8Se7RKpsyfyLedUVFCrf4mcr/6oFp5tDMjuyNWG231uuQuXISmQvCHQ4rfBbrYu+SCjzvK9rIVSR7X+y3IU5kuP4OOSLwFF/86nLhZ0XUuI+GKpf1bnTXxyFiqG3vmU4+kvCHIU5svIb5kgvLgjtQLJTHOqSb3UjFgt/lW5XsakbY9Vm9mm+WAFw8jh71yzl9aV7qQSiC0Yy66L5TM2Ihsb9bHj3OZ5btJmDjkImXn4DX5o1kpzIs0VAbdG7PLQ+yJzxE5iUGziFoWotrz37V15dXUJt8iSuuO12rhycSJRL/e2KmB+rRSNODtUlTZZn2VsFMU9WF1MdNhnvqvlgVVCFkiOzH9lnlV/ZZ1WfaE9WyJgXv4hR1DsXHMmwy3yL40PBp4vNLCoMKt+yuMxtuj5xTcnmnZ0XLjJcdtrt8qHCbrYR5qinhDmyjtdsTxWLyncoHMmwmXW7Pnc9W80plejyLxuji1X0a8avm1tmn3bnqQqnHZ9hjsIchTn6eDly6YgRxe5Y3biudlmQZh3VoSGzpWrr0rWT9O4TtYa9q99j0YsHibt0PpMDFexZ9S8+eMpN7D3zcK9+nRUbD5E+8xrGdB5lyauv8FwzfPWqUSQGayha9ip/ePwJ/ha8kKGFIzCMWGAfr/73b1kZOYTZV1xAx+61PPH/niLw0K1clB2PV4hdRrCdRWDnsJXlWfSryrFuEVsVCjI+dBO2a+HrigbVHNAVHqrPKh2rBSWLRzZvZZuhLCc6jH3hSOxX+bY7xq5/O3uGHft2uFbZ1NmwshXK/mPlw+74MEdqP2GOeoezt2N0HIXCd2/3KbB+sarDYtVmdU6EwpnV+FAx2R0T5ijMkUrCHNkfI352qUCINylZn3nTl91yVQkTwamKSVWAuuLTSs5iaqR0zzpee2AbnomVrH59BycHzuKau2/k0oRidhUdYWf2TB6YM52EiEq8R7bw2kebOLg9ixMbyzmWeCl3L1xAZrAIR9Gv2Lh7I4fKRtG47Q3+8c5REgMDGUDMWWxV+1m9xkfqfyxg3sVjiK7wsP7Zv3Hg0NW0ZCbgddmLw06xoVoEoeZZJ6FeXGX47BQNdm3buThZ6djxY8eebD30xfa54Ehmz87FzazbW1w6bFbtobzQCcWvzqbVJf1cSpijsxLmqKf0Ns5zxZGury8++2NeqUS2b/cn/jBHfZcwR/3jM8xRaKL8GyTzpm71Uxyve6uu8iX2yQ4VmV/z23rzxU3l66y0c7J2J2vfeZ61VUNYcPe1TE84zBu/eZa1LVlMuugGvnPzZBI9QFMVZcdrKW+JITJYQ6U7Fl/6YLJ8LiL82Qwr8NPZcpzSikYSh87gqltu4pZrxjIgJfIs3qgcBhaUUltbQnNzB/VVR9nV7iMixoXDof5mSFb0i/HLxlnFH+qhbGVPhkk3NtQLrcy27hKiwqDDFkoMKr/mdhlWu7yYP/cXR1YSyhyyKvz6ikWFLdTC2cqObN+RtemeQ4k1zFHodsIc9b/0tUASuZHtxVYc9dZnf4tY0Klis7qgnwtc/aEf5ohuY/obV3/ohzmi25j+xtVbcXV9EN/+mYOxU9TZKXrFAjRU4FZvCVUHtFwPwIUvPpvR8y9h7sgISuPaKfnri6zYex2TZuaQAgSDZWxd/yKL9leTNferDPLs4J2mejwRblxAMOjGHeGiM9hKW3s7/tRsBqUCLR6cTlOxG5HH1IVjWfPQA9z86K9obvIwbOGPmJOdRKRD/i2dVSEg40z1U9QR+VLlVobLjEP2rJo/VvZEW7I5JRsnxqHza1dHliuRAzHPsiJNtSmofIr2+pMjK2yycTqcMl+irirHqn1FdUntzeXVrGtnf5PxL2sXedH12ymOVTGFOQpzpMLQW46scOrGyDhS4bMTuxVWqzkh2tbFpDqfZDhFHTscyWyHOQpzFObos82RSzVYBV4WiExX7JONN7ebf6oOEVFXlhg7BJ7qB4gkKnoIg4fGEOEIEpeSRV5ePLsaWk/ZaSxn6/tP8/grG0ge/w1uu2gg3v1baGtrwyP4T4iLJRDlP4tfjHv3azz4VBMRc/6d/5iQQmzNRzzx+3+ycvdgMialE+1Wky/mTYxVlW/ZxJR9lo2V5Vymr3qW2dbZs9Mv+jCLuU+2AGU4VTGobKtw6NaKym9Xn8q2zG9fOVJhs2oz96kwif51tq1wW2GxszfpfOti0K0hseC2g93O3NCNC3PU016Yo4+PI7u5tutLtT/b8afrt/KvsieK6gyQ2VfNNd2erfIR5khtT5QwR2GOVD76myOH7malUpQV6OZ21VgzqXZ9irZVPnSHidnv2bEADhwODxGeU2NbW5qoqy499dB0mNUv/YZf/Gkz8Rf8gG9cO4O0gJvo6FgCuKirrqEuGARqqKmsp6XJjcvZ4755RsoPbmJ7XCZz505jzsypTLnkVuaPWs/yzXuoa2rrEbc5NtlnWc7F3Ni5NfeXiBNX91nHoWhTdqsX7Ym50OVQ5V+Gx+zXzrhgUP0PlfUm3/3NUSj+rN4gmUXHkU5P1293nwhV7L6kCUU+Tp7CHIU5suv7XEpv9zQ4eyZ/WsTuXm91HtmVMEehS5ijnhLm6NzHfuZ/0iA7/FRtVsDM397Yvbnp3qRbjbFqM8fXvb2K0vKlvLnsFiZO76BoyzrWbc/jkhubWPPSn3j01WImfeMX3Dgzk+QoF8FgEGd2HsO8r/LOR2+w6fyBjO5Yx8sfQdOYfNLTTBiEGGPjEnDvXsvGoouZNiSJxOr1FK0txVsQi8Pp7HGB6/qsyoedS4hs4sns6wof3Y3e7jhRR/bTjEls1/kRx5ljUn0W89TVrtIRJZRYu0R8S9KF1Yrr/uZItyZ1m5aMM7OOap7ZyadMertpyuzInnUvc3QvHczturkp09f5No8JcxTmSBWD3ZzbuaRZ6evypjvXdbypfJnH2akvrCSUuWm1T8o4scJjdx7pbPQGt8q+KGGOwhyFOVLj7hLlVx52iLMiIZQ+KzLt2rc6vKALN0AAf1scVe/cyoh7SglknccV3/oRE9o38LeXH+PlZfDuts084T2llzT+Cr5+zz1cev3VtP7jYR64YTJFjjyGXXwbd105i+wIIHgag+DTPeY2fvW9kzz24O1c9KMGWjtSGHXj/Xz/8gKSIg02/H4e362+i1e+N4/EqAhpLLpLg+oCoOpX5U/Mncy/TF81LlQdVcwqCRWP3dh1+nY2ny4fsiJNh0eXL5W+3Xyr7On6ZLas8Fnpy3DaxdNf0hs+Zfp254HsWeU3zFHvsKj0wxz1jqOPW8+url37vZ0vus+hip16pC8+whz1zo5oM8xR/+H4PHFk1NTUnKncdACqq6tZsWLFmXEZGRnMmTMnJECy26R4EFndIu0Wzjrfp6SWQ2sX8advHeSC125iQE07bm8M8SnJRFFPdfkJqpq623BFBohPSCLW00ZjbQWV1Y00G16i4hJJiPHjdZoGN9dyojFItD+KKI8TwzBoP1lNRWkV9S3tdOIhOjmZ5IAPpwEnKw9xoiOBnMRoXE5Hj7eMsqJYzI8ubqs3nnYuA70ZpxOZjtVlpK94+jtWVUxWb1JCtd0fuHsjMl56w29/4bHjJ5TxshcH59L3uZAwR/3r+1zIZ4GjUEXc6z4NmPoi5jhCybGdPfuTkjBHZ/XCHH088nniqNs3SL25UeqKXJFw0b7sdmn38LA7TvXNxBk7Lg8xKTkMSjk7HqJIyhpEonLiOomKz8QfJx7iJh/eAOne7lic3lhSsmNJFWwGg0EiE/Mo0MQpxioWD6oLpyr3dqWvbwDsfrthZ46Egu3jWlChfHtzruRc+pTx0pt9IhS9UKUvdvuK6dNwmIU5Orf6/SGfBY5EsVuYiC+EPu1i51vBUHKsGvtx8BTmyJ6EOep/+SJw5OrLrc3OJUVsFwv3UPzZwSgrUkWfskkoe+Nvblfpyi5g4hjdxDe3qzBY2ZFhMmOT6cgufna+mVBdCER7Yl7EdtUl2m4OZfpW+HVxqzDILtc6vyouZBdaMT8ynf7kSGdXpi/jQIxRlguViP06XzobIgbRlioW1brW4dftGboYZbGq/Fr1hzkKcyTDbyceFX4rjuz6CQWzlW8Zjt7kwg4uK47s+LE6r+3EE+YozJGdXITi205MqnEyPzpcn3uOevMrdgDp6enMnTtXGYhKxISqfMuw6PDpxsmfg7S3tnCyvgNPQhRuzcEt2tD1q3Rk8YP6AmnXnllPZs9OjqzshjrOjr6I146+lb2+xtBXHbu4e2Ojv+ILhUPVWrVjrzfx9kXvXNn5JHyFOep/+aJxFJbQJJz/T7+EOfr0y+eNI4f54VwHYE6SVaHfFxFtywkzcEX4iIr3E0HPG7PKpu4WLbbJPusw6fzKfMpuxKJP80/Vjbu3RZKdPpVtw1D/m0U6H6FcAPui01exmi8y/mQ2zhVHKn8y/1Zvdc5F3s6lHdnaUPVbxdaXjb83eQtz1LM/zNEnIzIOZOeeXY4+SVFxI+7jnzX+whx1l086BpmEOeoun3QMZnFYD1GLilirS4ZOrC5QZr996bMoz2rMAAABzUlEQVQ6rEQ9uxPTjDvUwlxW1OvaxBjMdkLJtdVlLlSx802SbqyVnVBF5U9nKxTudIve7gVRham/OQp1Tlqtx644euvn4xLZHFDFZm63isOq32qO9cdLgDBHYY4+LlFxJPuGrD85kvm30x6KTTtnUajn1SchYY7CHIXi3057KDY/Txwp/zffdopskURRR2bD/Catt4noDz27BadqnKyQ1V1mdG9Adf06fLrCXNTvwie7XKk+i7bMvMniVRUSsren4oVJh0fEYKXTl/h0cVvFZYXbKo+y5/7kSCe6i5jVpVKmq+Jd1LOjo1tbOj92uZblzs68soPZDq4wR2GOVLq95Ujmx2ovFSWU/UZlz87eaIVZdzaq7In9uvkjwynWKFbYrTCHOQpzFObos8dRr/4dJNGwyqEsSV1jRR3xWWXXCovKhmjPDtmqceJnVbxWtmV2RIz9YdvO4lPlySqHoj9RVHkX54TOjwy3lY4Kq9ViVcUn+rPKjzjf+5rv/uLIal1ZbSQye6o+1VrX2bO7P3S1yTZUna6dmKx0VPGEEr8uJ2GOwhzZxWiF1Y5vO5yIz3Zz358c6cRqjAyH1Z4ZCna7a8Eu9jBHYY7CHH3yHP1/81l+7qy6tgwAAAAASUVORK5CYII=)
The arrow appears to be pointing to the correct entry: the title and author match, and it’s a book. The publication date matches the details inside the book too.
If you click on Show Details you’ll see more information about this entry which can help you to decide if your item is a match:

In this example the ISBN matches the physical item, so it’s safe to add a local copy to this record.
If you are unsure if an item matched the record then you would stop here and re-consult the guidance in the Staff Portal or contact Technical Services for more advice.
Click on Show Copies to bring up the list of copies already in the system:

Here you can check if a copy is already recorded for your location. If there is then it will appear at the top of the list.
If there is already a copy showing at your location then consider if you need to add a second. If the copy that’s showing is missing then consider using the new item as a replacement and simply record the new barcode. See the section Replacing a Barcode for more details.
In this case there isn’t a copy showing for this location so you can go ahead and add a copy to the record. Click on the Send To button ![]() in the toolbar. A pop-up box appears:
in the toolbar. A pop-up box appears:

Select Copy/Item List and click on OK. The List Items window will open:

It is tempting to click on the New button to add a new entry. Don’t!
Why? The New button will open the correct window to add a new item. However most of the details will be left blank, such as which collection the item belongs to and the Call Number. If you make a mistake or leave out any details then your entry won’t be catalogued correctly.
To add a new entry for your copy, select from top menu File > Copy Record. The Item Edit window will open:

Attach a barcode to the item and scan it in.
Don’t alter any other details in the record!
The location field is automatically set to your location and you can see that details are automatically completed for collection, call number, item type and price.
Click on Save. The item is now added to the system.
Notice that the item’s status is recorded as Available Soon. This is to allow you time to add a spine label, dust jacket and due date label to the item, and to mark it as belonging to our library system and your location.
When the item is ready to circulate, check it in.
Magazines and Periodicals
Magazines and periodicals are added in the same way that books and DVDs are added, with an extra step that you will need to record the date for the magazine in its entry:

The format for the date needs to be precise:
|
type |
date format |
example |
|
weekly |
3-letter month, space, DD/YY |
Feb 28/19 |
|
monthly |
3-letter month |
Jun 19 |
|
quarterly or irregular |
as it appears on the item |
Spring/Summer 03 |
For full guidance on how to add a magazine please refer to Adding Items to the Catalogue in the Staff Portal.
Editing an Item
![]() Printable Quick Guide: Editing an Item
Printable Quick Guide: Editing an Item
Sometimes information about an item needs to be changed. Such as when it's being reallocated to a new site, when it’s being discarded or when it needs a new barcode.
Items can be edited one-at-a-time or in groups. This section explains how to edit items one-at-a-time.
To see how to edit several items at-a-time refer to the section Item Group Editor.
Finding the Entry for the Item
To edit an item we first need to find it in the system.
When the Item is Present and has a Barcode
If an item is present and has a barcode then the quickest way to edit it is to:
-
-
- scan the item into the checkin
- click on Edit Item
-
When the Item is Not Present or Does Not Have a Barcode
If an item is not present or does not have a barcode then you will need to search for it and select it in the Copies window.
See the section Searching for an Item by Title for how to do that.

With the correct copy of the item selected:
-
-
- click on the Send To button

- the Send To pop-up box will open
- select Copy/Item List
- click on OK
- the List Items window will open:
- click on the Send To button
-

The correct copy should be highlighted, but double-check.
It is very easy to accidentally edit an item that belongs to another location, and Horizon will not warn you.
Click on the Edit button at the bottom of the window to open the Item Edit window.
From the Item Edit window you can change several details about an item.
Changing the Status
The status of an item can be changed, such as to show that it’s being discarded, needs to be traced, or is being moved from the non-fiction to reference collection.
To change the status, delete the current status and type in the code for the new status.
Example: showing that an item has been discarded
![]()
Click on Codes see all possible codes. The list is comprehensive and some status codes are not used.
Some status codes cannot be changed or used in the edit window, such as ‘checked in’, ‘checked out’ or ‘lost’. To check a book in or out you will need to use regular circulation procedures, such as checking the item in or out.
If you have an item that requires a status change that cannot be done using the edit window or through regular circulation procedures then contact your Division Office or Technical Services.
Here are some commonly used status codes. Codes shown in yellow are automatically assigned by the system, the others can be assigned by staff:
|
status |
description |
status |
description |
|
as |
available soon |
me |
mending |
|
bm |
back room |
lo |
librarian’s office |
|
c |
claimed returned |
mi |
missing inventory |
|
d |
discarded |
nc |
non-circulating |
|
dis |
on display |
o |
checked out |
|
e |
item hold expired |
pr |
please request (ask if available) |
|
h |
item being held |
s |
shelving cart |
|
i |
checked in |
tr |
in transit |
|
l |
lost |
trace |
trace |
|
m |
item missing |
yad |
YA display |
Changing the Location
The location that an item belongs to can be changed in the edit window.
Just replace the 3-letter location code with the new one, then click on Save. Use the Codes button if you don’t know the code:
![]()
Replacing a Barcode
A worn or missing barcode can be replaced. Bring up the item’s edit window, then:
-
-
- delete the old barcode
- scan in the new barcode
- click on Save
-
This also applies if a borrower loses an item and replaces it. Add a new barcode to the replacement item and then edit the item’s record as shown above. Then check the item in.
Adding a Checkin Note
If an item has light damage but is otherwise good to circulate then you can add a checkin note to the item’s record. This will let staff and borrowers know that we are already aware of the damage.
You can reach the item’s Edit Window by checking in the item or by searching for it, as explained above in Finding the Entry for the Item.
If the item is already checked out then you can also edit it from the borrower’s checkout window:
-
-
- click on All Items Out
- select the item
- click on Edit Item
-
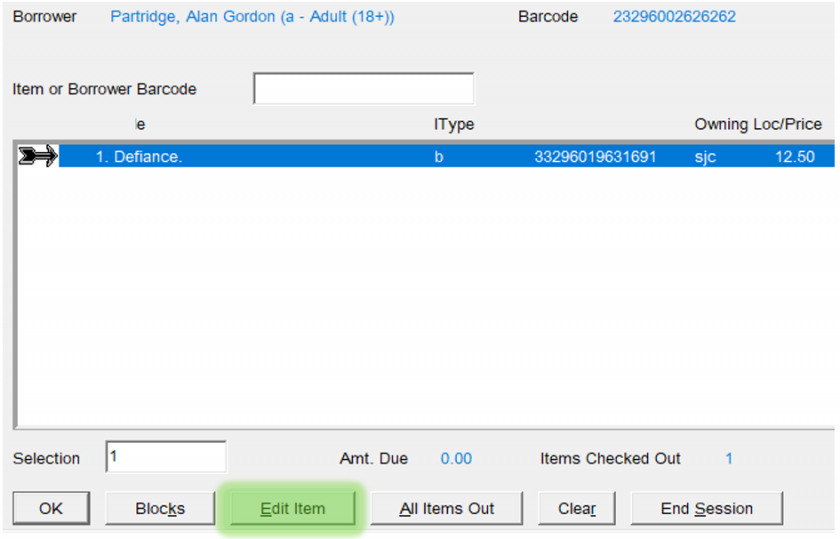
When you add the checkin note describe the existing damage clearly and succinctly:
![]()
Tracing Items
Recording that an Item Needs to be Traced
Suppose that an item shows as checked in, but you can't find it on the shelves. That might happen when you run the daily Pull List, or when a borrower asks for the item.
If the item can't be found after a quick check then you will need to record that it needs to be traced.
Search for the item in Horizon, go into its record and change its status to ’trace’:
![]()
This will let staff and borrowers know that the item is not available for loan.
Do not use the statuses of ‘item missing’ or ‘missing inventory’. These statuses are assigned by the system, for example when a borrower pays for a lost item.
The Trace Items Report
At regular intervals reports are generated which list all the items needing to be traced at each location.
When you receive the report for your site, check the shelves and other likely hiding places for the missing items.
If an Item is Found
If you find an item that was set-to-trace, just check it in and re-shelve.
Item Group Editor
![]() Printable Quick Guide: Item Group Editor
Printable Quick Guide: Item Group Editor
The Item Group Editor lets you change several items’ records at the same time.
This is particularly useful if you have weeded many items and need to show that they are discarded, or if your division uses a book exchange and you need to update the location for a set of books.
You can edit several items using the group editor in one of two ways:
-
-
- by scanning each item into a list and then telling Horizon to change the same information for every item
- this is the easiest way to discard a set of books, or change their location
- by saving a Group of items that can be retrieved and worked with later
- by scanning each item into a list and then telling Horizon to change the same information for every item
-
We’ll look at both.
Using the Group Editor without Creating a Group
If you have a physical pile of items that you want to discard, or change the location of, the quickest way to do it is:
-
-
- open the group editor
- scan in the items
- select them all
- edit them all as a batch
-
So, click on the Item Group Editor button ![]() in the taskbar.
in the taskbar.
The Group Editor window will open and the Compound Search pop-up will appear:
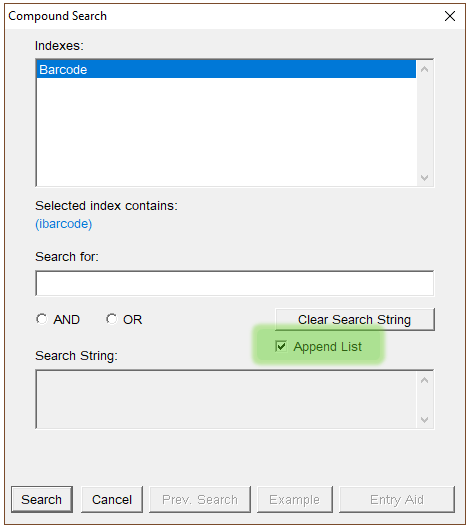
Then:
-
-
- select Append List - or only the first item will scan.
- click in the ‘Search for’ field to focus it ready for scanning.
- scan the pile of items
- they will form a list in the group editor window
- click on the X in the top-right corner of the pop-up when done
-
The list will look like this:

To edit all the items in the list:
-
-
- select them all:
- press [Ctrl] + [A] or select from top menu Edit > Select All
- click on Edit
- the batch change warning message appears:
- select them all:
-

- click on OK
- the batch change window will open:
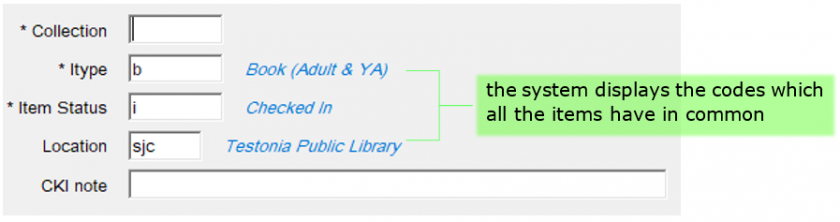
The batch change window lets you change one or more of these things for all the selected items:
-
-
- Collection
- Item Type (Itype)
- Item Status
- Location
- Checkin Note
-
Don’t change or add anything more than you need to.
For example, if you are wanting to discard this pile of items then only change the item status to ‘d’ for discarded.
Click on Save and Close. The batch change will be applied to all the items.
Press [Esc] to close the group editor window.
Working with Saved Groups
Items can be saved into a group which can be retrieved and used later.
This can be useful if you have used the Item Report feature to find a list of items and need to edit some or all of them.
See the case study Using Groups when Weeding as an example.
Creating a Group
To create a group first make a list of items. This can be done either by scanning them in using the method shown in Using the Group Editor without Creating a Group, or by searching for them using Item Report.
Next, to save the list of items as a group:
-
-
- select the items you want to put in the group
- to select all items press [Ctrl] + [A]
- select from top menu Group > Save Group
- the Create Group pop-up appears:
- select the items you want to put in the group
-

Give the group a meaningful name. Always begin the name with the 3 letter code for your location or department.
If you have created a group because you want to make a temporary change to the items then include the change in the group name. For example:
‘SJC – Audio Exchange June 2019 (Loc: SJA to SJC)’
Click on OK to save the group.
Retrieving a Group
To retrieve a group so that you can work with it, open the Group Editor:
-
-
- click on the Group Editor button to open it
- the compound search window will pop-up
- click on Cancel to dismiss it
- the ‘Load ALL rows’ message will pop up
- click on Cancel to dismiss it
- from top menu select Group > Retrieve Group:
-

Click on Groups to bring up the list of all saved groups and find your group:

Click on OK to select, then click on OK again to retrieve the group.
The list of items will appear in the group editor window.
Editing Items in a Group
With a group opened you can edit any or all of the items:
-
-
- select the items to edit:
-

-
-
- click on Edit
- the batch change warning will appear
- the batch change window will open:
- click on Edit
-

When you have finished editing:
-
-
- click on Save
- click on Close
-
Deleting Items from a Group
There is no direct way to delete items from a group, so we use a simple trick:
-
-
-
-
- open the group
- select only the items that we want to keep
- overwrite the group
- by creating a group for the selected items using the same name
-
-
-
Here’s how:
-
-
- retrieve the group
- select all items in the group
- now deselect the items you don’t want to keep
- select from top menu Group > Create Group
- the name of the group you are working on will appear in the pop-up
- click on OK to save
- confirm that an existing group will be replaced:
-

Adding Items to a Group
To add items to an existing group we need to:
-
-
- open the group
- scan in the items to be added
- overwrite the group
- by creating a group for the selected items using the same name
-
Here's how:
-
-
- retrieve the group
- open the Compound Search box:
- press [Alt] + [F2] or select from top menu File > Compound Search
- select Append List
- scan the items to be added
- close the search box
- select all items in the group
- select from top menu Group > Create Group
- the name of the group you are working on will appear in the pop-up
- click on OK to save
- confirm that an existing group will be replaced
-
Deleting a Group
To delete a group:
-
-
- click on the Group Editor button
- dismiss the compound search box and the ‘load all rows’ pop-ups
- select from top menu Group > Delete Group
- the pop-up appears:
- click on the Group Editor button
-

-
- choose the correct group. Use the Groups button to find it.
- click on OK. A confirmation message will appear:

-
- click on OK and it’s done.
Case Study: Using Groups When Weeding
This longer example explores how the group editor can help when performing a large weeding task. It’s been included in the guidance because it brings together tasks from several areas of Horizon: how to search for individual items, how to edit them, how to perform complex searches for many items, how to edit many items and how to use groups.
This example is only an illustration. It is not intended to show how weeding should be done, and divisions and sites may have their own policies. Speak with your supervisor before weeding large amounts of items.
Although it’s ideal to weed the collections day-by-day, sometimes a collection needs reviewing and thinning to remove a large number of items at one time. We can use the group editor to help with this.
Suppose we need to weed the juvenile non-fiction section, and suppose this section is large. We can use Horizon to help us identify all the items that haven’t been checked out during the last 5 years.
We can print that list, pull those items from the shelves and decide whether or not to weed them. In this case study, to keep things simple, we'll decide that all the items are going to be weeded.
Whilst shelf-pulling that we might notice that some items are not present and need to be set to trace. Rather than slowly changing each item’s status one-at-a-time we can use the group functions to edit them as a batch.
So let’s work through it.
Printing the List of Items to Weed
Use Item Report to get a list of all juvenile non-fiction not checked out during the last 5 years.
Suppose you are at Mount Pearl (AMP). Open Item Report and search for:
|
Coll is ‘jnf’
AND
Location is ‘amp’
AND
Last CKO Date is prior to ‘4/13/12’ |
The third part of the search – Last CKO Date – uses a date range. To enter that, Click on the Date Range button and a pop-up appears:

In this case we want items that haven’t been checked out during the past 5 years, so select Prior to and enter a date.
Click on OK to submit the date range and the final search will look like this:

Click on Search to get the list of results.
The results will look something like this:

To make the list printable you need to deselect some columns from displaying.
Click on Display and leave just the first 4 columns highlighted:

Click on OK to close the pop-up.
Then click on Sort and highlight all the columns to arrange the list. This will make shelf reading a lot easier!

Click on OK to close the pop-up.
The results are now sorted:

Click on the Print button ![]() to print the list.
to print the list.
You’re now ready to pull the items from the shelves for weeding.
Discarding the Weeded Items
The quickest way to discard the weeded items is to scan them all in to the group editor and edit them as a batch.
The section Using the Group Editor without Creating a Group shows how to do that.
Setting Items not found to Trace
Any items that you don’t find when weeding need to be set to a status of ‘trace’.
Because the items aren’t present this can’t be done by scanning them in. You could search for each item one-by-one and change its status, but if there are a lot items that need to be changed then it’s far quicker to do a search and then edit them as a group.
To edit the items as a group:
-
- search for the list of items
- save the list to a group
- retrieve the group
- change the status of the items to trace
- delete the group
Let's go through each step in detail.
1. Search for the List of Items
First use Item Report to get the list of all juvenile non-fiction items not checked out during the last 5 years, that also have a status of checked in.
This is almost identical to the search that you did at the start, but won’t include the newly discarded items and won’t include any non-circulating reference items.
Open Item Report and search for:
|
Coll is ‘jnf’
AND
Location is ‘amp’
AND
Last CKO Date is prior to ‘4/13/12’
AND
Status is ‘i’ |
The results will look like this:

2. Save the List to a Group
All the items in the list need to be set to trace. But you cannot edit items from the Item Report window.
So, you need to save the list as a group and then retrieve it using the Group Editor:
-
-
- select all the items in the group
- press [Ctrl] + [A] or select from top menu Edit > Select All
- select from top menu Group > Save Group
- the Create Group pop-up appears:
- select all the items in the group
-

Give the group a meaningful name that begins with the name with the 3 letter code for your location.
Click on OK to save.
With the group saved you can now close the Item Report window.
3. Retrieve the Group
To be able to edit a group you need to be in the Group Editor:
-
-
- click on the Group Editor button to open it
- dismiss the compound search box and ‘load all rows’ pop-ups
- from top menu select Group > Retrieve Group:
- click on the Group Editor button to open it
-
Click on Groups to bring up the list of all saved groups and find your group:

Click on OK to select, then click on OK again to retrieve the group.
4. Change the Status of the Items to Trace
With the group retrieved:
-
-
- select all items in it
- click on Edit
- the batch change warning message appears:
-
-
-
- click on OK
- the batch change window will open
- click on OK
-
Change the status to trace. This will apply to all the items:
Click on Save and it’s done.
5. Delete the Group
Finally, you need to delete the group you just made because it’s no longer needed.

Choose the correct group, using the Groups button to find it if necessary.
Click on OK and confirm the deletion.
And that’s it! The weeding is complete and the missing items have been set to trace.
If the missing items turn up in future then you can choose whether or not to discard them.
Reports
This section explains how to generate and send the daily notices that remind borrowers about overdue, almost-due, or lost items, and how to run the reports that tell you which items need to be put on hold, sent elsewhere, or re-shelved. It also explains how to use the Item Report and Adhoc Stats features to help manage your collection.
Circulation Reports
| The Circulation Reports window is opened by clicking on its button: |  |
The window opens separate from the rest of Horizon, so you can still access circulation functions while reports are being generated and output.
Circulation Notices
![]() Printable Quick Guide: Circulation Notices
Printable Quick Guide: Circulation Notices
Circulation Notices must be run daily.
Running notices is a 2-step process: they have to be generated and then outputted. There are 2 batches to run, Auto Notices and Pre-Overdue Notices.
Auto Notices will send reminder emails to borrowers with overdue items, tell borrowers about items being held, and print letters for borrowers with lost items.
Pre-Overdue Notices will send reminder emails to borrowers 4 days before items are due back.
Emails about overdue and held items will only be sent to borrowers who have an email address record in their borrower record.
Pre-overdue reminder emails will only be sent to borrowers who also have the PreOverdue option selected in their record:

You can check this by going into the borrower’s record from the checkout window:
-
-
- search for the borrower or scan their card
- press [F6]
-
To begin generating the notices:
-
-
- open Circulation Reports
- select from top menu Notices > Notice Output
-
The Notice Batch List opens. It lists all the notices that have been recently generated across the province. The notices that you are about to generate will appear at the bottom of this list.

|
To generate the Auto Notices:
|
 |
If there are no notices to generate then Horizon will tell you. That often happens at smaller sites.
Generate the Preoverdue Notices in a similar way:
|
When both sets of notices have been generated scroll to the bottom of the list. The quickest way is to press [Ctrl] + [End] on your keyboard.
Select the notices for your location, making sure that the last output date is blank:

If the date is not blank it means that someone else has already output the notices for your site. Don’t output them again.
Click on Output to email and print the notices. If you don’t do this then messages will not be sent.
Emails will be automatically sent. If any emails cannot be sent then an error message will appear, and you will need to submit a support ticket to IT. See the section on Troubleshooting.
If any letters have been printed for lost items, check the shelves for the items before mailing.
If the Printer Jams and Notices are Lost
Notices can be reprinted:
-
-
- highlight the Auto Notices for today for your location
- if you are coming back later to do this make sure to choose the correct date
- click on Select
- a list of borrowers who should have received notices appears
- notices sent by email have a blue tick in the email column
- highlight the notices to be reprinted
- click on Output to print
- highlight the Auto Notices for today for your location
-

Request Pull List
![]() Printable Quick Guide: Requests and Holds
Printable Quick Guide: Requests and Holds
The Pull List is the list of all items that need to be fetched from the shelves and put on hold for borrowers or sent to other locations. Scan the items into the checkin and Horizon will tell you what to do.
The pull list must be requested daily, and at smaller sites it may often be empty.
To request the pull list:
-
-
- open Circulation Reports
- select from top menu Requests > Request Pull List
- this message will appear:
-

It can take some time before the list is generated, but while that’s happening you can go back into Horizon and use other circulation functions if need be.
You will need to print the list and go find the items on the shelves. However when first generated it provides too much information about each item to print tidily:

|
So click on Display and choose these four columns:
If your site holds multiple copies of items then you will need to select Barcode too. |
 |
Click on OK and the list will look a lot tidier, and can now be printed with one item per line:

When you have printed the list click on Keep List. This will make sure that items keep appearing in the list until you have found them and checked them in.
Click on Yes when this pop-up appears:

Never click on List Pulled. This will delete everything from from the list for the next 24 hours.
Never click on Delete Request(s). This will cancel all the requests made by borrowers. If you need to delete a request for a borrower, do that from the Borrower’s Request List. See the section Requests and Holds.
When you have found the items check them in. Horizon will tell you who to place each item on hold for.
If you cannot find an item in the list, then after a few days you will need to change its status to trace. See the section Adding and Editing items.
Expired and Cancelled Holds
The Expired and Cancelled Holds Report provides a list of items being held that the borrowers have not picked up on time. The items need to be removed from the holds shelf and checked in. Horizon will then tell you if the item needs to be held for another borrower, placed in transit, or re-shelved.
This report must be generated daily, and at smaller sites it may often be empty.
To generate the report:
-
-
- open Circulation Reports
- select from top menu Requests > Expired/Canceled
-
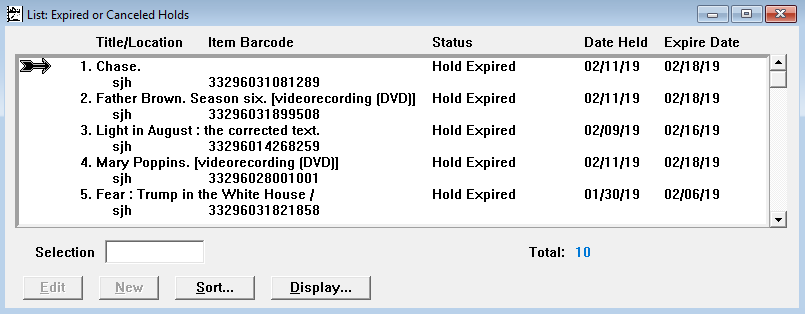
Remove the items from the holds shelf and check them in. If an item cannot be found on the holds shelf then check the regular shelving. If an item is not there either then you will need to set its status to trace using the Item Status Editor. See the section Adding and Editing items.
I didn’t have time to run my notices today!
Generate and output them as soon as you can. Horizon will generate all notices that should have been sent since you last ran notices.
Be aware that running notices late gives borrowers less notice about items that are almost due back and items that are being held for them.
Online Stats
Every day you need to submit circulation and activity statistics for your site.
This is done through the Library Stats System. Some of the stats are automatically completed by Horizon, and they appear in gray. Some stats have to be completed manually, and they appear in blue or yellow:

Item Report
Item Report is useful for managing your collections. You ask it to search for items in a particular collection, status, and location and it will return a list of results.
As examples, it can provide lists of all items that:
-
-
- are currently checked out
- have not been checked out in the last 4 years (or any other time period)
- are in the Adult Fiction NL collection
- need to be traced
- are on order for your location
-
You can compound the search, meaning that you can ask it to search based on 2 or more conditions.
For example, a search for ‘items that need to be traced from the DVD location at Bay Roberts’ will use 3 conditions:
|
status is ‘trace’
AND
item type is ‘dvd’
AND
location is ‘abr’ |
See Compound Search for how to do this.
You can print the list of results, and you can also sort the list by collection and call number, which will help when you are searching the shelves for items.
| Item Report is opened by clicking on |
|
|

Double-click on it to open the compound search box:

Select an index in the top half of the box and then type in the code for it in the ‘Search for’ field. Click on Search to see the list of results.
If you don’t know what code to use then click on Show Codes:

Simple example: find all items belonging to a location
To find all items belonging to Trepassey (ATY):
-
-
- select the index 'Loc'
- in the Search for field, enter the code ‘aty’
-
These are the results:

Clicking on Display lets you choose which information to display for each item, which is useful if you need to print the list.
Keep the columns highlighted that you want to display:

The list is now clearer to read:

It can also help to sort the list, by collection and into alphabetical order. Click on Display and choose what to order by:

…and the list is now sorted, and good to print:

Compound Search
To search using more than one condition you need to:
-
-
- select the first index to search
- enter the first condition
- select AND or OR
- select the second index to search
- enter the second condition, and so on
-
Compound Example: find items on order for your location
|
|
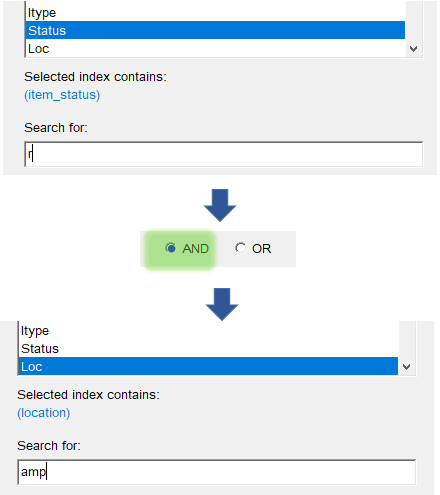 |
…and here are the results:

Compound Example: listing items needing to be traced at your location
-
-
- select the index Status
- enter ‘trace’ into the Search for field
- select AND
- select the index Loc
- enter the 3 letter code for your location (for example 'amp' for Mount Pearl)
- click on Search
-
Cancelling a Search
If you decide to cancel a search this pop-up message will appear:

Click on Cancel, otherwise Horizon will try to fetch the entire database of items.
Press [Esc] to close the Item Report window.
Adhoc Stat Reports
Horizon can generate detailed reports, such as a breakdown of how many items are in each collection at a site, or how much revenue was taken in lost and late fees over a chosen period.
These reports are generated by the Adhoc Stats Report feature found in the navigation bar:

Double-click on Adhoc Stats Reports to open the generator box. Select:
-
-
- the type of report
- one or more locations to generate it for
- if you have chosen a daily report then also enter a date in the Date field
-
If you are not working at Bell Island then deselect that location before selecting your site

In the example above the monthly Collection Snapshot report is going to be generated for Bay Roberts (ABR).
Click on Save to File if you want to keep the report.
To open the saved file use Wordpad or Notepad because both programs retain the column formatting.
A monthly collection snapshot looks like this:

The report can run to several pages and provides a comprehensive breakdown of how many items are in each collection, as well as how many items were in the collections 1 month ago and 1 year ago.
The descriptions are truncated, so some can be slightly cryptic – for example in ‘Adult Fiction A’, the ‘A’ is for ‘Audio’. Similarly ‘B’ is for ‘Blu-Ray’, ‘D’ is for ‘DVD’ and so on.
Also, be aware that the report lists how many items per collection Horizon has recorded for your site.
This can differ from reality if weeded books were not discarded in Horizon, or if books have gone missing without staff being aware.
The Item Report feature can be used to list exactly which items Horizon has recorded for the collections at your location.
Troubleshooting
This section explains what to do when Horizon isn’t working properly, or at all.
Common Problems
I don’t know what to do now!
If you’re in the middle of a task and aren’t sure what to do next, and if this guide can’t help, then ask someone.
Your local superuser can help during daytime hours.
If you don’t know who your local superuser is then ask your divisional office. During evenings and weekends, contact staff at other libraries in your division.
If you are trying to register a new borrower, or are trying to check items in and out and cannot get immediate support, then carry on using paper records to cause minimal disruption to service. See the section Horizon is Down.
It’s not me, it’s Horizon! – Submitting a Ticket
If there’s a problem with Horizon, try logging off and then back on again.
If the problem persists, then submit a ticket to IT using the helpdesk in the staff portal.
Open a new ticket and provide as much information as you can. For example:

Circulation Notices Not Outputting
Sometimes Horizon throws up a cryptic error message when sending circulation notices.
The most likely cause it that a borrower’s email address is incorrect. Submit a support ticket and IT staff will investigate.
Network Error
If Horizon has been left idle for a while, or if the network temporarily disconnects, then when you come to use Horizon again you might get a message like this:

Simply log out of Horizon and then log back in again. If the connection problem persists, submit a ticket to IT.
Horizon is Down
![]() Printable Quick Guide: Horizon is Down
Printable Quick Guide: Horizon is Down
Sometimes Horizon cannot be used because it is being upgraded or there is a persistent connection problem.
When this happens, we need to use other methods to record circulation activities. They key thing is to try to maintain a seamless service for the public.
Checkins
Handling returned items is the easiest task of all!
-
-
- just keep them in a neat pile or bag labelled ‘check ins’
- when Horizon is working again, check in the items
- if that’s a different working day then use Exempt Fines Mode
-
Don't re-shelve items until you are sure that they have been checked in using Horizon. If need be, check them in again.
Checkouts
When the Items Go Out
You will need to record checkouts as they happen.
On the computer desktop, you will find an Excel file called ‘Horizon is Down’:

Open it:

Record each item to be checked out, one per row:
-
-
- type the borrower’s name
- type the borrower’s phone number
- scan the barcode on the borrower’s card
- scan the barcode on the item
-
Save the file after every use.
Stamp the due date on the item and the borrower is good to go.
Take care with recording details.
The Excel file does not connect to Horizon, so it won’t be able to tell whether or not a name or barcode is valid. You also won’t be able to tell if the borrower has any lost or overdue items, any fees or any items on hold.
When Horizon is Working Again
You will need to record the checkouts into Horizon. Do this by bringing up each patron in the checkout and copy-pasting the item barcodes from the Horizon is Down Excel file.
The quickest way to do it is by using keyboard shortcuts:
-
-
-
bring up the borrower’s record:
- in Excel, select the borrower barcode
- press [Ctrl] + [C] to copy it
- press [Alt] + [Tab] to switch back to Horizon
- the cursor should be flashing in the barcode prompt area
- press [Ctrl] + [V] to paste the borrower barcode
- if the blocks window opens click on CKO and Override as need be
- in Excel, select the borrower barcode
-
bring up the borrower’s record:
-
-
check out each item to the borrower:
-
[Alt] + [Tab] switch back to Excel
- select the item barcode
- press [Ctrl] + [C] to copy it
- [Alt] + [Tab] switch back to Horizon
-
[Ctrl] + [V] paste the item barcode
- it should now show as checked out to the borrower
- select the item barcode
-
[Alt] + [Tab] switch back to Excel
-
check out each item to the borrower:
-
Pay careful attention to the due dates.
If an item is given a short 2-week due date, then extend it to 3 weeks. See the section Changing the Due Date for how to do that.
When you have finished, delete the entries from the Excel file and save it, ready for the next time that the system goes down.
Hold Requests
Explain to borrowers that these cannot be processed at the moment.
If a borrower knows exactly which title they want then collect details on a slip of paper:
-
-
- borrower’s name
- borrower’s phone number
- item title
- author
-
Be sure to inform the borrower that the title might not be available.
Registering New Borrowers
If Horizon is down, you won’t be able to check if a borrower is already registered or if they are blocked from borrowing because of lost items or long-standing fines.
So if a new borrower arrives then collect their details on a Borrower Registration Form.
Don’t issue a borrower card at this point!
Record any items checked out to them in the Horizon is Down file, and where the borrower barcode should be scanned, type in “new borrower”.
When Horizon is Working Again
-
-
- check for an existing record for the borrower
- if they don’t have one then register them
- see the section Registering a New Borrower
- place a note on their record to let the borrower and staff know that the borrower card is waiting to be picked up
- see the section Manually Adding a Block
- shred the paper form
-
Scanner Configuration
Your barcode scanner might need to be configured to ensure that it scans correctly.
Print the Barcode Scanner Configuration Sheet and scan the barcodes in the order listed.
You must press the button on the scanner.
As you scan the barcodes you will hear a series of beeps.
Please don't try to scan barcodes directly from the sample image below, they might not scan properly.

Other Guidance
Staff Portal
Guides to extended tasks, such as the Guidelines for Completing Cataloguing by Mail Forms, can be found in the Staff Portal.
Quick Guides
A set of printable quick guides have been created to accompany this online guide. Links to the quick guides appear throughout the sections.
Click on the name of a guide to view it in a new window:
 |
 |
||
...or click here to view all 12 guides as a single document.
Video Guides


A collection of videos have been recorded that take you through all the key aspects of using Horizon at the circulation desk. They don’t have to be watched in order, but are listed here in a natural progression. The videos appear throughout the guide, alongside the written explanations.
The videos contain sound, so contact your regional office if you don’t have headphones or a speaker available.
Click on the name of a video to view it: