Adding & Editing Items
This section explains how to add and edit items. This is useful for adding donated items and magazines to the collection, and for editing the records of items to show that they have been discarded or have a new location or barcode.
![]() Printable Quick Guide: Adding an Item
Printable Quick Guide: Adding an Item
Adding an Item
Donations and Locally Purchased Items
Items such as donated or locally purchased books and dvds can be added to Horizon directly at sites. The way to do it is:
-
-
-
search for the title in Horizon:
- identify the correct version
- check that there isn’t already a local copy recorded
-
tell Horizon to create an entry for the local copy:
- add a barcode and scan it in
- save the entry
-
prepare the item for circulation:
- add a spine label and due date label
- mark the item as belonging to our organization and to your location
-
search for the title in Horizon:
-
|
Before You Begin |
||
|
Read the Guide! It’s important that we accurately record new copies of titles, such as identifying the particular format or edition.
For this reason a definitive guide to Adding Items to the Catalogue can be found in the Staff Portal and should be read before adding any items to the system. What if I Can’t Find a Record for this Title, or for this Particular Version? If a title isn’t recorded in the system then a copy cannot be added at a site.
You will need to contact Technical Services and provide them with details about the title so that they can add it to the collection.
The Cataloguing by Mail guidelines can be found in the Staff Portal. |
||
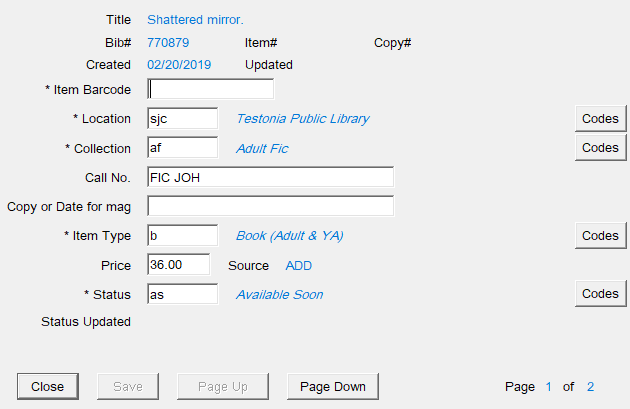
Example: adding a copy of a locally purchased book to the collection
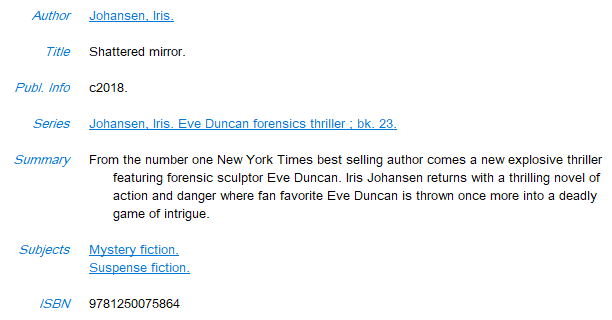
Suppose the book Shattered Mirror by Iris Johansen has been purchased locally. To add it to the system, first search for it. The results look like this:
![List of search results from an [F2] item search](https://documentation.nlpl.ca/uploads/images/gallery/2019-03-Mar/scaled-840-0/PjyuLARD7DLyecLo-Search-Results.PNG)
The arrow appears to be pointing to the correct entry: the title and author match, and it’s a book. The publication date matches the details inside the book too.
If you click on Show Details you’ll see more information about this entry which can help you to decide if your item is a match:
In this example the ISBN matches the physical item, so it’s safe to add a local copy to this record.
If you are unsure if an item matched the record then you would stop here and re-consult the guidance in the Staff Portal or contact Technical Services for more advice.
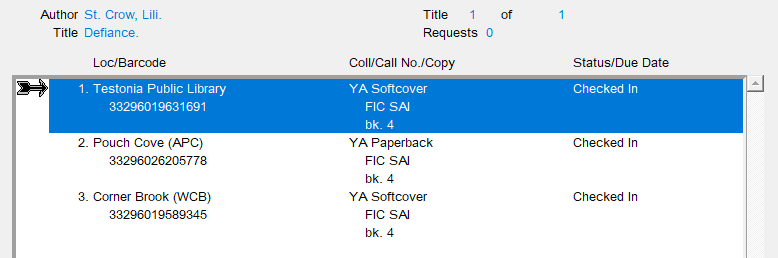
Click on Show Copies to bring up the list of copies already in the system:
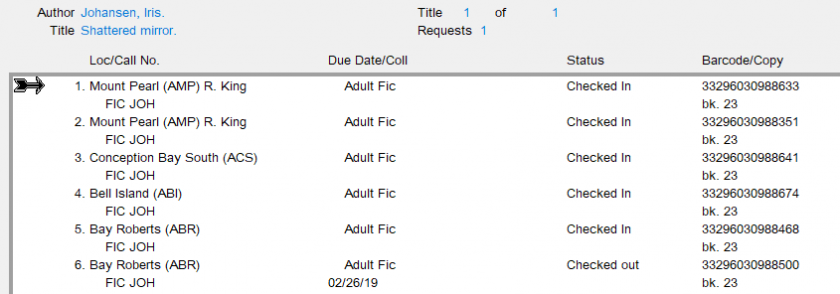
Here you can check if a copy is already recorded for your location. If there is then it will appear at the top of the list.
If there is already a copy showing at your location then consider if you need to add a second. If the copy that’s showing is missing then consider using the new item as a replacement and simply record the new barcode. See the section Replacing a Barcode for more details.
In this case there isn’t a copy showing for this location so you can go ahead and add a copy to the record. Click on the Send To button ![]() in the toolbar. A pop-up box appears:
in the toolbar. A pop-up box appears:
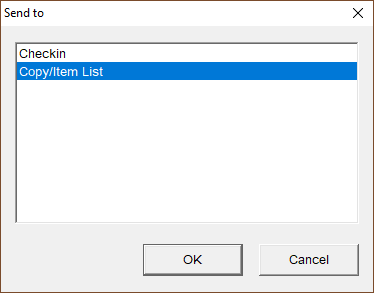
Select Copy/Item List and click on OK. The List Items window will open:
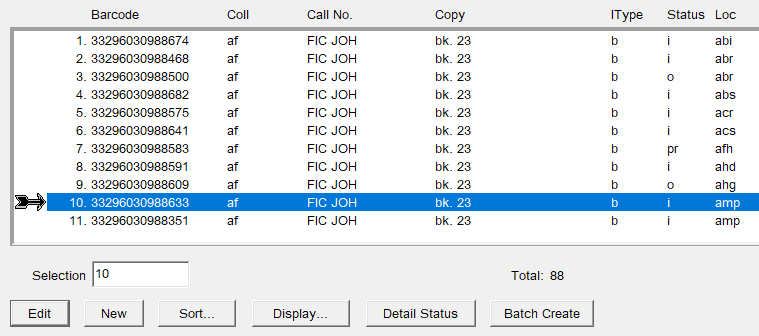
It is tempting to click on the New button to add a new entry. Don’t!
Why? The New button will open the correct window to add a new item. However most of the details will be left blank, such as which collection the item belongs to and the Call Number. If you make a mistake or leave out any details then your entry won’t be catalogued correctly.
To add a new entry for your copy, select from top menu File > Copy Record. The Item Edit window will open:
Attach a barcode to the item and scan it in.
Don’t alter any other details in the record!
The location field is automatically set to your location and you can see that details are automatically completed for collection, call number, item type and price.
Click on Save. The item is now added to the system.
Notice that the item’s status is recorded as Available Soon. This is to allow you time to add a spine label, dust jacket and due date label to the item, and to mark it as belonging to our library system and your location.
When the item is ready to circulate, check it in.
Magazines and Periodicals
Magazines and periodicals are added in the same way that books and DVDs are added, with an extra step that you will need to record the date for the magazine in its entry:
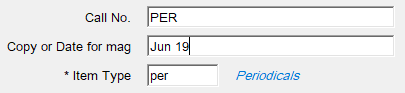
The format for the date needs to be precise:
|
type |
date format |
example |
|
weekly |
3-letter month, space, DD/YY |
Feb 28/19 |
|
monthly |
3-letter month |
Jun 19 |
|
quarterly or irregular |
as it appears on the item |
Spring/Summer 03 |
For full guidance on how to add a magazine please refer to Adding Items to the Catalogue in the Staff Portal.
Editing an Item
![]() Printable Quick Guide: Editing an Item
Printable Quick Guide: Editing an Item
Sometimes information about an item needs to be changed. Such as when it's being reallocated to a new site, when it’s being discarded or when it needs a new barcode.
Items can be edited one-at-a-time or in groups. This section explains how to edit items one-at-a-time.
To see how to edit several items at-a-time refer to the section Item Group Editor.
Finding the Entry for the Item
To edit an item we first need to find it in the system.
When the Item is Present and has a Barcode
If an item is present and has a barcode then the quickest way to edit it is to:
-
-
- scan the item into the checkin
- click on Edit Item
-
When the Item is Not Present or Does Not Have a Barcode
If an item is not present or does not have a barcode then you will need to search for it and select it in the Copies window.
See the section Searching for an Item by Title for how to do that.
With the correct copy of the item selected:
-
-
- click on the Send To button

- the Send To pop-up box will open
- select Copy/Item List
- click on OK
- the List Items window will open:
- click on the Send To button
-

The correct copy should be highlighted, but double-check.
It is very easy to accidentally edit an item that belongs to another location, and Horizon will not warn you.
Click on the Edit button at the bottom of the window to open the Item Edit window.
From the Item Edit window you can change several details about an item.
Changing the Status
The status of an item can be changed, such as to show that it’s being discarded, needs to be traced, or is being moved from the non-fiction to reference collection.
To change the status, delete the current status and type in the code for the new status.
Example: showing that an item has been discarded
![]()
Click on Codes see all possible codes. The list is comprehensive and some status codes are not used.
Some status codes cannot be changed or used in the edit window, such as ‘checked in’, ‘checked out’ or ‘lost’. To check a book in or out you will need to use regular circulation procedures, such as checking the item in or out.
If you have an item that requires a status change that cannot be done using the edit window or through regular circulation procedures then contact your Division Office or Technical Services.
Here are some commonly used status codes. Codes shown in yellow are automatically assigned by the system, the others can be assigned by staff:
|
status |
description |
status |
description |
|
as |
available soon |
me |
mending |
|
bm |
back room |
lo |
librarian’s office |
|
c |
claimed returned |
mi |
missing inventory |
|
d |
discarded |
nc |
non-circulating |
|
dis |
on display |
o |
checked out |
|
e |
item hold expired |
pr |
please request (ask if available) |
|
h |
item being held |
s |
shelving cart |
|
i |
checked in |
tr |
in transit |
|
l |
lost |
trace |
trace |
|
m |
item missing |
yad |
YA display |
Changing the Location
The location that an item belongs to can be changed in the edit window.
Just replace the 3-letter location code with the new one, then click on Save. Use the Codes button if you don’t know the code:
![]()
Replacing a Barcode
A worn or missing barcode can be replaced. Bring up the item’s edit window, then:
-
-
- delete the old barcode
- scan in the new barcode
- click on Save
-
This also applies if a borrower loses an item and replaces it. Add a new barcode to the replacement item and then edit the item’s record as shown above. Then check the item in.
Adding a Checkin Note
If an item has light damage but is otherwise good to circulate then you can add a checkin note to the item’s record. This will let staff and borrowers know that we are already aware of the damage.
You can reach the item’s Edit Window by checking in the item or by searching for it, as explained above in Finding the Entry for the Item.
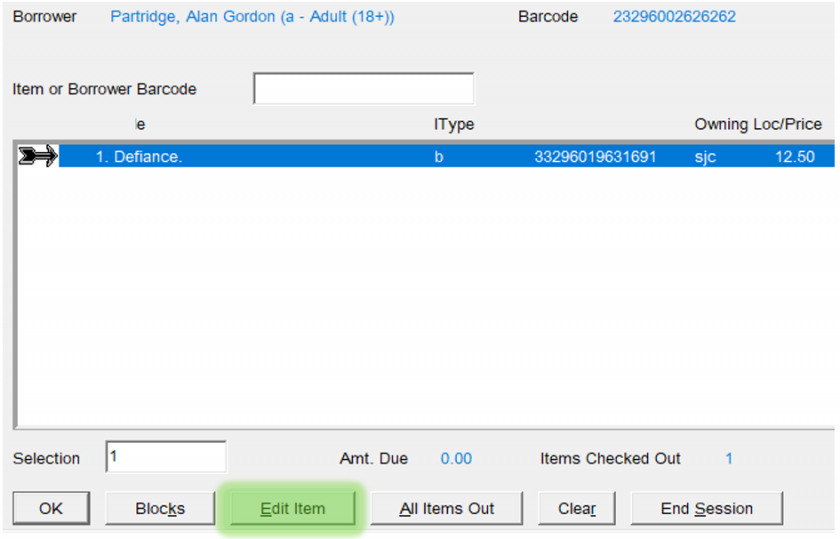
If the item is already checked out then you can also edit it from the borrower’s checkout window:
-
-
- click on All Items Out
- select the item
- click on Edit Item
-
When you add the checkin note describe the existing damage clearly and succinctly:
![]()
Tracing Items
Recording that an Item Needs to be Traced
Suppose that an item shows as checked in, but you can't find it on the shelves. That might happen when you run the daily Pull List, or when a borrower asks for the item.
If the item can't be found after a quick check then you will need to record that it needs to be traced.
Search for the item in Horizon, go into its record and change its status to ’trace’:
![]()
This will let staff and borrowers know that the item is not available for loan.
Do not use the statuses of ‘item missing’ or ‘missing inventory’. These statuses are assigned by the system, for example when a borrower pays for a lost item.
The Trace Items Report
At regular intervals reports are generated which list all the items needing to be traced at each location.
When you receive the report for your site, check the shelves and other likely hiding places for the missing items.
If an Item is Found
If you find an item that was set-to-trace, just check it in and re-shelve.
Item Group Editor
![]() Printable Quick Guide: Item Group Editor
Printable Quick Guide: Item Group Editor
The Item Group Editor lets you change several items’ records at the same time.
This is particularly useful if you have weeded many items and need to show that they are discarded, or if your division uses a book exchange and you need to update the location for a set of books.
You can edit several items using the group editor in one of two ways:
-
-
- by scanning each item into a list and then telling Horizon to change the same information for every item
- this is the easiest way to discard a set of books, or change their location
- by saving a Group of items that can be retrieved and worked with later
- by scanning each item into a list and then telling Horizon to change the same information for every item
-
We’ll look at both.
Using the Group Editor without Creating a Group
If you have a physical pile of items that you want to discard, or change the location of, the quickest way to do it is:
-
-
- open the group editor
- scan in the items
- select them all
- edit them all as a batch
-
So, click on the Item Group Editor button ![]() in the taskbar.
in the taskbar.
The Group Editor window will open and the Compound Search pop-up will appear:
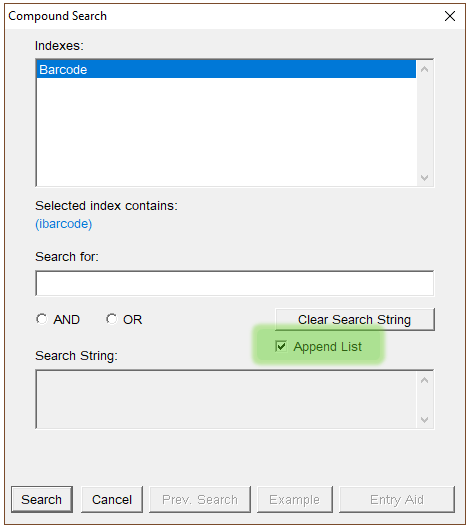
Then:
-
-
- select Append List - or only the first item will scan.
- click in the ‘Search for’ field to focus it ready for scanning.
- scan the pile of items
- they will form a list in the group editor window
- click on the X in the top-right corner of the pop-up when done
-
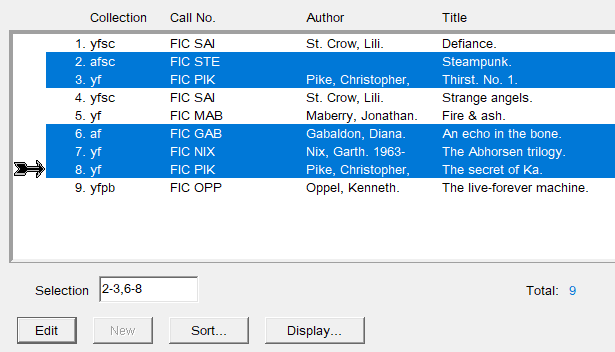
The list will look like this:
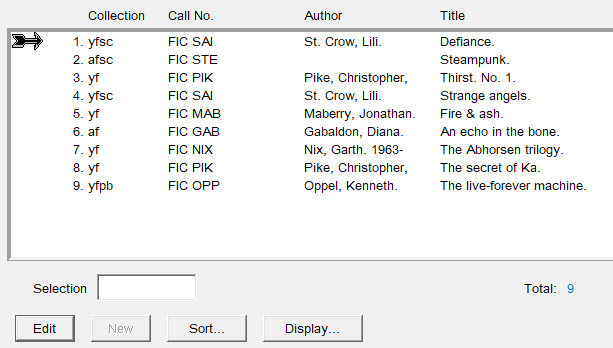
To edit all the items in the list:
-
-
- select them all:
- press [Ctrl] + [A] or select from top menu Edit > Select All
- click on Edit
- the batch change warning message appears:
- select them all:
-

- click on OK
- the batch change window will open:
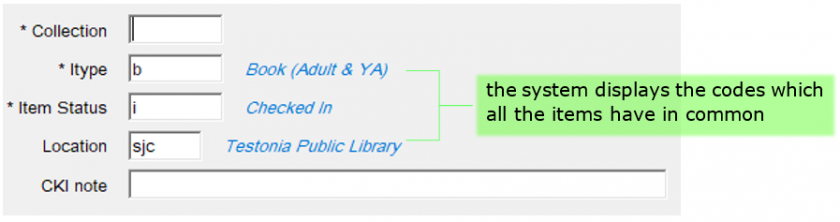
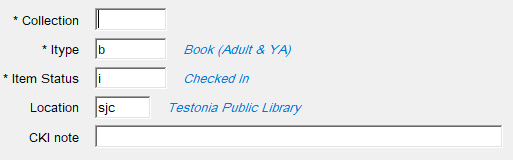
The batch change window lets you change one or more of these things for all the selected items:
-
-
- Collection
- Item Type (Itype)
- Item Status
- Location
- Checkin Note
-
Don’t change or add anything more than you need to.
For example, if you are wanting to discard this pile of items then only change the item status to ‘d’ for discarded.
Click on Save and Close. The batch change will be applied to all the items.
Press [Esc] to close the group editor window.
Working with Saved Groups
Items can be saved into a group which can be retrieved and used later.
This can be useful if you have used the Item Report feature to find a list of items and need to edit some or all of them.
See the case study Using Groups when Weeding as an example.
Creating a Group
To create a group first make a list of items. This can be done either by scanning them in using the method shown in Using the Group Editor without Creating a Group, or by searching for them using Item Report.
Next, to save the list of items as a group:
-
-
- select the items you want to put in the group
- to select all items press [Ctrl] + [A]
- select from top menu Group > Save Group
- the Create Group pop-up appears:
- select the items you want to put in the group
-
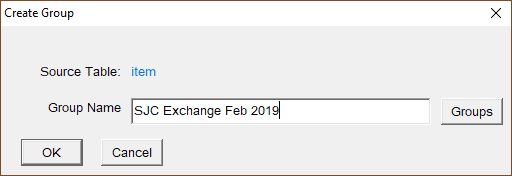
Give the group a meaningful name. Always begin the name with the 3 letter code for your location or department.
If you have created a group because you want to make a temporary change to the items then include the change in the group name. For example:
‘SJC – Audio Exchange June 2019 (Loc: SJA to SJC)’
Click on OK to save the group.
Retrieving a Group
To retrieve a group so that you can work with it, open the Group Editor:
-
-
- click on the Group Editor button to open it
- the compound search window will pop-up
- click on Cancel to dismiss it
- the ‘Load ALL rows’ message will pop up
- click on Cancel to dismiss it
- from top menu select Group > Retrieve Group:
-
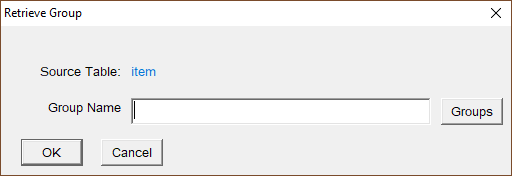
Click on Groups to bring up the list of all saved groups and find your group:
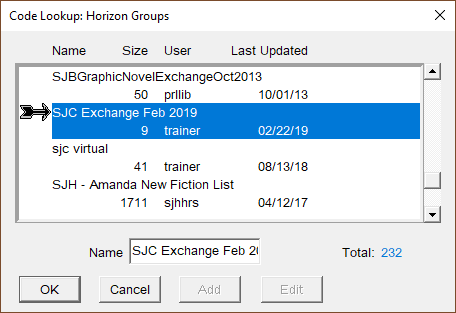
Click on OK to select, then click on OK again to retrieve the group.
The list of items will appear in the group editor window.
Editing Items in a Group
With a group opened you can edit any or all of the items:
-
-
- select the items to edit:
-
-
-
- click on Edit
- the batch change warning will appear
- the batch change window will open:
- click on Edit
-
When you have finished editing:
-
-
- click on Save
- click on Close
-
Deleting Items from a Group
There is no direct way to delete items from a group, so we use a simple trick:
-
-
-
-
- open the group
- select only the items that we want to keep
- overwrite the group
- by creating a group for the selected items using the same name
-
-
-
Here’s how:
-
-
- retrieve the group
- select all items in the group
- now deselect the items you don’t want to keep
- select from top menu Group > Create Group
- the name of the group you are working on will appear in the pop-up
- click on OK to save
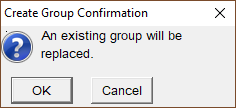
- confirm that an existing group will be replaced:
-
Adding Items to a Group
To add items to an existing group we need to:
-
-
- open the group
- scan in the items to be added
- overwrite the group
- by creating a group for the selected items using the same name
-
Here's how:
-
-
- retrieve the group
- open the Compound Search box:
- press [Alt] + [F2] or select from top menu File > Compound Search
- select Append List
- scan the items to be added
- close the search box
- select all items in the group
- select from top menu Group > Create Group
- the name of the group you are working on will appear in the pop-up
- click on OK to save
- confirm that an existing group will be replaced
-
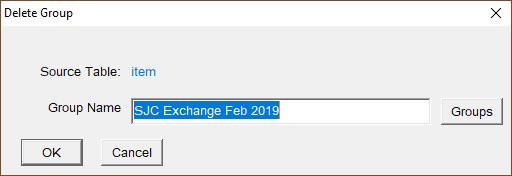
Deleting a Group
To delete a group:
-
-
- click on the Group Editor button
- dismiss the compound search box and the ‘load all rows’ pop-ups
- select from top menu Group > Delete Group
- the pop-up appears:
- click on the Group Editor button
-
-
- choose the correct group. Use the Groups button to find it.
- click on OK. A confirmation message will appear:
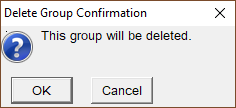
-
- click on OK and it’s done.
Case Study: Using Groups When Weeding
This longer example explores how the group editor can help when performing a large weeding task. It’s been included in the guidance because it brings together tasks from several areas of Horizon: how to search for individual items, how to edit them, how to perform complex searches for many items, how to edit many items and how to use groups.
This example is only an illustration. It is not intended to show how weeding should be done, and divisions and sites may have their own policies. Speak with your supervisor before weeding large amounts of items.
Although it’s ideal to weed the collections day-by-day, sometimes a collection needs reviewing and thinning to remove a large number of items at one time. We can use the group editor to help with this.
Suppose we need to weed the juvenile non-fiction section, and suppose this section is large. We can use Horizon to help us identify all the items that haven’t been checked out during the last 5 years.
We can print that list, pull those items from the shelves and decide whether or not to weed them. In this case study, to keep things simple, we'll decide that all the items are going to be weeded.
Whilst shelf-pulling that we might notice that some items are not present and need to be set to trace. Rather than slowly changing each item’s status one-at-a-time we can use the group functions to edit them as a batch.
So let’s work through it.
Printing the List of Items to Weed
Use Item Report to get a list of all juvenile non-fiction not checked out during the last 5 years.
Suppose you are at Mount Pearl (AMP). Open Item Report and search for:
|
Coll is ‘jnf’
AND
Location is ‘amp’
AND
Last CKO Date is prior to ‘4/13/12’ |
The third part of the search – Last CKO Date – uses a date range. To enter that, Click on the Date Range button and a pop-up appears:
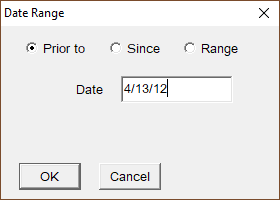
In this case we want items that haven’t been checked out during the past 5 years, so select Prior to and enter a date.
Click on OK to submit the date range and the final search will look like this:

Click on Search to get the list of results.
The results will look something like this:
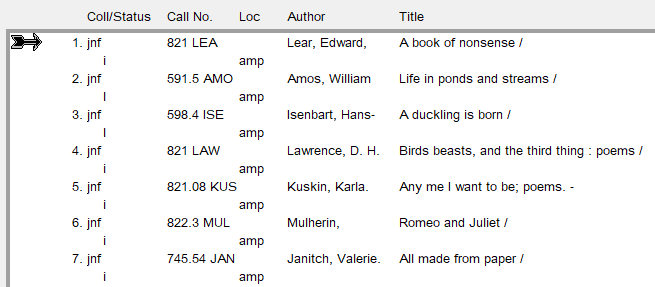
To make the list printable you need to deselect some columns from displaying.
Click on Display and leave just the first 4 columns highlighted:
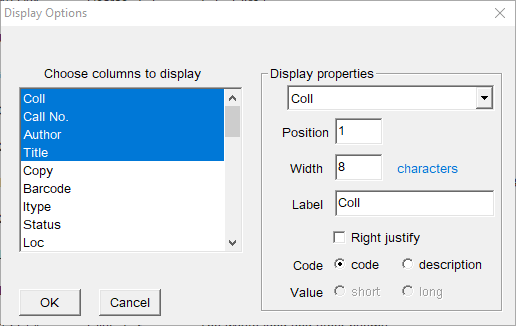
Click on OK to close the pop-up.
Then click on Sort and highlight all the columns to arrange the list. This will make shelf reading a lot easier!
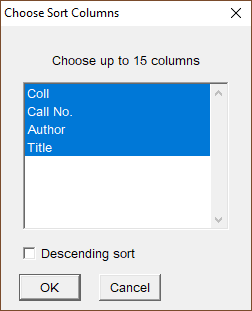
Click on OK to close the pop-up.
The results are now sorted:
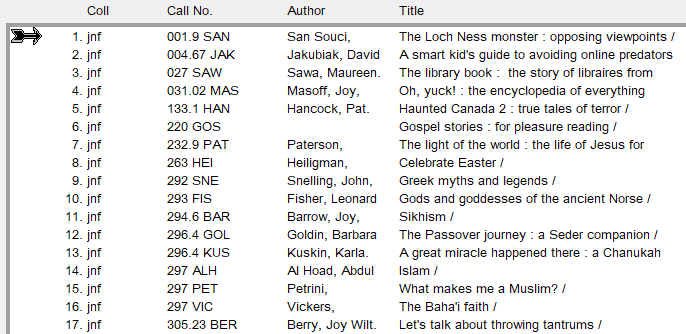
Click on the Print button ![]() to print the list.
to print the list.
You’re now ready to pull the items from the shelves for weeding.
Discarding the Weeded Items
The quickest way to discard the weeded items is to scan them all in to the group editor and edit them as a batch.
The section Using the Group Editor without Creating a Group shows how to do that.
Setting Items not found to Trace
Any items that you don’t find when weeding need to be set to a status of ‘trace’.
Because the items aren’t present this can’t be done by scanning them in. You could search for each item one-by-one and change its status, but if there are a lot items that need to be changed then it’s far quicker to do a search and then edit them as a group.
To edit the items as a group:
-
- search for the list of items
- save the list to a group
- retrieve the group
- change the status of the items to trace
- delete the group
Let's go through each step in detail.
1. Search for the List of Items
First use Item Report to get the list of all juvenile non-fiction items not checked out during the last 5 years, that also have a status of checked in.
This is almost identical to the search that you did at the start, but won’t include the newly discarded items and won’t include any non-circulating reference items.
Open Item Report and search for:
|
Coll is ‘jnf’
AND
Location is ‘amp’
AND
Last CKO Date is prior to ‘4/13/12’
AND
Status is ‘i’ |
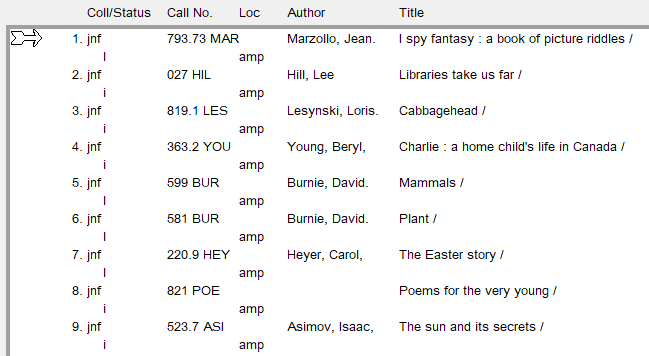
The results will look like this:
2. Save the List to a Group
All the items in the list need to be set to trace. But you cannot edit items from the Item Report window.
So, you need to save the list as a group and then retrieve it using the Group Editor:
-
-
- select all the items in the group
- press [Ctrl] + [A] or select from top menu Edit > Select All
- select from top menu Group > Save Group
- the Create Group pop-up appears:
- select all the items in the group
-

Give the group a meaningful name that begins with the name with the 3 letter code for your location.
Click on OK to save.
With the group saved you can now close the Item Report window.
3. Retrieve the Group
To be able to edit a group you need to be in the Group Editor:
-
-
- click on the Group Editor button to open it
- dismiss the compound search box and ‘load all rows’ pop-ups
- from top menu select Group > Retrieve Group:
- click on the Group Editor button to open it
-
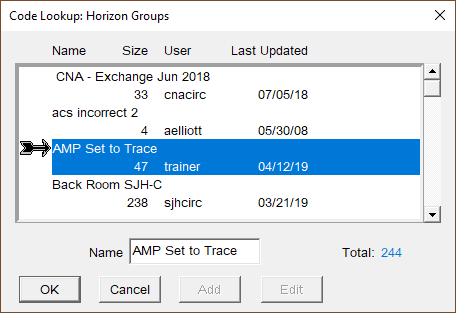
Click on Groups to bring up the list of all saved groups and find your group:
Click on OK to select, then click on OK again to retrieve the group.
4. Change the Status of the Items to Trace
With the group retrieved:
-
-
- select all items in it
- click on Edit
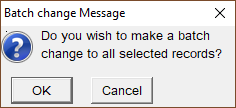
- the batch change warning message appears:
-
-
-
- click on OK
- the batch change window will open
- click on OK
-
Change the status to trace. This will apply to all the items:
Click on Save and it’s done.
5. Delete the Group
Finally, you need to delete the group you just made because it’s no longer needed.
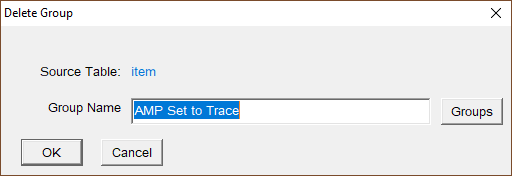
Choose the correct group, using the Groups button to find it if necessary.
Click on OK and confirm the deletion.
And that’s it! The weeding is complete and the missing items have been set to trace.
If the missing items turn up in future then you can choose whether or not to discard them.